The IEEE Builds A Smart Watch

It used to be that building your own watch was either a big project or it meant that you didn’t really care about how something looked on your wrist. But now with modern parts and construction techniques, a good-looking smart watch isn’t out of reach of the home shop. But if you don’t want to totally do it yourself, you can turn to a kit and that’s what [Stephen Cass] did. Writing in IEEE Spectrum, he took a kit called a Watchy and put it through its paces for you.

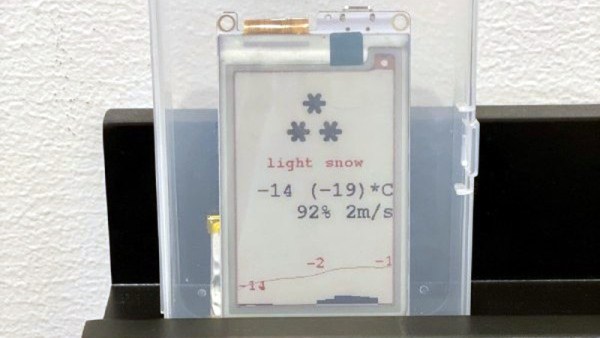
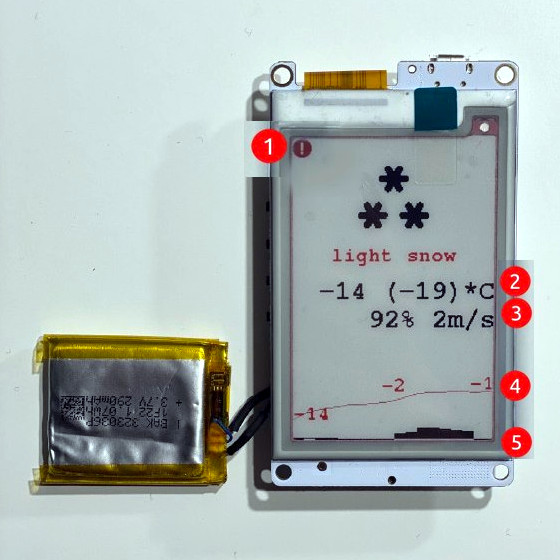
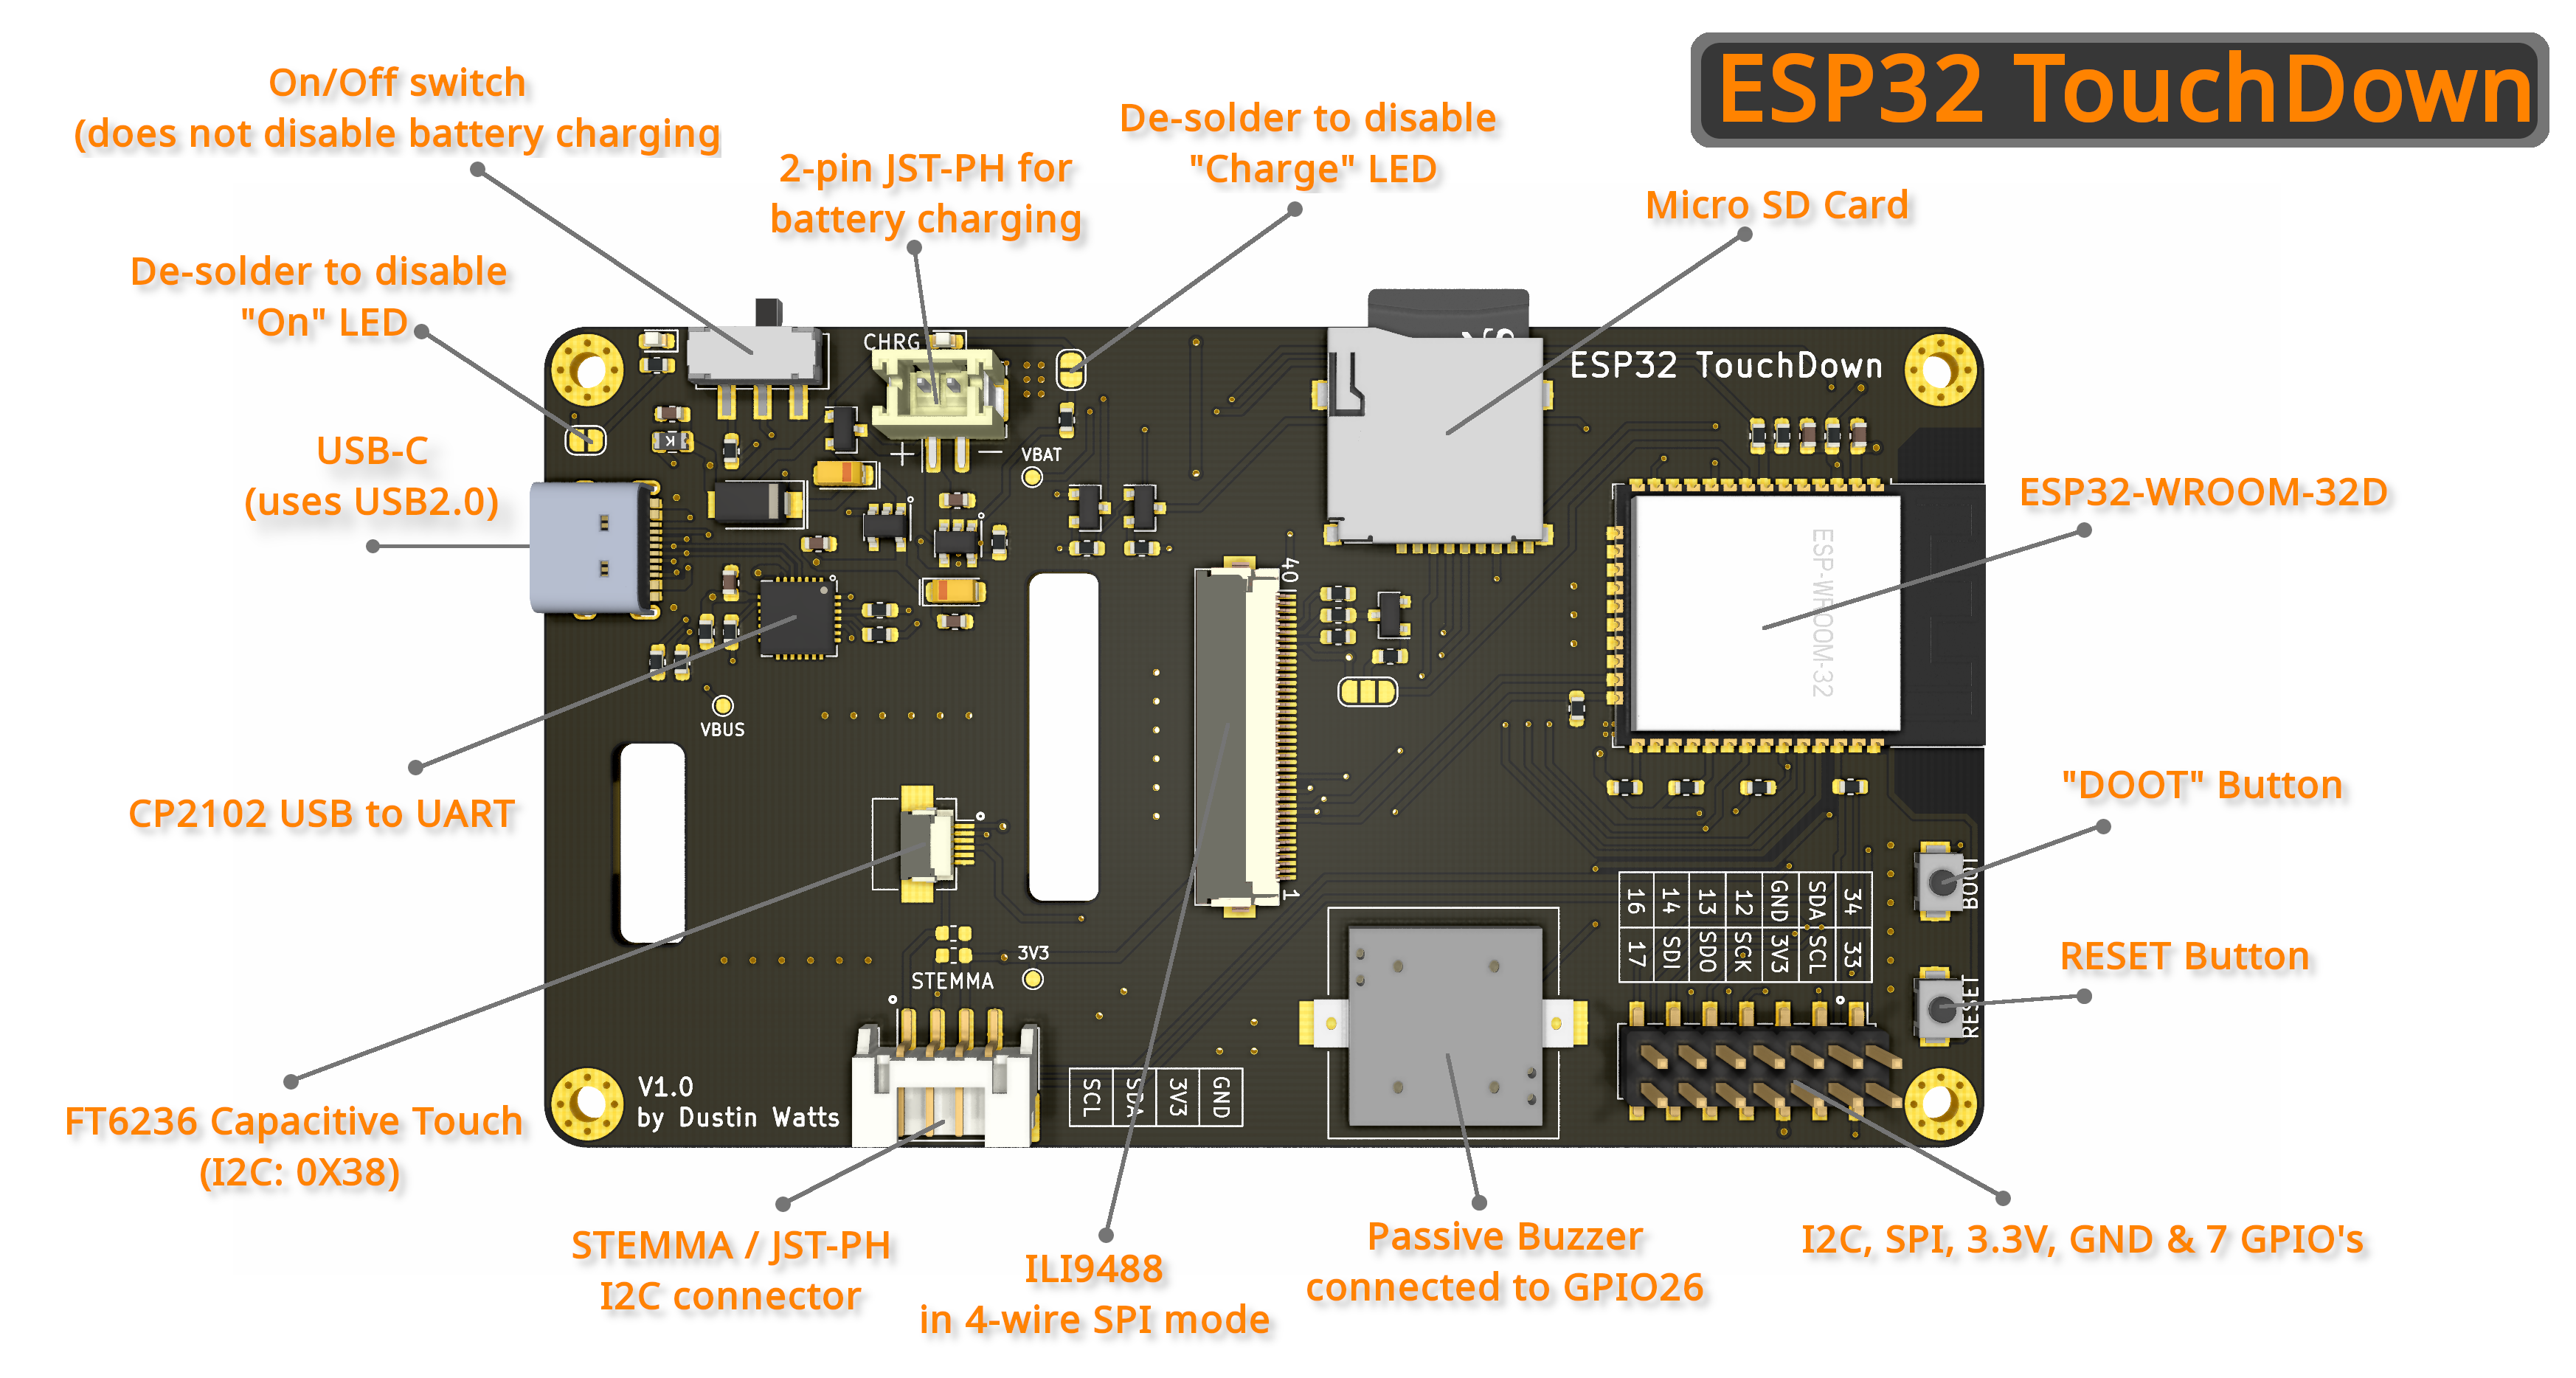
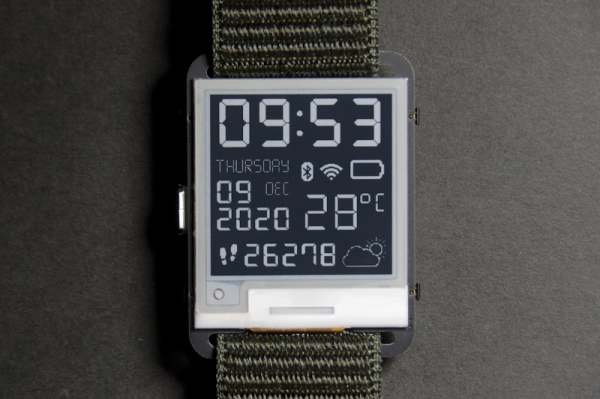
Watchy is an open source product that uses an ESP32, an E-ink display, and costs about $50. The display is 1.5 inches — good enough for a watch — and it has a real time clock, a vibration motor, an accelerometer, and four buttons. The whole thing runs on a 200 mAh lithium polymer battery. The charger is microUSB and you can also upload software to it using the usual Arduino tools.

However, [Stephen] found that none of the examples he tried would work at first. He found problems with the Mac software, but he also had problems under Windows. The answer? Switching to a Raspberry Pi seemed to work and once the watch was wiped clean, the Mac tools would work, too. It sounds like this isn’t a common problem, but he has to erase the watch with the Pi before each programming cycle.

Unlike a normal Arduino program, all the work in a typical Watchy program happens in setup() so the watch can mostly sleep and it updates the 200×200 typically just once a minute. As an example, [Stephan] wrote a watch face that uses an old Irish alphabet to tell time. He plans to add code to grab online data, too, and the phone has support for connecting wirelessly and parsing JSON to make tasks like that easier.

We always thought the EZ430-Chronos was a good-looking watch, but its screen is dated now. You can also pick up a lot of cheap import watches that can be hacked.

Inspire Dev Kit Drops Price Of MSLA Printer To Just $30

Over the last couple of years, we’ve seen massive price reductions on consumer 3D printers based on masked stereolithography (MSLA) technology. As the name implies, these machines use a standard LCD panel to selectively mask off the ultraviolet light coming from an array of LEDs. Add in a motorized Z stage, and you’ve got a simple and cheap way of coaxing UV resin into three dimensional shapes. These days, $200 USD can get you a turn-key MSLA printer with resolution far beyond the capabilities of filament-based FDM machines.

But [JD] still thinks we can do better. His project aims to produce a fully-functional MSLA printer for $30, and perhaps as low as $15 if manufactured in sufficient quality. He believes that by making high-resolution 3D printing more accessible, it will allow users all over the globe to bring their ideas to life. It’s no wonder he’s calling his machine the Inspire 3D Printer.

A test fixture for the LCD module.

This isn’t just some pie in the sky concept rolling around in [JD]’s head, either. You can order the Inspire Development Kit right now for just $30, though he makes it clear what you’ll receive isn’t quite a functional MSLA printer. By leveraging a common LCD module, the ESP32, and several 3D printed parts, he’s proven his price point for the kit is achievable; but there’s still plenty of work that needs to be done before the machine is ready for the general public.

For one thing, he’s still working the kinks out of the Z movement. The current design is 3D printed, but [JD] says he’s not quite happy with the amount of slop in the movement and is considering replacing the entire thing with the linear actuator from an optical drive. We’ve already seen these parts reused for accurately positioning lasers, so there’s certainly precedent for it. The firmware for the ESP32 is also in its infancy, and currently only allows the user to print from a selection of simple hard-coded shapes as a proof of concept.

We’ve seen DIY attempts at resin printers in the past, but they’ve often been based on more complex techniques involving projectors or UV lasers. Masked stereolithography is much more approachable for the home gamer, and projects like the Inspire 3D Printer show just how little it really takes to pull solid objects out of a puddle of goo.

Cycling Cadence Display With ESP32

Terry Pratchett once said “Wisdom comes from experience. Experience is often a result of lack of wisdom.” This is as true with technical skills as it is with the rest of life, and you won’t truly understand a specific topic unless you’ve struggled with it a bit. [publidave] wanted a simple wireless display for a bluetooth cycling cadence sensor, and soon found himself deep down the rabbit hole of Micropython and Bluetooth Low Energy on the ESP32.

[publidave] had converted his bicycle for indoor training during lockdown and winter, and realized he can’t use the guided training app and view his cadence simultaneously, so he needed a dedicated cadence display. Since [publidave] was comfortable with Python, he decided to give Micropython on the ESP32 ago. Bluetooth Low Energy can be rather confusing if you haven’t implemented it before, especially if good examples are hard to come by. In short, the ESP32 needs to find the sensor, connect to it, select the right service, and listen for the notifications containing the data. The data is then converted to RPM and displayed on a small OLED display. [publidave] does an excellent job of describing what exactly he did, highlighting the problems he encountered, and how he solved them.

In the end, he had a functional display, a good idea of what he would do differently next time, and a lot of additional knowledge and understanding. In our book that’s a successful project.

Since so much of the health related devices work with Bluetooth Low Energy, it could be handy to know the technology and how to interface with it. It would allow you to do things like unbrick a $2000 exercise bike,

Wireless, Low Power E-Ink Weather Gadget

Not that long ago, making a low-power and wireless weather display complete with an e-ink screen would have required a lot of work and almost certainly would have been larger than the device [Dmitry] created.

(1) Weather alert indicator, (2) Current temperature, (3) Humidity and wind, (4) 24-hour temperature graph, (5) 24-hour precipitation probably graph

His low power e-ink weather gadget takes advantage of one of the niftier developer boards out there to create a useful and slim device that does exactly what he needs and not a lick more. It’s fast to look up weather online, but not as fast as glancing at a display in a convenient location.

The board [Dmitry] selected is a LilyGO TTGO T5s, an ESP32-based board that integrates an e-ink display, which requires no power unless being updated. It has been loaded with just enough smarts to fetch weather information using the OpenWeather API, and update the display accordingly.

Powering up the WiFi to fetch an easily-parsed JSON file and update the display only once per hour means that a battery can provide months of runtime. As a bonus, the LilyGO board even includes the ability to charge the battery, making things awfully convenient.

The bill of materials is here and code for the device, including setup directions, is on the project’s GitHub repository. And if your tastes happen to run more towards the artistic than utilitarian, we have just the weather display for you.

Laser Galvos And An ESP32 Recreate Old-School Asteroids

Playing Asteroids now isn’t quite what it used to be when it came out 40 years ago. At the time, the vector-scan display was part of the charm; making do with an emulator running on a traditional raster display just doesn’t quite do it for purists. But if you manage to build your own laser-projector version of the game like [Chris G] did, you’re getting close to capturing some of the original magic of the game.

There’s a lot to unpack about this project, and the video below does a good job explaining it. Where the original game used a beam of electrons flashing inside a CRT to trace out each object in the game, [Chris] substituted an off-the-shelf two-axis galvanometer from eBay and a 5-mW laser LED. This can project a gamefield on a wall up to two meters on a side, far bigger than any version of the machine ever built. The galvos are driven by op-amp drivers and an SPI DAC on a custom PCB. And in comparison to the discrete logic chips and 6502 running the original game, [Chris] opted for an ESP32.

As interesting as the hardware for this is, the real story is in the software. [Chris] does an excellent job running through his design, making the bulk of the video feel like a master class in game programming. His software is from scratch — no emulations here. As such it doesn’t perfectly reproduce the original games — no flying saucers and no spaceship explosion animations (yet) — but when coupled with the laser vector display, it certainly captures the feel of the original.

Being devoted Asteroids fans from back in the day, this one really pushes our buttons. We’ve seen laser-based recreations of the game before, but this one makes us think we can finally afford to recapture the glory of our misspent youth.

Continue reading “Laser Galvos And An ESP32 Recreate Old-School Asteroids”

Minimal MQTT With Micropython

I have been meaning to play around with MQTT for some time now, and finally decided to take the plunge one evening last week. I had three cheap home temperature and humidity sensors, and was bothered that they often didn’t agree. Surprisingly, while the analog one had a calibration adjustment in the back, I have no idea how to calibrate the two digital ones. I took this as a sign that it was time to learn MQTT and be able to install my own, accurate sensors. Of course, I began by ordering the cheapest sensors I could find, but I can always upgrade later on.

Three Cheap Sensors

While we have written quite a bit about MQTT in Hackaday, I had to go all the way back to 2016 to find this introductory four-part series by Elliot Williams. Five years is a long time in the tech world, but I decided to give it a try anyway. Continue reading “Minimal MQTT With Micropython”

FreeTouchDeck Upgrades Its Hardware And Its Name: ESP32 Touchdown

With many folks continuing to work from home for far longer than they ever thought, it’s no surprise that we’re seeing the rise of small DIY devices to make that video call or virtual presentation a little easier. [Dustin Watts] was interested in the functionality of the Elgato Stream Deck — a macro keyboard where each key is its own screen. But that kind of fancy hardware comes with a formidable price tag. So he built his own, and made it open source!

His first iteration — FreeTouchDeck — was built using commonly available modules but has since evolved into the ESP32 Touchdown which does it all with a single PCB. It’s a highly-customizable touchscreen macro keyboard which provide easy access shortcuts and macros for quick actions. Need a quick mute button, want to switch camera views on OBS, or maybe you want smarter shortcut keys for your CAD of choice. This will can get you there.

There a few key differences from the first version (FreeTouchDeck). The ESP32 dev board was ditched for a tidy PCB the directly integrates the module. This one has a capacitive touch controller (FT6236) rather than a resistive one as the capacitive screens deliver a far nicer user experience. A built-in battery and charger circuit (which the FreeTouchDesk didn’t have) allows for the extra bit of flexibility to stream from anywhere (within wireless range of course). Multiple case designs are available in STL form that allows it to be placed on a wall or desk with ease.

Datasheets, gerbers, kicad files, BOMs, and example firmware is provided on GitHub. The software is easily configurable so it can be set up to do any sort of macro, key combination, or action. This isn’t just limited to emulating a Bluetooth keyboard as there are examples showing how to connect to Home Assistant. All in all, this is a wonderful example of continued iteration on a project.

Thanks [Timothy Gregory] for sending this one in!