Castellated Breakout Is Pitchin’ Brilliant!

Radio, WiFi and similar modules are getting smaller by the day. Trouble is, they end up having non-DIY-friendly, odd pitch, mounting pads. Sometimes, though, simple hacks come around to help save the day.

[Hemal] over at Black Electronics came up with a hack to convert odd-pitch modules to standard 2.54mm / 0.1″. The process looks simple once you see the detailed pictures on his blog. He’s using the technique to add 2mm pitch modules like the ESP8266 and XBee by soldering them to standard perf board. Once they are hooked to the board, just add a row of male header pins, trim the perf board and you’re done. Couldn’t get simpler.

Another technique that we’ve seen is to solder straight across the legs and cut the wire afterward. That technique is also for protoyping board, but custom-sized breakout boards are one good reason to still keep those etchants hanging around. If you have other techniques or hacks for doing this, let us know in the comments.

Hack Allows ESP-01 To Go To Deep Sleep

The ESP-01 module based on the ESP8266 is all the rage with IoT folks at the moment – and why not. For about 5 bucks, it can’t be beat on price for the features it offers. The one thing that such radios do a lot is suck power. So, it’s no surprise that ways to cut down on the juice that this device consumes is top priority for many people. [Tim] figured out a simple hardware hack to get the ESP-01 to go to deep sleep, effectively reducing its current draw to 78uA – low enough to allow battery powered deployment.

While [Tim] was working on understanding the ESP8266 tool chain (NodeMCU firmware > Lua interpreter > ESPlorer IDE), he realized that some essential pins weren’t accessible on the ESP-01 module. [Tim] built a Dev board on perf board that let him access these pins and also added some frills while at it. We’re guessing he (or someone else) will come up with a proper PCB to make things easier. But the real hack is on the ESP-01 module itself. [Tim] needed to hardwire the ‘post-sleep-reset-pin’ on the MCU to the Reset terminal. That, and also pry off the indicator LED’s with a screw driver! That sounds a bit drastic, and we’d recommend pulling out your soldering iron instead. If you’re one of the unlucky one’s to receive the “magic smoke” releasing ESP8266 modules, then you don’t need the LED anyway.

Alarm1

Adding WiFi And SMS To An Alarm System

[Don] wanted to bring his alarm system into the modern age. He figured that making it more connected would do the trick. Specifically, he wanted his alarm system to send him an SMS message whenever the alarm was tripped.

[Don] first had to figure out a way to trigger an event when the alarm sounds. He found a screw terminal that lead to the siren. When the alarm is tripped, this screw terminal outputs 12V to enable the siren. This would be a good place to monitor for an alarm trip.

[Don] is using an Arduino nano to monitor the alarm signal. This meant that the 12V signal needed to be stepped down. He ran it through a resistor and a Zener diode to lower the voltage to something the Arduino can handle. Once the Arduino detects a signal, it uses an ESP8266 WiFi module to send an email. The address [Don] used is the email-to-SMS address which results in a text message hitting his phone over the cell network.

The Arduino also needed power. [Don] found a screw terminal on the alarm system circuit board that provided a regulated 12V output. He ran this to another power regulator board to lower the voltage to a steady 5V. This provides just the amount of juice the Arduino needs to run, and it doesn’t rely on batteries. [Don] provides a good explanation of the system in the video below. Continue reading “Adding WiFi And SMS To An Alarm System”

Flashing The ESP8266 In Windows

It’s only been a few months since the ESP8266 rolled out of some factory in China, and already the community is moving from simply getting custom firmware to work on the device to making the development tools easy to use. That’s huge – the barrier to entry is lowered, getting even more people on board with this very cool Internet of Things thing.

While the majority of the community is settling on using the Lua interpreter firmware, there’s still the matter of getting this firmware uploaded to the ESP. [Peter Jennings] of Microchess fame has been working on a Windows app to upload firmware to the ESP via a serial interface. There’s not much to it, but this will allow you to upload the community-created Lua firmware, set the WiFi credentials, toggle GPIO pins, and give you the ability to write a little bit of Lua in the same window.

If you’re looking for something that isn’t designed exclusively for Windows, there’s an alternative firmware flasher over on the nodemcu Github. This flasher also connects the ESP8266 to a network and uploads firmware. It’s a stripped-down programmer without a serial terminal or the ability to toggle pins, but there are plans for making this programmer cross-platform.

Faulty ESP8266s Release Smoke, Then Keep Working?

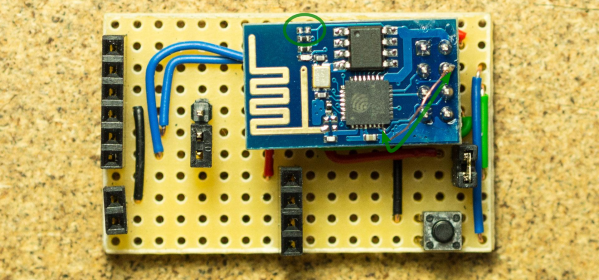
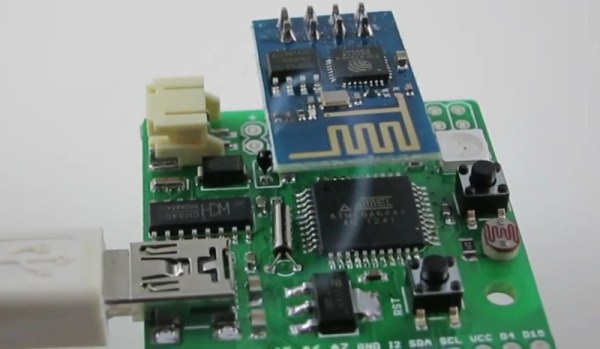
[Ray] is in a bit of a pickle. All appeared well when he began selling an ESP8266-based product, but shortly thereafter some of them got hot and let the smoke out. Not to worry, he recommends ignoring the problem since once the faulty components have vaporized the device will be fine.

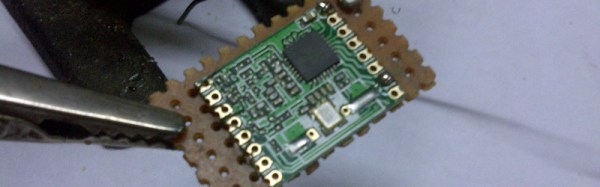
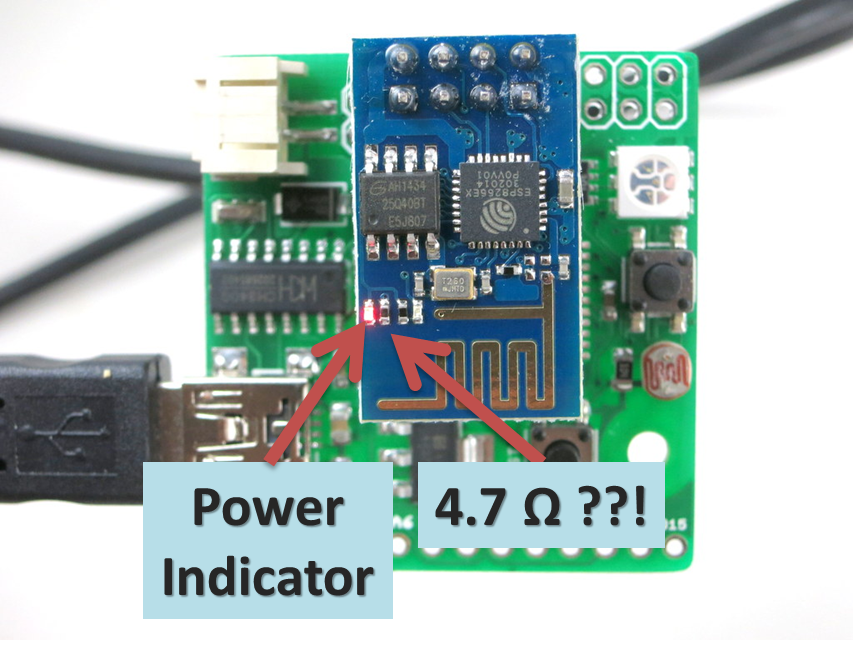
The symptom lies in the onboard red power indicator LED smoking. (Probably) nothing is wrong with the LED, because upon testing the batch he discovered its current limiting resistor is sometimes a little bit low to spec. Off by a hair of, oh, call it an even 1000x.

HAD - HotESPY3
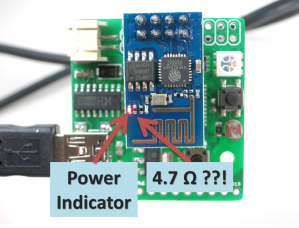
Yep, the 4700 ohm resistor is sometimes replaced with a 4.7 ohm. Right across the power rail. That poor little LED is trying to dissipate half a watt on a pinhead. Like a sparrow trying to slow a sledgehammer, it does not end well. Try not to be too critical, pick ‘n place machines have rough days now and then too and everyone knows those reels look practically the same!

The good news is that the LED and resistor begin a thermal race and whoever wins escapes in the breeze. Soon as the connection cuts the heat issue disappears and power draw drops back to normal. Everything is fine unless you needed that indicator light. Behold – there are not many repairs you can make with zero tools, zero effort, and only a few seconds of your time.

[Ray] also recommends measuring and desoldering the resistor or LED if you are one of the unlucky few, or, if worst comes to worst, he has of course offered to replace the product too. He did his best to buy from authentic vendors and apologizes to the few customers affected. As far as he knows no one else has had this problem yet so he wanted to share it with the community here on Hackaday as soon as possible. Keep an eye out.

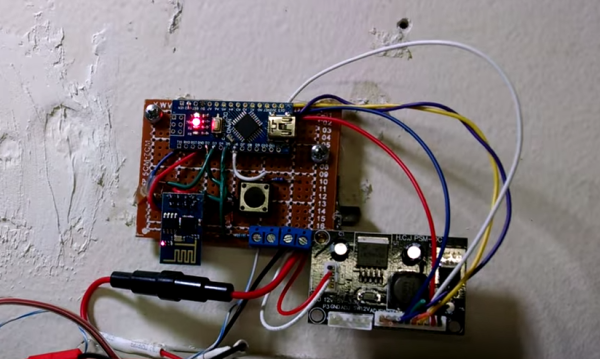
If you have never seen smoke ISO9001-certified electronics repair before, there is a short video of this particular disaster upgrade caught live on tape after the break.

Continue reading “Faulty ESP8266s Release Smoke, Then Keep Working?”

Making Something Useful With The ESP8266

The ESP8266 is the latest and greatest way to get a project connected to the Internet, but so far we haven’t seen many projects that actually do something with this very cool chip. Yes, there are a few people pinging away with AT commands, and there is a thriving community building interpreters and flashing new code on this chip, but not much in the way of actual projects. [Martin] is the exception. He’s come up with two projects that use the ESP8266.

The first project is one that puts the readings from a DHT22 temperature/humidity sensor up on the Internet. Following the spirit of all the recent development of the ESP8266, [Martin] isn’t using an external microcontroller. Instead, he’s using the SDK to run an HTTP daemon using [Sprite_TM]’s code. This web server provides an interface to turn an LED on and off, and reports the temperature and humidity readings from the DHT22. It’s simple, but it’s easy to see how this tiny chip could become the basis for a smart thermostat.

If lighting up LEDs isn’t enough, [Martin] has another project that includes three solid state relays. This one is a bit more complex with MQTT support, a fancy jQuery interface, and support for network time. [Martin] isn’t quite ready to publish the complete code for this project, but that’s only because there are a few features he’d like to implement before making it public. These include dynamic DNS, scheduling functionality, and support for an I2C status display. Even without these fancy features, it’s still a great project that’s still extremely capable for an Internet of Things thing. You can check out [Martin]’s video demo of this board below.

Continue reading “Making Something Useful With The ESP8266”

A Dev Board For The ESP Lua Interpreter

From the great minds behind the NodeMCU Lua interpreter for the ESP8266 comes a proper dev board for the WiFi platform of 2015. They are calling it, the NodeMCU-devkit, and it’s a reasonable, cheap, and breadboardable breakout board for the ESP8266.

The version of ESP8266 used in this project is the ESP-12, the newer, fancier model with RF shielding, a questionable FCC logo, and every single one of the GPIOs exposed on castellated connectors. The rest of the board is a USB to serial converter (the CH340G – probably the cheapest USB to serial chip out there), a few passives, and a USB micro connector. It’s simple, cheap, and open source. You can’t do better than that.

This dev board is explicitly designed to work with the NodeMCU firmware, a Lua-based firmware for the ESP. Already we’ve seen some projects make the Hackaday front page with this firmware. Sure, it’s just a garage door opener, but that’s extremely impressive for a chip that’s only a few months old.

Thanks [Baboon] for the tip.