Fail Of The Week: The Deadliest Multimeter

Need a good multimeter? The Fluke 17B is an excellent basic meter that will last your entire career. It’s also $100 USD. Need something cheaper? Allow me to introduce the AIMOmeter MS8217. On the outside, it’s a direct copy of the Fluke 17b, right down to the screen printing but understandably lacking the yellow enclosure. $30 USD will get you an exact copy of a Fluke 17B, it would seem. Right? Not a chance. [electronupdate] did a teardown of the AIMOmeter, and while this meter looks like a Fluke on the outside, it’s probably going to kill somebody.

The teardown begins with a look at the ratings on the back of this off-brand meter. It does have two fuses, but the engraving on the back strangely claims ‘Wrrebt insurance limit’. If anyone has any idea what a ‘wrrebt’ is, please leave a note in the comments. The only references to this word in Google are mis-OCRed blackletter type in a book from the early 1800s.

Opening up the meter reveals – surprisingly – two real fuses in the meter. There were no markings on the bigger fuse, which could be a problem for verifying if the fuse is of the proper value. That’s not really a problem, though: the fuse isn’t even between ground and the amp probe socket. Yes, this fuse is completely useless, and testing the resistance with the fuse out of the circuit confirms this.

After putting the meter back together, [electron] tests the accuracy of the meter. With a 1 mA current source, the mA setting seems to work, but when testing the larger Amp range of this meter, the results display in milliVolts. Don’t worry, there’s an easy fix for that: just press the dial down just right and the correct setting will be displayed. Wow.

You get what you pay for, and if you only ever use an AIMOmeter for measuring Arduinos and batteries, you might – might – be alright. This is not the kind of meter you want to measure line voltage, motors, or anything else with, though.

Hackaday Fail: A $3000 Prototype That Doesn’t Work

[Dan Royer] is hard at work building his own personal robot army. Robots mean motors, and motors mean gearboxes. In [Dan]’s case, gearboxes mean $3000 wasted on a prototype that doesn’t work. Why doesn’t it work? He doesn’t know, and we don’t either.

[Dan] would like to use small but fast DC motors for his robots coupled to a gearbox to step down the speed and increase the torque. The most common way of doing this is with a planetary gear set, but there’s a problem with the design of planetary gears – there is inherent backlash and play between the gears. This makes programming challenging, and the robot imprecise.

A much better way to gear down a small DC motor is a hypocycloid gear. If you’ve ever seen the inside of a Wankel engine, this sort of gearing will look very familiar: a single gear is placed slightly off-axis inside a ring gear. On paper, it works. In reality, not so much.

[Dan] spent $3000 on a prototype hypocycloid gearbox that doesn’t turn without binding or jamming. The gear was made with incredible tolerances and top quality machining, but [Dan] has a very expensive paper weight sitting on his desk right now.

If anyone out there has ever designed or machined a hypocycloid gearbox that works, your input is needed. The brightest minds [Dan] met at the Bring A Hack event at Maker Faire last weekend could only come up with. ‘add more lasers’, but we know there’s a genius machinist out there that knows exactly how to make this work.


2013-09-05-Hackaday-Fail-tips-tileHackaday Fail is a column which runs every now and again. Help keep the fun rolling by writing about your past failures and sending us a link to the story — or sending in links to fail write ups you find in your Internet travels.

Fail Of The Week : Measuring DC Current Has To Be Easy, Right?

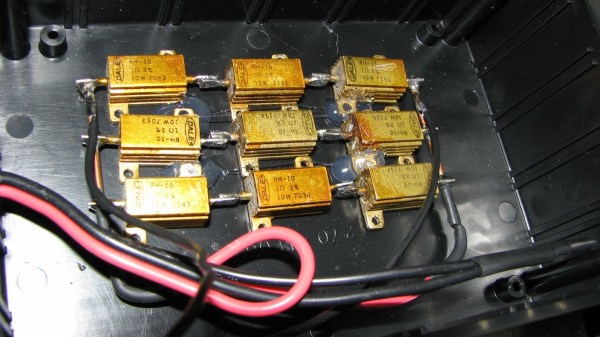
[DainBramage] needed a DC ammeter to check how long his amateur radio station would be able to stay powered on battery backup power. The one’s he already had on hand were a Clamp Meter, which could only measure AC, and another one that measured just a few milliamps. Since he didn’t have one which could measure up to 25A, he decided to build his own DIY DC Ammeter with parts scavenged from his parts bin. Measuring DC current is not too difficult. Pass the current to be measured through a precision resistor, and measure the voltage drop across it using a sensitive voltmeter.

I = V/R

So far, so good. If it’s late at night and you’ve had a lot of coffee, busy building your DC ammeter, things could head south soon. [DainBramage]’s first step was to build a suitable Shunt. He had a lot of old, 1Ω, 10W resistors lying around. He made a series-parallel combination using nine of them to create a hefty 1Ω, 90W shunt (well, 0.999999999 Ohms if you want to be picky). This gave him a nice 1 Volt per Amp ratio, making it easy to do his measurements.

Next step was to hook up the shunt to a suitable voltmeter. Luckily, he had a Micronta voltmeter lying around, ripped out from a Radio Shack product. Since he didn’t have the voltmeter data, he hooked up a 10k resistor across the meter inputs, and slowly increased the voltage applied to the meter. At 260mV, the needle touched full-scale and the voltage across the inputs of the voltmeter was 33mV. [DainBramage] then describes the math he used to calculate the resistors he would need to have a 10A and a 25A measurement range. He misses his chance to catch the fail. His project log then describes some of the boring details of putting all this together inside a case and wrapping it all up.

A while later, his updates crop up. First thing he probably realized was that he needed more accurate readings, so he added connectors to allow attaching a more accurate voltmeter instead of the analog Micronta. At this point, he still didn’t catch the fail although it’s staring him straight in the face.

His head scratching moment comes when he tries to connect his home made ammeter in series with the 12V DC power supply to his amateur radio station. Every time he tries to transmit (which is when the Radio is drawing some current), the Radio shuts off.  If you still haven’t spotted the fail, try figuring out how much voltage gets dropped across the 1Ω shunt resistor when the current is 1A and when it is 5A or more.

Vacuum Tube

Vacuum Tube Repair After A Spectacular Failure

[Eric] has an Atwater Kent 55C AM radio from the early 1900’s. He’s been trying to restore the radio to proper working condition. His most recent pain has been with the rectifier tube. The tube is supposed to have a complete vacuum inside, but that’s not the case here. When the tube is powered up, it glows a beautiful violet color. It may look pretty, but that’s indicative that gas has leaked into the tube. It needed to be replaced.

[Eric] had a tube that would serve as a good replacement, but it’s plug didn’t fit the socket properly. He was going to have to use this old broken tube to make an adapter. Rather than just tearing the old tube apart, he decided to have some fun with it first. He hooked it up to a variac, an ammeter, and a volt meter. Then he slowly increased the voltage to see what would happen. The result was visually stunning.

The tube starts out with the same violet/blue glowing [Eric] experienced previously. As the voltage increases, it gets more and more intense. Eventually we start to see some green colors mixing in with the violets. [Eric’s] reaction to this unexpected result is priceless. As the tube gets increasingly hot, the anode starts glowing an orange-red color. Finally, the filament starts to crackle like a sparkler before the tube just gives up and completely fails.

After the light show, [Eric] moves on to replacing the tube. He begins by tapping on the old tube’s socket with the end of a screwdriver. After much tapping, the glass starts to come lose from the socket. After a bit of wiggling and twisting the tube finally came free from the socket. [Eric] luckily had an unused octal socket that fit perfectly inside of the old socket. All he needed to do to build his adapter was to connect the four pins from the old adapter to the proper pins on the octal socket. Piece of cake.

…Or so [Eric] thought. After testing some new tubes with a tube tester, he realized he had soldered all four pins incorrectly. On top of that, he had super glued the adapter together. He eventually got the two pieces apart. This time he removed all of the unused pins from the octal socket so he wouldn’t get it wrong. Another run on the tube tester confirmed that everything looked good. After plugging the tube into the radio, it worked just as expected

If you need fabrication rather than repair, we’ve got you covered there as well. Check out [Charles Alexanian’s] process for making new vacuum tubes in his garage. Now if you just have too darn many of them around, you can always decorate your pad with ’em.

Continue reading “Vacuum Tube Repair After A Spectacular Failure”

Fail Of The Week: Project Frosty Mug Is Merely Chilly

Like many of us, [C] enjoys an ice-cold, refreshing soda while coding. Driven by a strong desire to keep a soda ice-cold indefinitely without using ice, [C] started Project Frosty Mug.

[C]’s stated goal is to keep a 20oz plastic bottle of soda at ~35F indefinitely while it sits in a room temperature environment. He started with a thermoelectric unit to cool an aluminium disc, like a cold coaster. Builds one and two made him realize that dealing with the generated heat was a big issue: it got so hot that it deformed the PLA frame. [C] also realized that bottom-only cooling wasn’t going to get the job done.

This project is now in its third build, which is pictured above. As you can see, it’s more koozie than coaster. That 3-D printed holster is lined with aluminium sheeting. Another flat piece covers the opening and attaches to the cooling element. A beefy CPU heat sink does its best, and a couple of U-brackets hold it all together.

[C]’s tested it with a glass bottle of Diet Sun Drop chilled to 38F. After 30 minutes in an ambient temperature of ~70F, the soda measured 45F. [C] lamented having not used a control bottle for comparison and reports that the power supply became quite warm. [C] isn’t going to give up that easily. Do you have any ideas for the fourth build?

Editor’s Note: This is one of the last Fail of the Week tips we have stored up. If you want to see the series continue on a weekly basis, we need help finding more documented fails! Please look back through your projects and document the ones that didn’t go quite right. We also encourage you to send in links to other fails you’ve found. Just drop the links in our tips line. Thanks!


2013-09-05-Hackaday-Fail-tips-tileFail of the Week is a Hackaday column which runs every Thursday. Help keep the fun rolling by writing about your past failures and sending us a link to the story — or sending in links to fail write ups you find in your Internet travels.


Fail Of The Week: How A Cheap USB AC Adapter Might Indirectly Burn Your House Down

This Fail of the Week will remind our readers that every project they make, no matter how small they might be, may have big consequences if something goes wrong. Shown in the picture above is an oven that [Kevin] tweaked to perform reflow soldering. The story is he had just moved into a new place a few weeks ago and needed to make a new batch of boards. As he had cycled this oven many times, he was confident enough to leave the room to answer a few emails. A few minutes later, he had the unfortunate experience of smelling something burning as well as discovering white smoke invading his place.

Continue reading “Fail Of The Week: How A Cheap USB AC Adapter Might Indirectly Burn Your House Down”

Fail Of The Week: Commute-Shortening Electric Scooter

fotw-electric-scooter

Please don’t judge [Alan] on his choice of vests. This project is from 1999 when it was common to see people rockin’ these threads. Anyone who has ever spent time on the University of Minnesota campus in Minneapolis, Minnesota will know that parking is at a premium. [Alan] had a 12-15 minute walk from his parking garage to his office and was considering a cheaper parking location that would balloon that to 20-25 minutes. But engineers don’t see problems, they see project ideas. He started work on a tiny electric scooter that could slim down his commute. Obviously he did find some success, but it was interspersed with failures that make his scooter the Fail of the Week.

Continue reading “Fail Of The Week: Commute-Shortening Electric Scooter”