Yes, yes. We all love to laugh at a technology in its infancy. It’s like when robots fall down: it’s a cheap shot and things will surely get better, right? Indeed, the Guardian has had its fun with this particular WiFi kettle before — they’re British and nothing is more important than a remote-controlled cuppa.
Every time we hear about one walled-garden protocol not speaking to another, and the resulting configuration mayhem that ensues, we can’t help think that [Mike] was right: home automation has a software problem. But that’s putting the blame on the technology. (We’re sure that [Mark] could have made the kettle work if he’d just applied a little Wireshark.)
There’s another mismatch here — one of expectations about the users. A water kettle is an object that should be usable by grandmothers, and a complex networked device is clearly aimed at techies and early adopters. Combining the two is asking for trouble. Non-functioning IoT devices are the blinking 12:00 of our generation.
What do you think? Where’s the blame here? Poor design, bad software stack, stupid users, or failure of mega-corps to integrate their systems together? More importantly, how could we make it better?
Laser cutters are CNC power tools, which means an operator uploads a job digitally and then pushes START to let the machine do all the work while they lie back in a hammock sipping a margarita, occasionally leaping out in a panic because the sound coming from the machine changed slightly.
Like other power tools, laser cutters are built around doing one thing very well, but they require an operator’s full attention and support. The operator needs to handle all the other things that go on before, during, and after the job. It’s not too hard to get adequate results, but to get truly professional and repeatable ones takes work and experience and an attention to detail.
People often focus on success stories, but learning from failures is much more educational. In the spirit of exploring that idea, here are my favorite ways to fail at laser cutting and engraving. Not all of these are my own personal experience, but they are all someone’s personal experience.
The Peachy Printer, originally a crowdfunding campaign for a $100 stereolithography 3D printer, is now dead in the water.[Rylan Grayston], the creator of the Peachy Printer, announced that [David Boe] — investor, 50% owner of Peachy Printer, and business partner — had stolen over $300,000 in Kickstarter campaign funds. According to [Rylan], this money was used to build a house.
An example print from the Peachy Printer Kickstarter campaign
When the Peachy Printer was announced on Kickstarter, it was, by any measure, a game changing product. Unlike other stereolithographic printers like the Form 1 and DLP projector kit printers, the Peachy was cheap. It was also absurdly clever. Instead of using a stepper motor to raise a print out of a vat of resin, the Peachy Printer floated the resin on a vat of salt water. By slowly dripping salt water into this vat, the level of the resin rose up, allowing the galvanometers and laser diode to print the next layer of a 3D object. In our first coverage of the Peachy Printer, everyone was agog at how simple this printer was. It wasn’t a high-resolution printer, but it was a 3D resin printer that only cost $100. Even today, nearly three years after the launch of the Kickstarter campaign, there’s nothing like it on the market.
For the last two years, [Rylan] appeared to have the Peachy Printer in a pseudo-stealth mode. Whispers of the Peachy Printer circled around 3D printer forums, with very little information coming from [Rylan]. For the last year, the Peachy Printer appeared to be just another failed crowdfunded 3D printer. Either [Rylan] didn’t have the engineering chops to take a novel device to market, there were problems with suppliers, or [Rylan] just couldn’t get the product out the door.
In the update published to the Kickstarter campaign, the reason for the failure of Peachy Printer to deliver becomes apparent. The Kickstarter campaign was set up to deliver the funds received – $587,435.73 – directly into [David Boe]’s account. Thirty days after the funds were received, [David] had spent over $165,000. In just over three months, all the Kickstarter funds, save for $200,000 transferred into the Peachy Printer corporate account, were spent by [David].
With no funds to complete the development of the Peachy Printer, [Rylan] looked into alternative means of keeping the company afloat until Kickstarter rewards had shipped. Peachy Printer received two government grants totalling $90,000 and $135,000. In March of 2015, one of [Rylan]’s family members loaned $50,000 to Peachy Printer. A plan to finance the delivery of Kickstarter rewards with new sales – a plan that is usually looked down upon by Kickstarter backers – was impossible, as cost and time required of certifying the laser in the Peachy Printer would have put the company in the red.
Right now, [Rylan] and the Peachy Printer are pursuing repayment from [David Boe], on the basis that Kickstarter reward money is still tied up in the construction of a house. Once the house is complete, the bank will disburse funds from the construction mortgage, and funds can then be transferred from [David] to Peachy Printer.
In all, the Peachy Printer is a mess, and has been since the Kickstarter funds were disbursed to [David]. There is – potentially – a way out of this situation that gets Peachy Printers into the hands of all the Kickstarter backers if the mortgage construction funds come through and production resumes, but that’s a lot of ‘ifs’. Failed Kickstarter projects for 3D printers are nothing new, but [Rylan]’s experience with the Peachy Printer is by far the most well-documented failure of a crowdfunding project we’ve ever seen.
[Richard Hawthorn] sent us in this interesting fail, complete with an attempted (and yet failed) clever solution. We love learning through other people’s mistakes, so we’re passing it on to you.
First the obvious-in-retrospect fail. [Richard] built a board with a temperature sensor and an ESP8266 module to report the temperature to the Interwebs. If you’ve ever put your finger on an ESP8266 module when it’s really working, you’ll know what went wrong here: the ESP8266 heated up the board and gave a high reading on the temperature sensor.
Next came the clever bit. [Richard] put cutouts into the board to hopefully stop the flow of heat from the ESP8266 module to the temperature sensor. Again, he found that the board heats up by around four degrees Celcius or nine degrees Farenheit. That’s a horrible result in any units.
What to do? [Richard’s] first ideas are to keep hammering on the thermal isolation, by maybe redoing the board again or adding a heatsink. Maybe a daughterboard for the thermal sensor? We can’t see the board design in enough detail, but we suspect that a flood ground plane may be partly to blame. Try running thin traces only to the temperature section?
[Richard]’s third suggestion is to put the ESP into sleep mode between updates to reduce waste heat and power consumption. He should be doing this anyway, in our opinion, and if it prevents scrapping the boards, so much the better. “Fix it in software!” is the hardware guy’s motto.
But we’ll put the question to you electronics-design backseat drivers loyal Hackaday readers. Have you ever noticed this effect with board-mounted temperature sensors? How did you / would you get around it?
Fail of the Week is a Hackaday column which celebrates failure as a learning tool. Help keep the fun rolling by writing about your own failures and sending us a link to the story — or sending in links to fail write ups you find in your Internet travels.
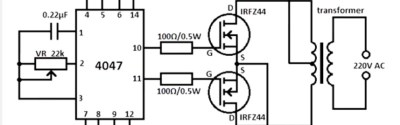
If you search the internet for 12 volt to mains AC inverter designs, the chances are you’ll encounter a simple circuit which has become rather ubiquitous. It features a 4047 CMOS astable multivibrator chip driving a pair of MOSFETs in a push-pull configuration which in turn drive a centre-tapped mains transformer in reverse. Not a new design, its variants and antecedents could be found even in those pre-Internet days when circuits came from books on the shelves of your local lending library.
[Afroman], no stranger to these pages, has published a video in which he investigates the 4047 inverter, and draws attention to some of its shortcomings. It is not the circuit’s lack of frequency stability with voltage that worries him, but the high-frequency ringing at the point of the square-wave switching when the device has an inadequate load. This can reach nearly 600 volts peak-to-peak with a 120 volt American transformer, or over a kilovolt if you live somewhere with 230 volt mains. The Internet’s suggested refinement, a capacitor on the output, only made the situation worse. As he remarks, it’s fine for powering a lightbulb, but you wouldn’t want it near your iPhone charger.
If this video achieves anything, it is a lesson to the uninitiated that while simple and popular designs can sometimes be absolute gems it must not be assumed that this is always the case.
Consider this a public service announcement. [Colin Furze], besides being a raging lunatic, seems to have the nine lives of a cat. Well, he’s not always so lucky, and now that we’ve recovered from being grossed out by the results, we’re glad that [Colin] posted this “fail” video.
Basically, he’s firing up one of his jet engines, and there’s a big fireball. He wasn’t wearing any protective clothing. This is hardly a spoiler — please don’t watch the video below if you’re grossed out by people visiting the doctor’s office to get their horrible second degree burns all up and down their forearm treated. You’ve probably learned the lesson already just by looking at the preview image.
Naturally, we’ve covered [Colin]’s videos before. He’s either very lucky or a little bit more careful than he lets on. We’ve seen him play with fire and not get burned, and stick a jet engine on a go-kart. We’re not gonna tell you what to do, but if that were us, we’d be wearing at least long sleeves and a helmet.
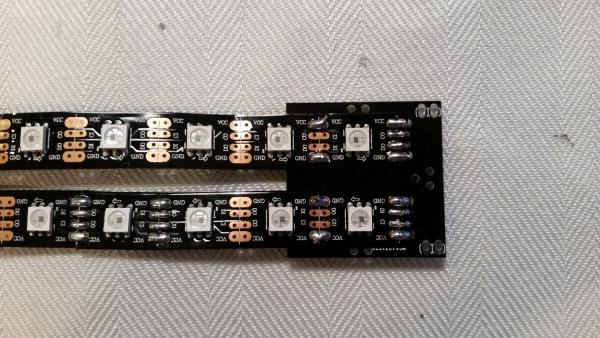
Sometimes you design the hardware around the software, and sometimes vice-versa. It’s all about the balance of pain. [prpplague] initially wired the strips together in a consistently left-to-right raster arrangement to make the coding easier, but this means long wires on the backside of the fabric returning from the right side back to the start again at the left. These long wires snagged on stuff, and pulled the solder connections apart.
The fix? Alternate rows of left-to-right with right-to-left to minimize wiring and make nice, robust connectors for the ends, and a much more elegant implementation at the expense of more complicated software to drive the device. (Alternating rows have to be flipped horizontally, so this means custom driver routines.)
The second gremlin was that the interfacing board that [prpplague] was using didn’t have enough current sourcing capability on the SPI lines, and he discovered that he couldn’t communicate reliably with the strings if the first pixel was more than 24″ of wire away from the board. Once the signal got to the first pixel, though, everything was fine. [prpplague] figured out that the RGB LEDs themselves had more drive capability than the SPI source.
The solution? Add a single pixel at the front of the chain to buffer the SPI lines and serve as a bonus status indicator. Cute.
We’d hardly call these “fails”, but rather “learning experiences”. Anyway, here’s two design “mistakes” that we won’t make when making a roll-up flexible pixel display. Thanks [prpplague].


 Next came the clever bit. [Richard] put cutouts into the board to hopefully stop the flow of heat from the ESP8266 module to the temperature sensor. Again, he found that the board heats up by around four degrees Celcius or nine degrees Farenheit. That’s a horrible result in any units.
 Fail of the Week is a Hackaday column which celebrates failure as a learning tool. Help keep the fun rolling by writing about your own failures and
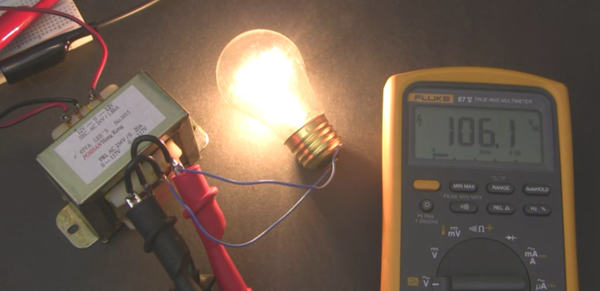
 [Afroman], no stranger to these pages, has published a video in which