2025 Component Abuse Challenge: An Input Is Now An Output

Part of setting up a microcontroller when writing a piece of firmware usually involves configuring its connections to the outside world. You define a mapping of physical pins to intenral peripherals to decide which is an input, output, analogue, or whatever other are available. In some cases though that choice isn’t available, and when you’ve used all the available output pins you’re done. But wait – can you use an input as an output? With [SCART VADER]’s lateral thinking, you can.

The whole thing takes advantage of the internal pull-up resistor that a microcontroller has among its internal kit of parts. Driving a transistor from an output pin usually requires a base resistor, so would it be possible to use the pullup as a base resistor? If the microcontroller can enable or disable the resistor on an input pin then yes it can, a transistor can be turned off and on with nary an output to be seen. In this case the chip is from ATmega parts bin so we’re not sure if the trick is possible on other manufacturers’ devices.

As part of our 2025 Component Abuse Challenge, this one embodies the finest principles of using a part in a way it was never intended to be used, and we love it. You’ve still got a few days to make an entry yourself at the time of writing this, so bring out your own hacks!

USB Dongle Brings Python-Controlled GPIO To The Desktop

Microcontroller dev boards are wonderfully useful items, in testament to which most of us maintain an ample collection of the things. But dragging one out to do a simple job can be a pain, what with making sure you have the whole toolchain set up to support the device, not to mention the inevitable need to solder or desolder header pins. Wouldn’t it be nice if there was a simple plug-and-play way to add a few bits of GPIO to your desktop or laptop machine?

[Nick Bild] thinks so, and came up with the USBgpio. The hardware in the dongle is pretty much what you’d expect — an Arduino Nano 33 IoT. Yes, you could just bust out a Nano and do this yourself, but [Nick] has done all the heavy lifting already. Eleven of the Nano’s IO pins plus 3.3V and ground are broken out to header pins that stick out of the 3D-printed enclosure, and the dongle is powered over the USB cable. [Nick] also built a Python library for the USBgpio, making it easy to whip up a quick program. You just import the library, define the serial port and baud rate, and the library takes care of the rest. The video below shows a quick blinkenlight test app.

Earth-shattering stuff? Perhaps not; [Nick] admits as much by noting the performance doesn’t really dazzle. But that’s hardly the point of the project, and if you need a couple of pins of IO on the desktop for a quick tactical project or some early-stage prototyping, USBgpio could be your friend. Continue reading “USB Dongle Brings Python-Controlled GPIO To The Desktop”

Spying On The ESP32’s GPIO

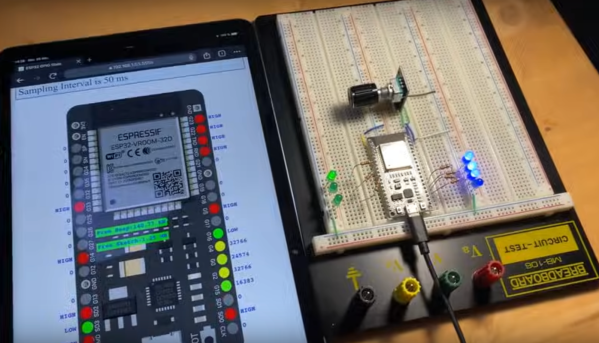
The ESP32 has been a go-to microcontroller platform for a while now, thanks to its versatile capabilities, integrated Wi-Fi and Bluetooth connectivity, and low power consumption. It’s ideal for a wide range of projects especially those revolving around IoT, partially because of all of the libraries and tools available for it now. The latest tool from [The Last Outpost Workshop] adds a feature we didn’t know we wanted until now: a webserver showing real-time updates of what all of the GPIO pins are doing.

The live GPIO pin monitoring library sets up the ESP32 to stream information about what all of the pins are doing in real time to a webserver, which displays the information as a helpful graphic. The demonstration in the video below shows and example troubleshooting a situation where the code is correct but there’s a mistake in the wiring, helping to quickly identify the problem and hopefully eliminating a wild goose chase for a bug in the software. The library can be quickly installed using the Arduino IDE and only requires the use of one other library and a few lines of code to get everything up and running.

As far as a debugging tool goes, something like this could save a lot of us a significant amount of time, especially with how easy it is to set up. A real-time look into the pins and their behavior, including those set up for PWM, is invaluable for plenty of situations. Of course if you’re building something like a real-time operating system that needs responses within a very specific interval you may want to look at more in-depth strategies for probing the GPIO.

Thanks to [Bob] for the tip!

Continue reading “Spying On The ESP32’s GPIO”

Odd Inputs And Peculiar Peripherals: RoenDi Smart Knob Thinks Outside The Box

When it comes to design decisions, we’re often advised to “think outside the box.” It’s generally good advice, if a bit abstract — it could really mean anything. But it appears that someone took it quite literally with this nifty little smart knob display and input device.

[Dimitar]’s inspiration for RoenDi — for “rotary encoder and display” — came from an unusual source: a car dashboard, and specifically, the multipurpose knobs that often crop up in a car’s climate control cluster. Designed for ease of use while driving while causing as little distraction as possible, such knobs often combine a rotary encoder with one or more indicators or buttons. RoenDi builds on that theme by putting a 1.7″ round LCD display in the middle of a ring attached to an Alps rotary encoder, allowing the knob to be customized for whatever you want it to represent. The backplane sports a powerful STM32 microcontroller with a lot of the GPIO pins broken out, so customization and interfacing are limited only by your imagination. The design is open source, so you can either build your own or support the project via Crowd Supply.

Unlike the haptic smart knob we’ve been seeing a bit about lately, which also features a round LCD at its center, RoenDi’s feedback is via the physical detents on the encoder. We think both devices are great, and they fill different niches in the novel input ecosystem.

Continue reading “Odd Inputs And Peculiar Peripherals: RoenDi Smart Knob Thinks Outside The Box”

Computer Vision Lets You Skip Songs With A Glance

Have you ever wished you could control your home automation devices with nothing more than a withering stare? Well then you’re in luck, as [Norbert Zare] has come up with a clever way of controlling an MP3 player with only your face. Though as you might imagine, the technique could be applied to a whole range of home automation tasks with some minor tweaks.

At the core of this project is the Raspberry Pi, specifically the 3 B+ model, though with the computational demands of computer vision you might want to bump it up to the latest-and-greatest Pi 4. From there you need to load up OpenCV and a model trained for face detection, which as luck would have it, tends to be a fairly common application for this technology.

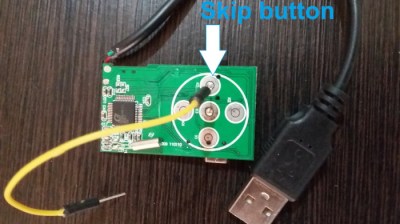
With a relatively simple Python script, [Norbert] is able to determine when OpenCV detects he’s looking directly into the camera and fire off one of the Pi’s GPIO pins that’s been connected to the “Skip” button on a physical MP3 player. That’s right, you read that correctly. He’s using a dedicated MP3 player in the year 2021.

In all seriousness, we’re not really sure why [Norbert] went this route compared to simply playing the music on the Pi and controlling it through software, but this does serve as a good example of how you can interface with physical devices if need be. In any event, using the Python script he’s provided, you could easily modify the setup to control other tasks, virtual or otherwise.

While face recognition can be a scary thing out in the wild, we do think it has some interesting applications within the home, so long as the user is the one who is in control of where their data ends up.

Continue reading “Computer Vision Lets You Skip Songs With A Glance”

Upgrade Board Adds GPIO Pins To Your Replica PDP-11

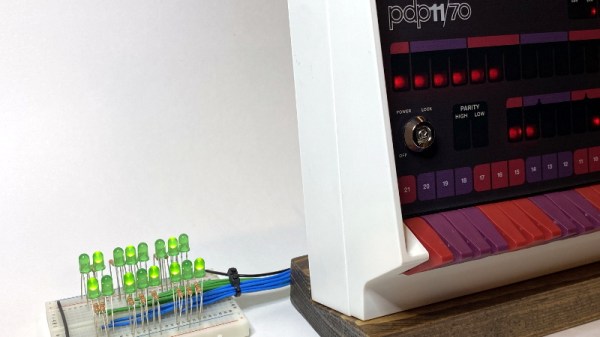
Like many Hackaday readers, [Steven Stallion] has had his eyes on the replica PDP-11 created by [Oscar Vermeulen] for some time now, and this summer he finally got the opportunity to build one himself. But while most owners might be content to just watch the Raspberry Pi based faux-retro computer blink away on a shelf, he wanted to explore putting the machine to more practical use. The end result is the PiDP-11 I/O Expander,  an add-on that lets the modern minicomputer interact with the world around it.

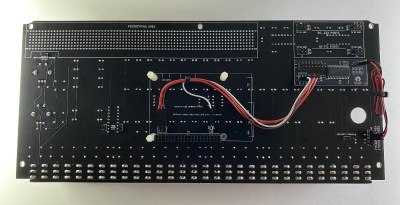
Developed after some discussion with [Oscar] himself, the Microchip MCP23016 based expander board fits neatly onto the PiDP-11 PCB, and [Steven] has made sure his installation guide meshes well with the replica’s documentation. The Pi’s I2C bus is actually broken out on the original PCB, so you just need to solder a header on and run some jumpers to where the expander is mounted. You’ll need to pull 5 V as well, and the installation guide has a few tips on convenient connection points.

The installed PiDP-11 I/O Expander

Each expander board gives you 16 GPIO pins which can be accessed over I2C, including support for interrupts which has been connected to GPIO 19 on the Raspberry Pi. [Steven] notes that you should be able to stack multiples of his expander up should you need even more free pins, though some fiddling with pull-up resistors and I2C addresses will likely be necessary.

The PCBs for the expander have been released under the two clause BSD license, so you’re free to spin up your own copies however you see fit. But if you’d like to save some time, [Steven] is offering assembled boards on Tindie.

Since [Oscar] first teased it at the 2015 Hackaday Supercon, we’ve been enamored with his fantastic PDP-11 replica. We’re always glad to see when somebody has picked up one of these wonderful kits, and doubly so when they’ve figured out a way to expand it in unexpected ways.

Run Out Of GPIO On Your Pi? Don’t Despair!

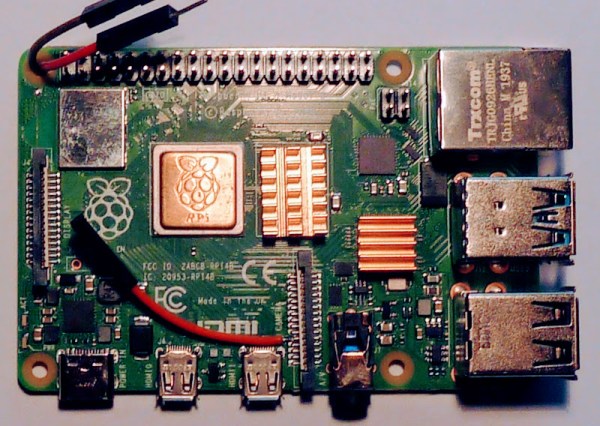
When the first Raspberry Pi rolled off the production line back in 2012 it sported a 26-pin expansion header that seemed to conceal endless possibilities. A later upgrade to the 40-pin header we have today unleashed a few more precious interfaces, but even then it’s still possible to run out. This was the problem faced by [woj], who needed a PWM line to drive a cooling fan  but whose other work had used everything on the header. The solution? Dive into the other connectors on board looking for an unused GPIO.

Every full-sized Pi has a connector for the camera and the LCD screen, and to operate some of the functions of those peripherals they contain a few extra GPIOs that aren’t normally used by end users. If  the camera or LCD is not being used then these lines are potentially up for grabs. In particular there’s a GPIO that turns the camera on or off that’s relatively easy to solder a wire to, and it was this one that fed the PWM line.

There are of course a few other ways to  find some more lines on a Pi and indeed almost any microcontroller, with one of the many types of GPIO expansion chips.  This trick is a particularly simple one though. and perhaps unsurprisingly it has surfaced here before.