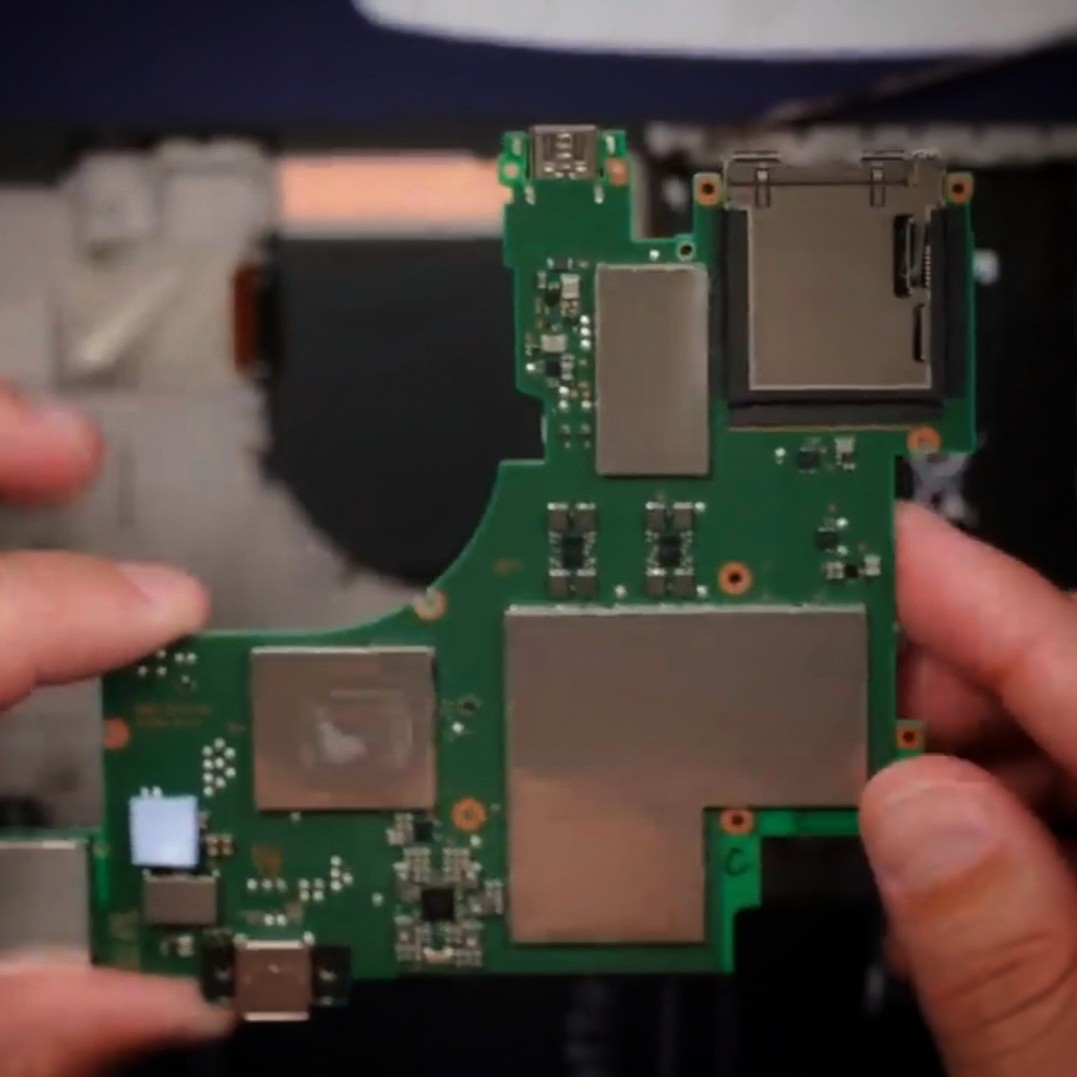
Unlocking The Potential Of A No-Name Handheld Game

The rise of inexpensive yet relatively powerful electronics has enabled a huge array of computing options that would have been unheard of even two decades ago. A handheld gaming PC with hours of battery life, for example, would have been impossible or extremely expensive until recently. But this revolution has also enabled a swath of inexpensive but low-quality knockoff consoles, often running unlicensed games, that might not even reach the low bar of quality set by their sellers. [Jorisclayton] was able to modify one of these to live up to its original promises.

This Ultimate Brick Game, as it is called, originally didn’t even boast the number of games, unlicensed or otherwise, that it claimed to. [Jorisclayton] removed almost all of the internals from this small handheld to help it live up to this original claim. It boasts a Raspberry Pi Zero 2W now as well as a TFT screen and has a number of other improvements including Bluetooth support for external controllers and upgraded audio. A second console was used for donor parts, and some case mods were made as well to accommodate a few extra buttons missing on the original console.

Right now the project is in a prototype phase, as [Jorisclayton] is hoping to use the donor case to build a more refined version of this handheld console in the future. Until then, this first edition upgrade of the original console can run RetroPie, which means it can run most games up through the Nintendo 64 era. RetroPie enables a ton of emulation for old video games including arcade games of the past. This small arcade cabinet uses that software to bring back a bit of nostalgia for the arcade era.

Game Boy? NES? Why Not Both!

If you’re a retro Nintendo fan you can of course carry a NES and a Game Boy around with you, but the former isn’t very portable. Never fear though, because here’s [Chad Burrow], who’s created a neat handheld console that emulates both.

It’s called the Acolyte Handheld, and it sports the slightly unusual choice for these parts of a PIC32 as its main processor. Unexpectedly it can use Sega Genesis controllers, but it has the usual buttons on board for portable use. It can drive either its own LCD or an external VGA monitor, and in a particularly nice touch, it switches between the two seamlessly. The NES emulator is his own work, while Game Boy support comes courtesy of Peanut-GB.

We like the design of the case, and particularly that of the buttons. Could it have been made smaller by forgoing some of the through-hole parts in favour of SMD ones? Quite likely, but though it’s chunky it’s certainly not outsized.

Portable Nintendo-inspired hardware is popular around here, as you can see with this previous handheld NES

Nintendo Switch 2 Teardown, Let’s A-Go!

A new console challenger has appeared, and it goes by the name Nintendo Switch 2. The company’s latest iteration of the home console portable hybrid initially showed promise by featuring a large 1080p display, though very little official footage of the handheld existed prior to the device’s global release last week. However, thanks to a teardown video from [TronicsFix], we’ve got a little more insight into the hardware.

The technical specifications of this new console have been speculated on for the last handful of years. We now know NVIDIA is again providing the main silicon in the form of a custom 8x ARM Cortex A78C processor. Keeping the system powered is a 5220 mAh lithium ion battery that according to [TronicsFix] is held in with some seriously strong adhesive.

On the plus side for repairability, the onboard microphone and headphone jack are each attached by their own ribbon cable to the motherboard. The magnetic controller interfaces are also modular in design as they may one day prove to be a point of failure from repeated detachment. Speaking of which, [TronicsFix] also took apart the new version of the Joy-Con controller that ships with the system.

Arguably the biggest pain point for owners of the original Nintendo Switch was the reliability of the analog sticks on the diminutive controllers. There were widespread reports of “stick drift” that caused players to lose control as onscreen avatars would lazily move in one direction without player input. For the Switch 2, the Joy-Con controllers feature roughly the same number of dome switch buttons as well as haptic feedback motors. The analog sticks are larger in size on the outside, but feature the same general wiper/resistor design of the original. Many will cry foul of the continued use of conventional analog stick design in favor of hall effect sensors, but only time will tell if the Nintendo Switch 2 will repeat history.

Continue reading “Nintendo Switch 2 Teardown, Let’s A-Go!”

Tune In To “Higher Lower”, The Minimal Handheld Electronic Game

[Tommy] has a great write-up about designing and building a minimalistic handheld electronic game called “Higher Lower”. It’s an audio-driven game in which the unit plays two tones and asks the player to choose whether the second tone was higher in pitch, or lower. The game relies on 3D printed components and minimal electronics, limiting player input to two buttons and output to whatever a speaker stuck to an output pin from an ATtiny85 can generate.

Fastener-free enclosure means fewer parts, and on the inside are pots for volume and difficulty. We love the thoughtful little tabs that hold the rocker switch in place during assembly.

Gameplay may be straightforward, but working with so little raises a number of design challenges. How does one best communicate game state (and things like scoring) with audio tones only? What’s the optimal way to generate a random seed when the best source of meaningful, zero-extra-components entropy (timing of player input) happens after the game has already started? What’s the most efficient way to turn a clear glue stick into a bunch of identical little light pipes? [Tommy] goes into great detail for each of these, and more.

In addition to the hardware and enclosure design, [Tommy] has tried new things on the software end of things. He found that using tools intended to develop for the Arduboy DIY handheld console along with a hardware emulator made for a very tight feedback loop during development. Being able to work on the software side without actually needing the hardware and chip programmer at hand was also flexible and convenient.

We’ve seen [Tommy]’s work before about his synth kits, and as usual his observations and shared insights about bringing an idea from concept to kit-worthy product are absolutely worth a read.

You can find all the design files on the GitHub repository, but Higher Lower is also available as a reasonably-priced kit with great documentation suitable for anyone with an interest. Watch it in action in the video below.

Continue reading “Tune In To “Higher Lower”, The Minimal Handheld Electronic Game”

A Cute Handheld Gaming Device That You Can Build In An Altoids Tin

The MintyPi was a popular project that put a Raspberry Pi inside an Altoids tin to make a pocketable gaming handheld. Unfortunately, it’s not the easiest build to replicate anymore, but [jackw01] was still a fan of the format. Thus was born the Pi Tin—a clamshell handheld for portable fun!

Neat, huh? More pocket-sized than the Game Boy Pocket.

The build is based around the Raspberry Pi Zero 2W, which packs more power than the original Pi Zero into the same compact form factor. It’s combined with a 320 x 240 TFT LCD screen and a 2000 mAh lithium-polymer battery which provides power on the go.

There are also a pair of custom PCBs used to lace everything together, including the action buttons, D-pad, and power management hardware. Depending on your tastes, you have two main enclosure options. You can use the neat 3D printed clamshell seen here in beautiful teal, or you can go with the classic Altoids tin build—just be careful when you’re cutting it to suit! Files can be found on GitHub for the curious.

We love a good handheld project around these parts; it’s particularly awesome how much gaming you can fit in your pocket given the magic of the Raspberry Pi and modern emulation. If you’re cooking up your own little retro rig, don’t hesitate to let us know!

Building A Handheld Pong Game

Pong was one of the first video games to really enter the public consciousness. While it hasn’t had the staying power of franchises like Zelda or Call of Duty, it nonetheless still resonates with gamers today. That includes [Arnov Sharma], who put together this neat handheld version using modern components.

An ESP32 development board serves as the brains of the operation. Capable of operating at many hundreds of megahertz, it has an excessive amount of power for an application as simple as this. Nonetheless, it’s cheap, and it gets the job done. It’s paired with an SSD1306 OLED screen of 124 x 32 resolution. That might not sound like much, but it’s plenty when you’re just drawing two paddles and a ball bouncing between them. Control is via a pair of SMD push buttons for a nice responsive feel.

What’s really neat, though, is the presentation. [Arnov] wrapped the electronics in a neat bean-shaped housing that vaguely apes game controllers of the 16-bit era. Indeed, [Arnov] explains that it was inspired by the Sega Genesis specifically. It looks great with the black PCBs integrated so nicely with the bright orange 3D printed components, and looks quite comfortable to use, too.

It might be a simple project, but it’s done rather well. Just by thinking about color choices and how to assemble the base components, [Arnov] was able to create an attractive and functional game that’s a lot more eye catching than some random boards thrown in an old project box. Indeed, we’ve featured stories on advanced FR4/PCB construction techniques before, too. Meanwhile, if you’re creating your own projects with similar techniques, don’t hesitate to let us know!

A Closer Look At The Tanmatsu

A few weeks ago we brought you news of a new palmtop computer for hackers, powered by the new Espressif ESP32-P4 application processor. The Tanmatsu (Japanese for “Terminal”) is a compact handheld device with a QWERTY keyboard and an 800×480 DSI display, and while it currently exists at the final prototype stage there is a pre-order page upon which you can reserve an early production model for yourself. We’ve been lucky enough to be invited to give one a close-up inspection, so it was time to hot-foot it on the train to a Dutch hackerspace in order to bring you a preview.

A Little History, And First Impressions

The Tanmatsu, held in both hands.
Recesses in the case fit well against the hands.

Before looking at the device, it’s time for a little history. The Tanmatsu has its origin in badge.team, the Netherlands-based group that has produced so many European event badges over the years, and it was destined to eventually become the badge for the upcoming WHY2025 hacker camp. As sometimes happens in any community there has been a significant difference of opinion between the event orga and the badge.team folks that it’s inappropriate to go into here, so now it exists as a standalone project. It’s destined to be open-source in its entirety including hardware and software (and we will hold them to that, never fear), but because of the events surrounding its conception the full repositories will be not be made public until some time late in the summer.

Picking the Tanmatsu up and holding it, it’s a rectangular slab a bit larger and thicker than a CD case with that QWERTY keyboard and display on its front face, an array of ports including an SMA socket for a LoRA antenna on its sides, and an expansion connector on its rear. It has a sandwich construction, with a PCB front face, a 3D printed spacer, the PCB itself, and a 3D printed back cover all held together with a set of screws. The recesses on its bottom edge and the lower halves of the sides locate neatly with fingers and thumbs when it’s held in two hands for two-thumb typing. The keyboard is a silicone moulding as is common on this type of device, and while the keys are quite small it was not difficult to type on it. The display meanwhile feels of much higher quality than the SPI parts previously seen on badges. Continue reading “A Closer Look At The Tanmatsu”