Tis The Season

’Tis the season for soldering! At least at my house. My son and I made some fairly LED-laden gifts for the immediate relatives last year, and he’s got the blinky bug. We were brainstorming what we could make this year, and his response was “I don’t care, but it needs to have lots of LEDs”.

It’s also the season for reverse engineering, apparently, because we’re using a string of WS2812-alike “fairy lights”. These are actually really neat, they look good and are relatively cheap. It’s a string of RGB LEDs with drivers, each dipped in epoxy, and run on a common three-enameled-wire bus. Unlike WS2812s, which pass the data on to the next unit in the line and then display them with a latching pulse at the end of a sequence, these LED drivers seem to count how many RGB packets have been sent down the wire, and only respond to their own number.

This means that if you cut up a string of 200 LEDs, it behaves like a string of 200 WS2812s. But if you cut say 10 LEDs off the string, where you cut them matters. If you cut it off the front of the string, you only have to send 10 color packets. If you cut them off the other end, you need to send 290 dummy packets before they even start listening. Bizarre, but ’tis the season for bizarre hacks.

And finally, ’tis the season for first steps into “software architecture”. Which is to say that my son is appreciating functions for the first time in his life. Controlling one LED is easy, but making a light show is about two more abstraction layers on top of that. We’ve been having fun making them dim, twinkle, and chase so far. We only have two more weekends, though, and we don’t have a final light show figured out yet, but after all, ’tis the season for last minute present hacking.

Hackaday Podcast Super-Short Holiday Edition

It’s a holiday weekend, and the Podcast is taking a break until 2022. But that can’t stop Hackaday’s Elliot Williams from giving out a t-shirt to the winner of last week’s What’s That Sound.

It’s the shortest Podcast ever!


Direct download (5 MB)

Continue reading “Hackaday Podcast Super-Short Holiday Edition”

Ringing In The Holidays With Self-Playing Chimes

The holiday season is here, and along with it comes Christmas music. Love them or hate them, Yuletide tunes are a simple fact of life each December. This year, [Derek Anderson] put a modern spin on a few classic melodies and listened to them via his set of self-playing chimes.

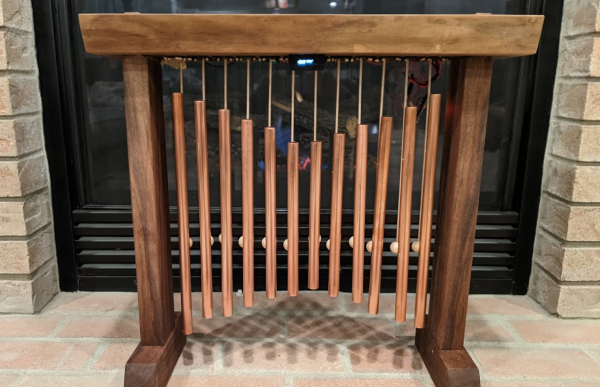
Inspired by [Derek]’s childhood Ye Merry Minstrel Caroling Christmas Bells (video), these chimes really bring the old-school Christmas decoration into the 21st century. Each chime is struck by a dedicated electromagnetically-actuated mallet, which is in turn controlled by an ESP32 running MicroPython.

Winding the electromagnets

The chimes play MIDI files, so you could, of course, play music unrelated to Christmas if you wanted to. And they even feature an OLED screen that displays what song is being played. For added flair, the entire thing is beautifully framed in black walnut, not to mention the custom-wound solenoids.

This project incorporated mechanical and electrical design, woodworking, 3D printing, programming, and song arrangement. It’s a wonder that [Derek] was able to create the entire product in the 40-80 hour time frame he estimated. (Though it looks like he had a bit of help.)

We always love to see projects like this, ones in which several disciplines get rolled together to create a beautiful finished piece.


Continue reading “Ringing In The Holidays With Self-Playing Chimes”

Wishing The Family A Sinusoidal Christmas

When it’s time to put together the annual Christmas card, most families take a few pictures of the kids, slap on a generic greeting, and call it a day. It used to be fairly common for the whole family to get dressed up and pose for a special Christmas picture, but who has the time anymore? It’s not like we have hours and hours to slave over a unique and memorable gift we can mail out to a dozen (or more) people.

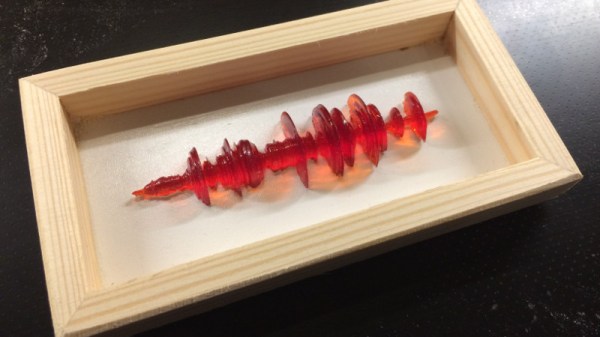
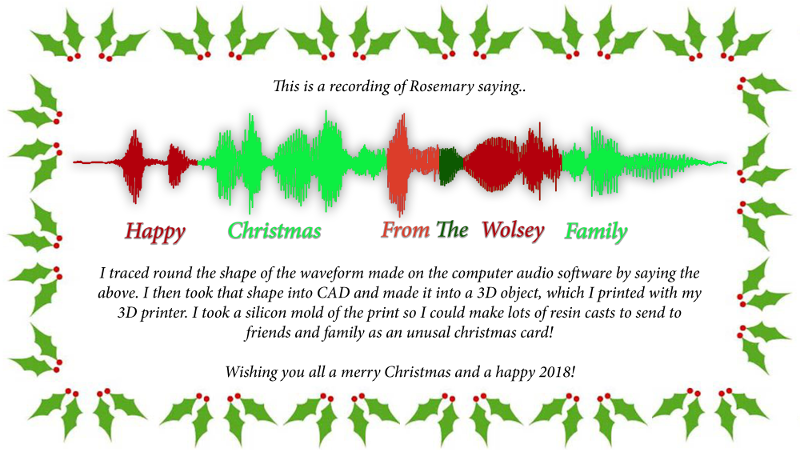
Unless you’re [Chris Wolsey], anyway. Rather than take the easy way out and simply mailing some pictures of his daughter out to friends and family, he recorded her giving a Christmas greeting and turned the waveform of her voice into a framed physical memento. Way to wreck the curve for the rest of us, [Chris].

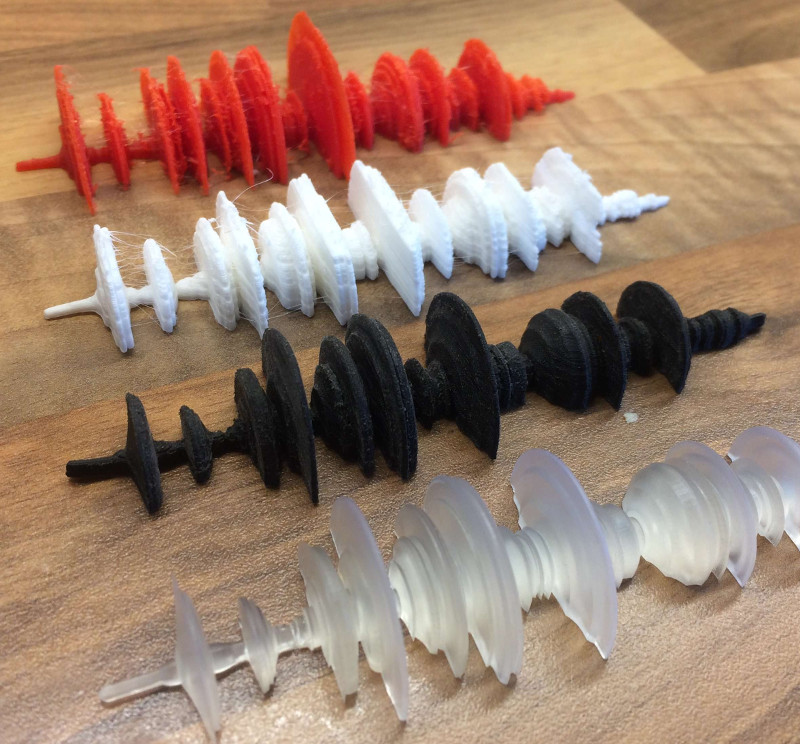
Evolution of the printed waveform.

As it turns out, getting sound into CAD software isn’t exactly straightforward. To start, he made a recording of his daughter saying the words “Happy Christmas From the Wolsey Family” with Audacity, and then took a screenshot of the resulting waveform. This screenshot was then brought into Adobe Illustrator and exported to SVG, which Fusion 360 (and most other CAD packages) is able to import.

Now that the wave was in Fusion 360 he could scale it to a reasonable size, and use the revolve function to bring it into three dimensions. Cutting that object in half down the length then gave [Chris] a shape which should, theoretically, be printable on his FDM printers. But unfortunately, it wasn’t so easy. His personal Anet A8 had a tough time printing it, and the Prusa i3 MK2 at work didn’t fare much better. In the end, he had to make the leap to SLA, getting the shape printed on a Form 2 via 3D Hubs.

With the finalized shape in hand, [Chris] just need to put them into production. Printing them all via 3D Hubs wasn’t really an option, so he decided to make a mold and cast them in resin. He printed up a mold box, and after fiddling around with the mix a bit, was able to settle on a resin which allowed him to de-mold the shapes just 30 minutes after pouring.

Finally, he made frames for each cast waveform, and printed up a little label explaining just what the recipient was looking at; even going as far as showing which word corresponded to which section of the shape.

This is a fantastically executed and documented project, and while it’s too late to whip up your own version this year, we have no doubt they’ll be a few people “borrowing” this idea next time the holidays roll around.

It’s never too early to start planning for next Christmas. We’ve covered unique takes on the traditional holiday card before, as well as a sleighful of holiday decorating projects.

A Menorah For The 21st Century

For those new and experienced, this time of year is a great chance for enterprising makers to apply their skills to create unique gifts and decorations for family and friends. [Mike Diamond] of What I Made Today built a phone controlled, light-up menorah. It’s a charming way to display some home automation know-how during the holidays.

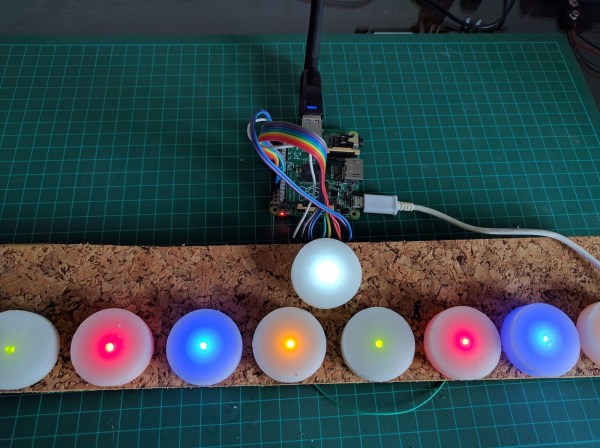
Expanding on his previous project — a pocket-sized menorah — a Raspberry Pi Zero with a WiFi dongle, some LEDs, wire, and tea lights suffice for the materials, while setting-up Blynk on the Raspberry Pi and a phone to control the lights ties it together after mounting it in an old monitor housing.

Continue reading “A Menorah For The 21st Century”

Keeping Christmas Present Hunters Guessing With QR Code Gift Tags

qr-code-gift-tags

[Thadd Brooks] is a geeky dad of the highest degree. His kids are constantly trying to figure out what mom and dad bought them for Christmas, while he continues to think up ways to stymie their progress. He certainly could have put a few prank presents under the tree, but he opted to go a different route, confusing his smartphone-wielding kids with QR codes.

Each gift under the tree bears no name tag, rather they are adorned with a single QR code sticker which [Thadd] printed out. When scanned, the code brings his children to a page on his web server stating who the gift is for.

The catch? Well, the codes bring up a random page each time, attributing the gift to every member of the family along the way. There’s no chance that any of the kids will be able to correctly identify their gifts before Christmas Eve, when [Thadd] flips a switch on the server and reveals the actual gift recipients.

It’s certainly a clever, yet frustrating, way to keep his family on their toes, and we think it’s a pretty awesome idea.

If you’d like to see some of the pages he has created to confuse his kids, just click the “Search” button on the link above.