Close up of a Sony FX-300 'Jackal' radio

Packing Even More Features Into A Classic Radio

When it comes to hacking niches, breathing new life into vintage devices is always an exciting challenge. [t0mg]’s recent project exemplifies this with his 1978 Sony FX-300 ‘Jackal’ radio. He’d already upgraded the radio in 2021 and turned it into a feature-packed marvel, but there’s always room for improvement.

[t0mg]’s initial 2021 build had its quirks: noisy sound, a subpar display, and a non-functional radio module. Determined to enhance these aspects, he sourced an IPS version of the original 3.2″ ILI9431 LCD, significantly improving viewing angles. To tackle the audio issues, he integrated an M5Stack Atom microcontroller, utilizing its Bluetooth A2DP capabilities to deliver cleaner digital sound via I2S to the Teensy audio board. The Teensy itself got a complete wire overhaul just for the sake of good craftmanship.

The new setup also enabled the display of song metadata. Additionally, [t0mg] incorporated a dedicated Arduino Nano clone to manage inputs, streamlining the overall design. The revamped ‘Jackal’ now boasts a bunch of impressive features such as displaying RDS data for FM stations, voice recording, and an NFC reader for personalized playlists.

If you’re into radio makeovers, look into this post for a real golden oldie, or start out with the basics. For [t0mg]’s earlier improved version of this Jackal, read our article on it here.

Continue reading “Packing Even More Features Into A Classic Radio”

A Microcontroller Friendly AR Headset On The Cheap

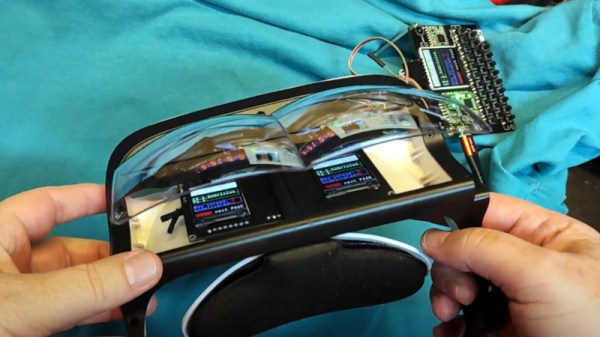
Generating the real-time images required for augmented reality (AR) goggles usually requires a fair amount of processing power, to the point that DIY efforts based around the Raspberry Pi often have trouble keeping up. But what if your AR aspirations don’t require fancy high-resolution graphics? If text and the occasional icon is enough to get the job done, then these lo-fi AR goggles from [bobricius] might be the ideal solution.

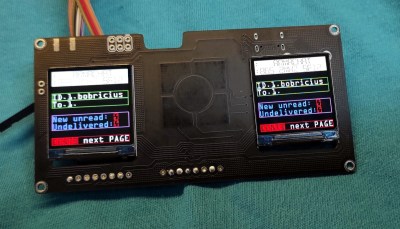
As with previous homebrew AR rigs we’ve seen, this one starts with an affordable headset designed to project the display of a smartphone onto a pair of curved optical combiners. But instead of tucking a phone into the headset, [bobricius] is using a custom PCB that holds a pair of ST7789 1.3 inch 240 x 240 IPS displays. Connected over SPI and supported by just about any microcontroller you’d care to use, tossing some textual data over your field of vision can be accomplished in just a few lines of code.

[bobricius] has actually put together a couple different versions of the PCB for this project. One uses his custom ATSAMD21E18-based “ArmaBrain” module that packs the MCU and an array of common components onto a 28 mm square board that can be easily dropped into other projects. If you’d rather roll your own solution, the second version of the board that simply holds the two displays in the appropriate position and routes the SPI lines to a convenient header should do nicely.

We’ve seen augmented reality displays using microcontrollers like the ESP32 before, but those were essentially just remote displays for a more powerful system. We like this simplified approach, as there are plenty of applications where just getting a few lines of text or some low-resolution images would be more than sufficient for the task at hand. Plus, the commercially-made headset this project is based on certainly looks better than some of the other donor goggles we’ve contemplated modifying in the past.

Continue reading “A Microcontroller Friendly AR Headset On The Cheap”

Game Boy Color Makes Itself At Home In A DMG-01

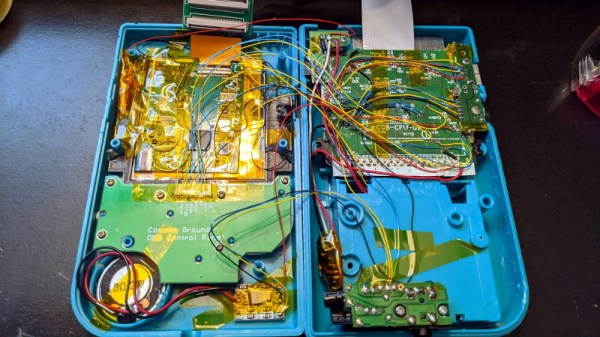
When we last checked in with [Bucket Mouse], he had just finished cramming a Game Boy Advance (GBA) SP motherboard into the body of the iconic Game Boy DMG-01, complete with an aftermarket IPS display. Unfortunately, after a few weeks of using the system, he ran into a few issues that sent him back to the drawing board.

This time, he’s revamped Nintendo’s classic handheld with the internals from its successor, the Game Boy Color (GBC). Obviously that means this new build can’t play any GBA titles, but that was never actually the goal in the first place. It might seem obvious in hindsight, but owing to their general similarity, it ended up being far easier to fit the GBC hardware into the Game Boy’s shell. Though we still wouldn’t call this an “easy” swap by any stretch of the imagination…

Whether you want to follow his footsteps towards portable gaming bliss or just want to live vicariously through his soldering iron, [Bucket Mouse] has done an absolutely phenomenal job of documenting this build. While he cautions the write-up isn’t designed to be a step by step instructional piece, there’s an incredible wealth of information here for others looking to perform similar modifications.

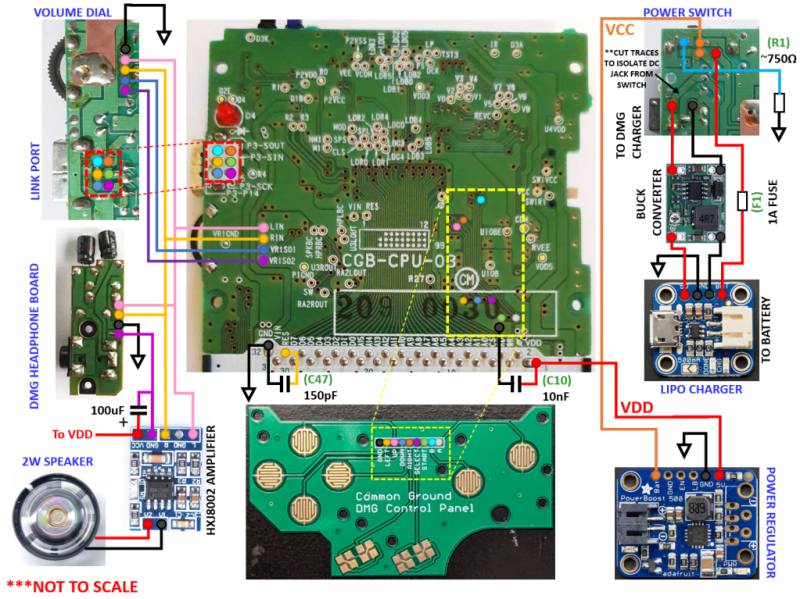
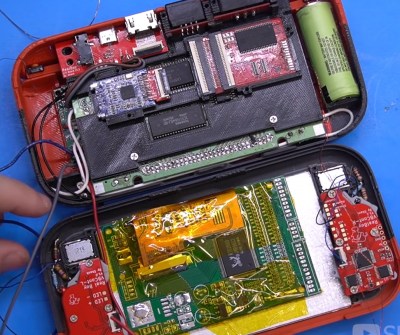
The build involved removing much of the original Game Boy’s connectors and controls, such as the volume wheel, Link Port, and even headphone jack, and grafting them onto a GBC motherboard that’s been physically trimmed down. At a high level it’s not unlike the trimmed Wii portables we’ve seen, but made much easier due to the fact the GBC only used a two-layer PCB. It also helps that [Bucket Mouse] has once again used an aftermarket IPS display, as that meant he could literally cut off the LCD driver section of the GBC motherboard. Of course there have also been several hardware additions, such as a new audio amplifier, power regulation system, LiPo charger, and 2000 mAh battery.

There’s a lot of fantastic details on this one, so if you’re remotely interested in what made the Game Boy and its successors tick, we’d highly recommend taking the time to read through this handheld hacking tour de force. His previous build is also more than worthy of some close study, even if it ended up being a bit ungainly in practice.

Turning The Virtual Boy Into A Handheld Console

The Virtual Boy, Nintendo’s most infamous failure, was plagued by several issues. The most glaring problem was the red monochrome stereoscopic display technology which gave many users a headache after even a short time playing, but it’s sky-high price and extremely limited library of games kept many prospective buyers at bay as well. There was also the issue of portability: unlike the Game Boy it was named after, the Virtual Boy barely qualified as a portable system due to the fact it needed to be set up on a table to use.

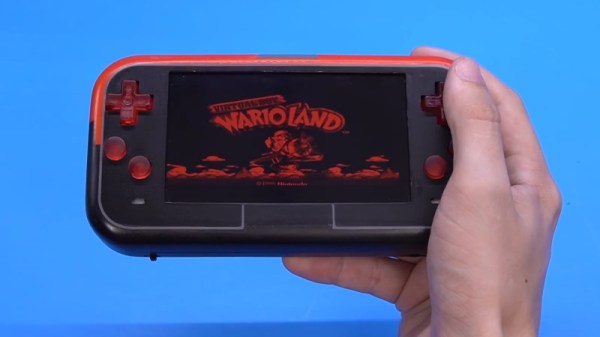
But now, thanks to the tireless efforts of [Shank], at least a few of those issues have been resolved. He’s built the world’s first truly portable Virtual Boy, which swaps the system’s troubled 3D display for a modern IPS LCD panel. The custom handheld, designed to merge the Virtual Boy’s unique aesthetic with the iconic styling of the Game Boy Advance, looks like it came from some alternate timeline where Nintendo decided to produce a cheaper and less cumbersome version of the system rather than abandoning it.

While the work [Shank] has put into the project is unquestionably impressive, it should be said that it took the efforts of several talented hackers to create the handheld Virtual Boy. The key component that made the modification possible in the first place is the VirtualTap by [Furrtek], which not only provides the VGA output that’s driving the LCD panel, but fools the system’s motherboard into believing the servo-actuated stereoscopic display is still connected and active.

It’s also using the open source power management board that [GMan] originally developed for his own portable N64, [Bassline] chipped in to cast the custom buttons and D-pad in translucent resin, and [Mitch 3D] put an untold number of hours into printing and reprinting the system’s multicolored enclosure until it came out just right.

All the little details of the final system, which [Shank] calls the Real Boy, put this project into a league of its own. Special combinations of button presses allows the user to change the color of the display, should you get sick of the infamous red-tint. The buttons also have RGB LEDs behind them that correspond with the color scheme of the display itself, for that extra bit of gamer cred. He even made sure to include the system’s original link port, despite the fact that no officially released game ever made use of it.

Our first run in with [Shank] was when he demoed a portable Wii built into a mint tin. It made for a pretty pitiful gaming experience, but the project demonstrated his dedication to seeing a project through to the end. Watching his skills improve over the last few years has been inspiring, and we can’t wait to see what he comes up with next.

Continue reading “Turning The Virtual Boy Into A Handheld Console”

World’s First RP2040 QWERTY Computer

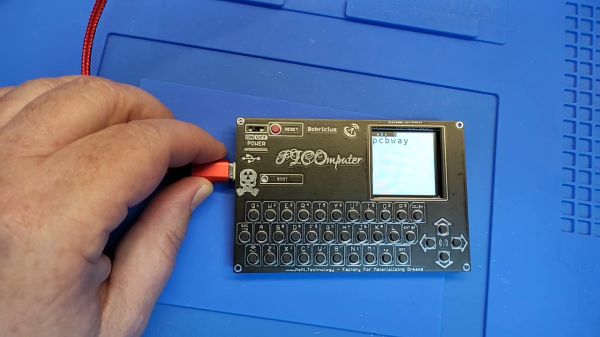
Independent hardware developer [bobricius] is at it again, making what he claims is the world’s first Pico RP2040 QWERTY + IPS development kit — the PICOmputer. This is a palm-sized computer of sorts. It integrates a keyboard made from tactile push button switches, a TFT IPS display, and a RP2040 Pico computer module. At 100 x 65 mm size, it is slightly bigger than your typical ISO-7810-ID-1-sized credit card, and slightly smaller than an A7 piece of paper.

One of [Bobricius]’s goals for this project was to minimize the number of external components, thus maximizing the use of the RP2040’s internal features. And if you peruse the schematic posted on his GitHub repository, you can agree he’s met this goal for sure. There’s a filter capacitor for the optional LoRa module, and two MOSFETs and three resistors to drive a speaker and the TFT backlight. Aside from connectors, the switches, and the submodules themselves, that’s all of the external circuitry.

The arrangement of two USB connectors, type C for power and micro-USB for data, is an interesting aspect of the connector / module placement. He plans to add an Ethernet module in the future, and issue some more revisions to fix small errors and to make the front panel fit more sizes of displays. We wonder if a battery module add-on is in the works, as well.

If you recognize [bobricius], that’s because his previous ARMACHAT handheld LoRa messenger project was among the Hackaday Prize Community Vote (Bootstrap) winners last year. We think tiny keyboards may be an obsession for him — indeed, he freely admits to being blinded by his own enthusiasm. Check out his mini (Pi)QWERTY USB keyboard from 2018, for example. Thanks to [Itay] for bringing this project to our attention via the Hackaday tip line.

Continue reading “World’s First RP2040 QWERTY Computer”

No-Nixie Nixie Clock

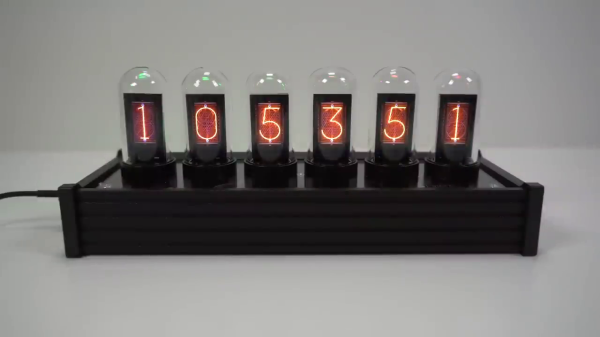
Over on [Techmoan]’s YouTube channel he’s excited about a new gadget that finally arrived after months of waiting — the EleksTube IPS fake Nixie tube clock. This is a re-imagining of a Nixie tube clock using six 135×240 pixel IPS display panels. They are mounted like tiny billboards, each one inside glass bulbs to mimic that retro look. Based on [Techmoan]’s measurement of these displays, it appears they are the same 16:9 IPS displays used in the TTGO ESP32 modules. The effect is quite impressive, and the fact that each digit is a complete display leads to quite a bit of flexibility. For example, if you don’t like the Nixie look, you can select from a suite of styles or make your own set of custom digits.

Additional digit styles are provided

Continue reading “No-Nixie Nixie Clock”