One of four MDF half-tone blocks coming off the laser cutter.

Laser Cutter Plus CYMK Spraypaint Equals Full-Color Prints

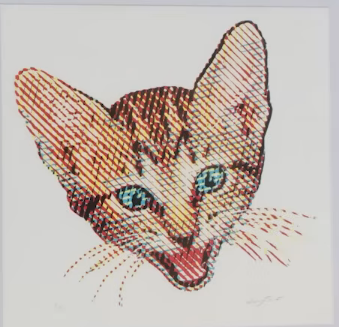
This is one of those fun hacks that come about from finding a product and going “I wonder if I could…” — in this case, artist/YouTuber [Wesley Treat] found out his favourite vendor makes spray cans in CYMK colours– that is the Cyan, Yellow, Magenta and blacK required for subtractive printing. Which got him wondering: can I make full-colour prints with this paint?

MDF block print
The MDF-based print, with naive half-tone dots.

His answer was “yes”, and the process to do so is fairly simple. First, split the image into colour channels, generate a half-tone pattern for each one, and carve it out of MDF on the laser. Then spray the MDF with the appropriate colour spray paint. Press the page against each block in turn, and voila! A full colour print block print, albeit at very low DPI compared to your average inkjet.

Now, you might be wondering, why half-tone instead of mixing? Well, it turns out that these CYMK paints are too opaque for that to work in a block-printing process. At least with a naive spray technique; [Weseley] does admit a very fine mist might be able to make that work. The second question is why not just hook the rattle cans into a CNC machine for a paint-based mega inkjet? That’s a great question and we hope someone tries it, but [Weseley] evidently likes block-printing so he tried that first.

The Mylar stencil print, with a more artistic half-tone pattern.

Laser-ablating enough MDF away to make decent print blocks took too long for [Weseley]’s tastes, however, so he switched to using mylar stencils. Instead of spraying a block and pressing onto it, the paint is sprayed through the stencil. The 10 mil Mylar not only cuts faster, but can support finer detail. Though the resulting prints lose some of the artistic flair the inconsistencies block printing brings, it probably looks better.

If you prefer to skip the manual paint-can-handling, perhaps we can interest you in a spray-can plotter. If you do like manually flinging paint, perhaps you could try this dot-painting spray can attachment, for a more self-directed half-tone.

Thanks to [Keith Olson] for the tip.

Continue reading “Laser Cutter Plus CYMK Spraypaint Equals Full-Color Prints”

Laser soldering

Solder Stencil Done Three Ways

This project, sent in by [Henk], goes through a few different ways to make a solder stencil using a vinyl cutter, a CO2 laser, and a fiber laser.

The project starts with identifying a method to convert the board’s Gerber files to a PNG, which is ultimately used to create a vector file for use with the laser. The first stencil, made with the CO2 laser, was cut out of masking tape. This worked fine for larger cutouts and is certainly a cheap option if you don’t have too many small components. A slightly better approach with the CO2 laser was using vinyl sheet release paper, which seemed to hold together better than the tape.

Laser-cut masking tape works, but not for long.

A vinyl cutter was also used as an experiment, but it didn’t perform as well as the CO2 laser, as expected, since the cutter uses a knife rather than light, leading to some tearing issues.

The final method utilized a fiber laser and an empty drink can to create a metal stencil. First, the can had to be cut open, heated, and flattened. The fiber laser was able to cut clean footprints in the aluminum, creating a stencil that would hold up to more use than the paper variations.

The finale of this exploration into laser stencil making was using the fiber laser to solder the board together. The stencil was used to spread paste on the pads, parts were placed on the board, and then the fiber laser heated the solder paste to solder them to the board. The board looked a bit toasty afterwards, but we imagine the process could be fine-tuned to reduce the collateral damage a bit.

Once you’ve got your stencil ready to go, you can combine it with a 3D printed jig to hold the PCB while you apply the solder paste.

“Man And Machine” Vs “Man Vs Machine”

Every time we end up talking about 3D printers, Al Williams starts off on how bad he is in a machine shop. I’m absolutely sure that he’s exaggerating, but the gist is that he’s much happier to work on stuff in CAD and let the machine take care of the precision and fine physical details. I’m like that too, but with me, it’s the artwork.

I can’t draw to save my life, but once I get it into digital form, I’m pretty good at manipulating images. And then I couldn’t copy that out into the real world, but that’s what the laser cutter is for, right? So the gameplan for this year’s Mother’s Day gift (reminder!) is three-way. I do the physical design, my son does the artwork, we combine them in FreeCAD and then hand it off to the machine. Everyone is playing to their strengths.

So why does it feel a little like cheating to just laser-cut out a present? I’m not honestly sure. My grandfather was a trained architectural draftsman before he let his artistic side run wild and went off to design jewellery. He could draw a nearly perfect circle with nothing more than a pencil, but he also used a French curve set, a pantograph, and a rolling architect’s ruler when they were called for. He had his tools too, and I bet he’d see the equivalence in mine.

People have used tools since the stone age, and the people who master their tools transcend them, and produce work where the “human” shines through despite having traced a curve or having passed the Gcode off to the cutter. If you doubt this, I’ll remind you of the technological feat that is the piano, with which people nonetheless produce music that doesn’t make you think of the hammers or of the tremendous cast metal frame. The tech disappears into the creation.

I’m sure there’s a parable here for our modern use of AI too, but I’ve got a Mother’s Day present to finish.

Classy Paper Tape Reader Complements Homebrew Retrocomputer

If you were one of the earliest of early adopters in the home computing revolution, you might have had to settle for paper tape mass storage. It was slow, it was bulky, but it was what you had, and that gave it a certain charm that’s hard to resist. And that charm is what [Joshua Coleman] captures with this DIY paper tape reader build.

If the overall style of this project looks familiar, it’s because it was meant to echo the design themes from [Joshua]’s Coleman Z-80 modular computer. The electronics of the reader are based on [David Hansel]’s take on a paper tape reader, which in turn was meant to complement his Altair 8080 simulator — it’s retrocomputers all the way down! [Joshua]’s build has a few bells and whistles to set it apart, though, including an adjustable read head, parametric 3D-printed reels, and a panel mounted ammeter, just because. He also set it up to be a sort of keyboard wedge thanks to an internal relay that bypasses the reader unless it’s actually playing back a tape. Playback speed is pretty fast; see the video below for details.

So far, writing the tapes is an offline process. [Joshua] uses a Python program to convert ASCII to an SVG file and uses a laser cutter to burn holes in lengths of paper, which are then connected together to form a longer tape. A logical next step might be to build a feeder that moves a paper tape across the bed of the laser cutter in sync with the conversion program, to create continuous paper tapes. Or, there’s always the old-school route of solenoid-powered punch and die. We’d be thrilled with either.

Continue reading “Classy Paper Tape Reader Complements Homebrew Retrocomputer”

Paper Tape – With LASERs!

Though it is many decades since paper tape was commonly used as a data input or storage medium, it still holds a fascination for many who work with computers. Over the years we’ve featured more than one paper tape related project, and the latest to come out way is [ColemanJW2]’s 8-bit ASCII paper tape generator.

It’s natural to expect when talking about a paper tape generator that a machine of some type will emerge, probably with a large reel of tape, a whirring mechanical punch, and a big box of paper confetti. This one however is different, because it exists in software and produces an SVG file to cut the tape with a laser cutter. Common workshop equipment in 2025, but the stuff of science fiction when paper tape was current.

The software is a Python script, which has a friendly GUI. It applies 8-bit ASCII to the tape, and supports control codes and ANSI escape sequences. There’s a very short demonstration video of a tape being cut, which we’ve placed below the break.

If you make any tapes this way, see if you can find a paper tape event badge to read them.

Continue reading “Paper Tape – With LASERs!”

A Little Pigment Helps With Laser Glass Engraving

The range of materials suitable for even the cheapest laser cutter is part of what makes them such versatile and desirable tools. As long as you temper your expectations, there’s plenty of material to cut with your 40 watt CO2 laser or at least engrave—just not glass; that’s a tough one.

Or is it? According to [rschoenm], all it takes to engrave glass is a special coating. The recipe is easy: two parts white PVA glue, one part water, and two parts powdered titanium dioxide. The TiO2 is the important part; it changes color when heated by the laser, forming a deep black line that adheres to the surface of the glass. The glue is just there as a binder to keep the TiO2 from being blasted away by the air assist, and the water thins out the goop for easy spreading with a paintbrush. Apply one or two coats, let it dry, and blast away. Vector files work better than raster files, and you’ll probably have to play with settings to get optimal results.

With plain float glass, [rschoenm] gets really nice results. He also tried ceramic tile and achieved similar results, although he says he had to add a drop or two of food coloring to the coating so he could see it against the white tile surface. Acrylic didn’t work, but there are other methods to do that.

Continue reading “A Little Pigment Helps With Laser Glass Engraving”

Laser Cutters: Where’s The Point?

It is funny how when you first start doing something, you have so many misconceptions that you have to discard. When you look back on it, it always seems like you should have known better. That was the case when I first got a low-end laser cutter. When you want to cut or engrave something, it has to be in just the right spot. It is like hanging a picture. You can get really close, but if it is off just a little bit, people will notice.

The big commercial units I’ve been around all had cameras that were in a fixed position and were calibrated. So the software didn’t show you a representation of the bed. It showed you the bed. The real bed plus whatever was on it. Getting things lined up was simply a matter of dragging everything around until it looked right on the screen.

Today, some cheap laser cutters have cameras, and you can probably add one to those that don’t. But you still don’t need it. My Ourtur Laser Master 3 has nothing fancy, and while I didn’t always tackle it the best way, my current method works well enough. In addition, I recently got a chance to try an XTool S1. It isn’t that cheap, but it doesn’t have a camera. Interestingly, though, there are two different ways of laying things out that also work. However, you can still do it the old-fashioned way, too. Continue reading “Laser Cutters: Where’s The Point?”