Build Yourself A Beautiful Interactive Light Toy

Sometimes, we build things with LEDs as indicator lamps or to illuminate something important. Sometimes, we build things with LEDs purely to glow and be beautiful. This interactive light toy from [Jens] falls into the latter category.

The build uses a 16×16 addressable LED matrix.  [Jens] then ported some “Bouncy Bubbles” Processing code from Keith Peters to the Arduino Mega, and set it up to display on the matrix. An accelerometer was used to control the bouncing ball animations, while a second Arduino was then tapped to act as a musical synthesizer to add more vibes. The whole kit was then built into a 3D-printed housing with a nice hazy diffuser to give the LEDs a smoother, even look. [Jens] steps through how he got the diffuser just right, including a support structure that made all the difference to the aesthetic of the finished product. Getting diffusion right is key to making a nice LED project, and [Jens] got it very right here.

It’s a nice little art piece that looks kind of relaxing to play with in a dark room. We love a good glowable project here at Hackaday, so if you’ve built your own—don’t hesitate to let us know! Video after the break.

Continue reading “Build Yourself A Beautiful Interactive Light Toy”

Setup of a small lightbulb passing light through a thin film

Experimenting With Interference On Thin Layers

[Stoppi] has taken on a fascinating project involving the interference of thin layers, a phenomenon often observed in everyday life but rarely explored in such depth. This project delves into the principles of interference, particularly focusing on how light waves interact with very thin films, like those seen in soap bubbles or oil slicks. The post is in German, but you can easily translate it using online tools.

Interference occurs when waves overlap, either reinforcing each other (constructive interference) or canceling each other out (destructive interference). In this project, [Stoppi] specifically examines how light behaves when passing through thin layers of air trapped between semi-transparent mirrors. When light waves reflect off these mirrors, the difference in path length leads to interference patterns that depend on the layer’s thickness and the wavelength of the light.

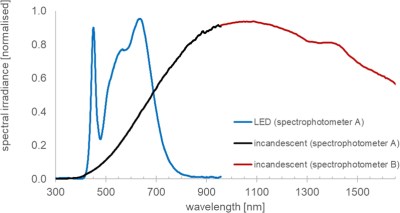
To visualize this, [Stoppi] used an interferometer made from semi-transparent mirrors and illuminated it with a bulb to ensure a continuous spectrum of light. By analyzing the transmitted light spectrum with a homemade spectrometer, he observed clear peaks corresponding to specific wavelengths that could pass through the interferometer. These experimental results align well with theoretical predictions, confirming the effectiveness of the setup.

If you like pretty patterns, soap bubbles are definitely good for several experiments. Don’t forget: pictures or it didn’t happen.

Continue reading “Experimenting With Interference On Thin Layers”

Creating Customized Diffraction Lenses For Lasers

[The Thought Emporium] has been fascinated by holograms for a long time, and in all sorts of different ways. His ultimate goal right now is to work up to creating holograms using chocolate, but along the way he’s found another interesting way to manipulate light. Using specialized diffraction gratings, a laser, and a few lines of code, he explores a unique way of projecting hologram-like images on his path to the chocolate hologram.

There’s a lot of background that [The Thought Emporium] has to go through before explaining how this project actually works. Briefly, this is a type of “transmission hologram” that doesn’t use a physical object as a model. Instead, it uses diffraction gratings, which are materials which are shaped to light apart in specific ways. After some discussion he demonstrates creating diffraction gratings using film. Certain diffraction patterns, including blocking all of the light source, can actually be used as a lens as the light bends around the blockage into the center of the shadow where there can be focal points. From there, a special diffraction lens can be built.

The diffraction lens can be shaped into any pattern with a small amount of computer code to compute the diffraction pattern for a given image. Then it’s transferred to film and when a laser is pointed at it, the image appears on the projected surface. Diffraction gratings like these have a number of other uses as well; the video also shows a specific pattern being used to focus a telescope for astrophotography, and a few others in the past have used them to create the illusive holographic chocolate that [The Thought Emporium] is working towards.

Continue reading “Creating Customized Diffraction Lenses For Lasers”

Build Your Own RGB Fill Light For Photography

Photography is all about light, and capturing it for posterity. As any experienced photographer will tell you, getting the right lighting is key to getting a good shot. To help in that regard, you might like to have a fill light. If you follow [tobychui]’s example, you can build your own!

Colors!

The build relies on addressable WS2812B LEDs as the core of the design. While they’re not necessarily the fanciest LEDs for balanced light output, they are RGB LEDs, so they can put out a ton of different colors for different stylistic effects. The LEDs are under the command of a Wemos D1, which provides a WiFI connection for wireless control of the light.

[tobychui] did a nice job of building a PCB for the project, including heatsinking to keep the array of 49 LEDs nice and cool. The whole assembly is all put together inside a 3D printed housing to keep it neat and tidy. Control is either via onboard buttons or over the WiFi connection.

Files are on GitHub if you’re seeking inspiration or want to duplicate the build for yourself. We’ve seen some other similar builds before, too. Meanwhile, if you’re cooking up your own rad photography hacks, don’t hesitate to let us know!

Cheap DIY Microscope Lamp Makes Tiny Macro Shots Look Great

For optical microscopes, light is everything. If you don’t have a good amount of light passing through or bouncing off your sample, you’ve got nothing for your eyeballs or a camera to pick up. To aid in this regard, [Halogenek] whipped up a nifty microscope lamp with some LEDs.

The build uses a neat arch-shaped PCB with a hole in the middle for the microscope’s optics to pass through. Surrounding this are the LEDs, which provide a circle of light focused on the sample, akin to the ring lights so favored by today’s online influencers. The LEDs are powered via USB C, so the lamp can be run off of any garden-variety phone charger you might have lying around.

[Halogenek] reports that the lamp has proven useful for extreme macro shots of PCBs. It’s an easy build to replicate or redesign your own way if you’re doing similar work.

Microscopes are super useful, and there are all kinds of hacks you can do to make them perform better in your quest for science. Meanwhile, if you’ve been jazzing up your own lab hardware, let us know—we’d love to hear about it!

The Ghost Detector 9000 Is A Fun Spirit-Chasing Game

Halloween may have come and gone for another year, but we’re still finding neat spooky projects lurking out on the Interwebs. Case in point, the Ghost Detector 9000 from [Jules].

Effectively, what you’re looking at here is a fun interactive ghost-detecting game. It consists of a Raspberry Pi Zero hooked up with an IMU sensor that can detect the rig’s movement and orientation. As the user moves the Ghost Detector 9000 around, it outputs lights and sound when it’s aimed at a so-called “ghost-signal”. The user then pulls the trigger to “capture” the ghost. The whole rig is built inside a flashlight which presented a useful form factor for modification.

For those eager to dive into the nitty-gritty, [Jules] has shared the project files on GitHub. There’s some nifty stuff going on, like Rust code that interfaces with I2C devices hooked up to the Pi, and a sensor-fusion algorithm to make the most out of the data from the 9-axis IMU.

It’s a fun build that probably taught [Jules] a great deal along the way, even if it’s a game at heart. If you prefer to shoot zombies instead of capture ghosts, we’ve seen a build that lets you go hunting with a laser crossbow, too.

Continue reading “The Ghost Detector 9000 Is A Fun Spirit-Chasing Game”

Bending Light To Fit Technology

Solar power is an excellent way of generating electricity, whether that’s for an off-grid home or for the power grid. With no moving parts maintenance is relatively low, and the downsides of burning fuel are eliminated as well. But as much as it’s revolutionized power generation over the last few decades, there’s still some performance gains to be made when it comes to the solar cells themselves. A team at Stanford recently made strides in improving cell efficiency by bending the properties of sunlight itself.

In order to generate electricity directly from sunlight, a photon with a specific amount of energy needs to strike the semiconductor material. Any photons with higher energy will waste some of that energy as heat, and any with lower energy won’t generate electricity. Previous methods to solve this problem involve using something similar to a prism to separate the light out into colors (or energies) that correlate to specific types of cells calibrated specifically for those colors. This method does the opposite: it changes the light itself to an color that fits the semiconductor material. In short, a specialized material converts the energy from two lower-energy photons into a single higher-energy photon, which then strikes the solar panel to create energy.

By adding these color-changing materials as a layer to a photovoltaic solar panel, the panel can generate more energy with a given amount of light than a traditional panel. The major hurdle, as with any research, is whether or not this will be viable when produced at scale, and this shows promise in that regard as well. There are other applications for these materials beyond photovoltaics as well, and the researchers provide an excellent demonstration in 3D printing. By adding these color-change materials to resin, red lasers can be used instead of blue or ultraviolet lasers to cure resin in extremely specific locations, leading to stronger and more accurate prints.