If You’re 3D Scanning, You’ll Want A Way To Work With Point Clouds

3D scanning is becoming much more accessible, which means it’s more likely that the average hacker will use it to solve problems — possibly odd ones. That being the case, a handy tool to have in one’s repertoire is a way to work with point clouds. We’ll explain why in a moment, but that’s where CloudCompare comes in (GitHub).

Not all point clouds are destined to be 3D models. A project may call for watching for changes in a surface, for example.

CloudCompare is an open source tool with which one can load up and do various operations on point clouds, including generating mesh models from them. Point clouds are what 3D scanners create when an object is scanned, and to become useful, those point clouds are usually post-processed into 3D models (specifically, meshes) like an .obj or .stl file.

We’ve gone into detail in the past about how 3D scanning works, what to expect from it, and taken a hands-on tour of what an all-in-one wireless scanner can do. But what do point clouds have to do with getting the most out of 3D scanning? Well, if one starts to push the boundaries of how and to what purposes 3D scanning can be applied, it sometimes makes more sense to work with point clouds directly instead of the generated meshes, and CloudCompare is an open-source tool for doing exactly that.

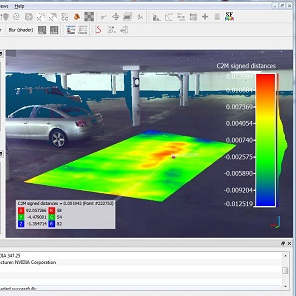
For example, one may wish to align and merge two or more different clouds, such as from two different (possibly incomplete) scans. Or, you might want to conduct a deviation analysis of how those different scans have changed. Alternately, if one is into designing wearable items, it can be invaluable to be able to align something to a 3D scan of a body part.

It’s a versatile tool with numerous tutorials, so if you find yourself into 3D scanning but yearning for more flexibility than you can get by working with the mesh models — or want an alternative to modeling-focused software like Blender — maybe it’s time to work with the point clouds directly.

Get Into Meshtastic On The Cheap With This Tiny Node Kit

There’s been a lot of buzz about Meshtastic lately, and with good reason. The low-power LoRa-based network has a ton of interesting use cases, and as with any mesh network, the more nodes there are, the better it works for everyone. That’s why we’re excited by this super-affordable Meshtastic kit that lets you get a node on the air for about ten bucks.

The diminutive kit, which consists of a microcontroller and a LoRa module, has actually been available from the usual outlets for a while. But [concretedog] has been deep in the Meshtastic weeds lately, and decided to review its pros and cons. Setup starts with flashing Meshtastic to the XIAO ESP32-S3 microcontroller and connecting the included BLE antenna. After that, the Wio-SX1262 LoRa module is snapped to the microcontroller board via surface-mount connectors, and a separate LoRa antenna is connected. Flash the firmware (this combo is supported by the official web flasher), and you’re good to go.

What do you do with your new node? That’s largely up to you, of course. Most Meshtastic users seem content to send encrypted text messages back and forth, but as our own [Jonathan Bennett] notes, a Meshtastic network could be extremely useful for emergency preparedness. Build a few of these nodes, slap them in a 3D printed box, distribute them to willing neighbors, and suddenly you’ve got a way to keep connected in an emergency, no license required.

Hackable Ham Radio Gives Up Its Mechanical Secrets

Reverse-engineered schematics are de rigeur around these parts, largely because they’re often the key to very cool hardware hacks. We don’t get to see many mechanical reverse-engineering efforts, though, which is a pity because electronic hacks often literally don’t stand on their own. That’s why these reverse-engineered mechanical diagrams of the Quansheng UV-K5 portable amateur radio transceiver really caught our eye.

Part of the reason for the dearth of mechanical diagrams for devices, even one as electrically and computationally hackable as the UV-K5, is that mechanical diagrams are a lot less abstract than a schematic or even firmware. Luckily, this fact didn’t daunt [mdlougheed] from putting a stripped-down UV-K5 under a camera for a series of images to gather the raw data needed by photogrammetry package RealityCapture. The point cloud was thoughtfully scaled to match the dimensions of the radio’s reverse-engineered PC board, so the two models can work together.

The results are pretty impressive, especially for a first effort, and should make electromechanical modifications to the radio all the easier to accomplish. Hats off to [mdlougheed] for the good work, and let the mechanical hacks begin.

Watch The OpenScan DIY 3D Scanner In Action

[TeachingTech] has a video covering the OpenScan Mini that does a great job of showing the workflow, hardware, and processing method for turning small objects into high-quality 3D models. If you’re at all interested but unsure where or how to start, the video makes an excellent guide.

We’ve covered the OpenScan project in the past, and the project has progressed quite a bit since then. [TeachingTech] demonstrates scanning a number of small and intricate objects, including a key, to create 3D models with excellent dimensional accuracy.

[Thomas Megel]’s OpenScan project is a DIY project that, at its heart, is an automated camera rig that takes a series of highly-controlled photographs. Those photographs are then used in a process called photogrammetry to generate a 3D model from the source images. Since the quality of the source images is absolutely critical to getting good results, the OpenScan hardware platform plays a pivotal role.

Once one has good quality images, the photogrammetry process itself can be done in any number of ways. One can feed images from OpenScan into a program like Meshroom, or one may choose to use the optional cloud service that OpenScan offers (originally created as an internal tool, it is made available as a convenient processing option.)

It’s really nice to have a video showing how the whole workflow works, and highlighting the quality of the results as well as contrasting them with other 3D scanning methods. We’ve previously talked about 3D scanning and what it does (and doesn’t) do well, and the results from the OpenScan Mini are fantastic. It might be limited to small objects, but it does a wonderful job on them. See it all for yourself in the video below.

Continue reading “Watch The OpenScan DIY 3D Scanner In Action”

3D-Printable Foaming Nozzle Shows How They Work

[Jack]’s design for a 3D-printable foaming nozzle works by mixing air with a fluid like liquid soap or hand sanitizer. This mixture gets forced through what looks like layers of fine-mesh sieve and eventually out the end by squeezing the bottle. The nozzle has no moving parts but does have an interesting structure to make this possible.

The fine meshes are formed by multiple layers of bridged filament.

Creating a foam with liquid soap requires roughly one part soap to nine parts air. The idea is that the resulting foam makes more efficient use of the liquid soap compared to dispensing an un-lathered goop directly onto one’s hands.

The really neat part is that the fine mesh structure inside the nozzle is created by having the printer stretch multiple layers of filament across the open span on the inside of the model. This is a technique similar to that used for creating bristles on 3D-printed brushes.

While this sort of thing may require a bit of expert tweaking to get the best results, it really showcases the way the fundamentals of how filament printers work. Once one knows the process, it can be exploited to get results that would be impossible elsewhere. Here are a few more examples of that: printing only a wall’s infill to allow airflow, manipulating “vase mode” to create volumes with structural ribs, and embedding a fine fabric mesh (like tulle) as either a fan filter or wearable and flexible armor. Everything’s got edge cases, and clever people can do some pretty neat things with them (when access isn’t restricted, that is.)

Generating Instead Of Storing Meshes

The 64kB is a category in the demoscene where the total executable size must be less than 65,536 bytes, and at that size, storing vertexes, edges, and normal maps is a waste of space. [Ctrl-Alt-Test] is a French Demoscene group that has been doing incredible animations for the last 13 years. They’ve written an excellent guide on how they’ve been procedurally generating the meshes in their demos.

It all starts with cubes. By stacking them, overlaying them, reusing them, and tiling them you can get better compression than raw vertexes. Revolution was the next trick, as it uses just a few points, plotting it via Catmul-Rom splines, and revolving around an axis. The numbers are pairs of 32-bit floats and before compression, a detailed pawn on a chess board can weigh in at just 40 bytes. Just these few techniques can take you surprisingly far (as seen in the picture above).

They later worked on deforming cubes and placing them into a semi-randomized column, which happened to look a lot like plants. This isn’t the first generated vegetation we’ve seen, and the demoscene technique focused more on getting the shape and setting the mood rather than being accurate.

Signed distance fields are another useful trick that allows you to generate a mesh by implementing a signed distance function and then running a marching cubes algorithm on it. In a nutshell, a signed distance function just returns the distance to the closest point on a surface from a given point. This means you can describe shapes with just a single mathematical equation. As you can imagine, this is a popular technique in the demoscene world because it is so space efficient in terms of code and data. [Ctrl-Alt-Test] even has a deep dive into one of their projects, Immersion, with a breakdown of where the space is allocated.

There are plenty of other tips and tricks here, such as generating textures and developing a C++ hot reload system for faster iteration. It’s just incredible that the executable that plays the whole video is smaller than just a JPEG screenshot of the video. It’s a reminder that the demoscene is still fascinating with new tricks and experiences even as the hardware stays the same. Continue reading “Generating Instead Of Storing Meshes”

Building A Communications Grid With LoRaType

Almost all of modern society is built around various infrastructure, whether that’s for electricity, water and sewer, transportation, or even communication. These vast networks aren’t immune from failure though, and at least as far as communication goes, plenty will reach for a radio of some sort to communicate when Internet or phone services are lacking. It turns out that certain LoRa devices are excellent for local communication as well, and this system known as LoraType looks to create off-grid text-based communications networks wherever they might be needed.

The project is based around the ESP32 platform with an E22 LoRa module built-in to allow it to operate within its UHF bands. It also includes a USB-based battery charger for its small battery, an e-paper display module to display the text messages without consuming too much power, and a keyboard layout for quickly typing messages. The device firmware lets it be largely automated; it will seek out other devices on the local mesh network automatically and the user can immediately begin communicating with other devices on that network as soon as it connects.

There are a few other upsides of using a device like this. Since it doesn’t require any existing communications infrastructure to function, it can be used wherever there are no other easy options, such as in the wilderness, during civil unrest where the common infrastructure has been shut down, or simply for local groups which do not have access to cell networks or Internet. LoRa is a powerful tool for these use cases, and it’s even possible to network together larger base stations to extend the range of devices like these.