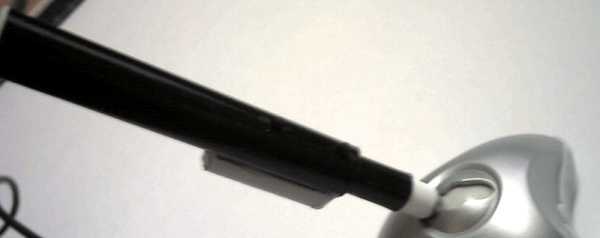
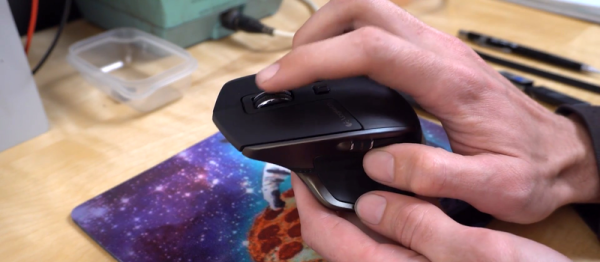
Hackaday Prize Entry: A Better KVM Switch

Now it’s not uncommon to have a desktop and a laptop at a battlestation with tablets waiting in the wings. Add in a few Raspis, consoles, and various cheap computers, and it’s pretty easy to have an enormous number of machines and monitors on a desk. Traditionally, a KVM switch would be the solution to this, sharing a keyboard, mouse, and monitor with many different boxes, but this is an ugly solution. [frankstripod] has a device that fixes that with some interesting software and a few USB hacks.

[frankstripod] is in love with a program called Synergy this program combines the keyboard, mouse, and display of several computers over a network so you’ll only ever have to use one keyboard and mouse; it’s as simple as dragging your mouse from one computer to the other. There are a few limitations, though: keyboards don’t work until the OS has loaded (no BIOS access, then), it doesn’t work if the network is down, and setup can be complicated. This project aims to replace the ‘server’ part of a Synergy setup with a small, networkable KVM.

Right now the plan is to use a small embedded board running Linux to read a USB keyboard and switch the output between several computers. A few scripts detect the mouse moving from one screen to another, and a microcontroller switches USB output between each computer. If it sounds weird, you’re right, but it does work: [frank]’s 2014 Hackaday Prize project was a mouse that worked with two computers at once.


The 2015 Hackaday Prize is sponsored by:

Wireless Trackpad Looks Like Fingernail Polish

All hands are on deck over at MIT where a very handy new trackpad has been created that will be able to give users a free hand to do other tasks. The device is called the NailO and attaches to one’s thumbnail, which allows the user an easy and reportedly natural way to use a trackpad while your hands are full, dirty, or otherwise occupied.

The device reportedly works like any normal trackpad, but is about the size of a quarter and attaches to the thumbnail in such a way that it takes advantage of the natural motion of running an index finger over the thumbnail. It communicates via Bluetooth radio, and has four layers which all go hand-in-hand: an artistic covering (to replicate the look of a painted fingernail), the sensors, the circuitry, the battery, and presumably an adhesive of some sort.

Details are quite sparse, but the device is scheduled to make its debut at the Computer Human Interaction conference in Seoul, South Korea very soon. If it can be made less bulky (although it’s somewhat uncomfortable to call something smaller than a quarter “bulky”) this might be, hands down, the next greatest evolution in mouse technology since multi-touch. We have to hand it to MIT for coming up with such a unique wearable!

Peripherals Behind The Iron Curtain

The article Home Computers Behind the Iron Curtain sparked a lot of interest, which made me very happy. Therefore, I decided to introduce more computer curiosities from the Iron Curtain period, especially from the former Czechoslovakia (CSSR).

As I mentioned in the previous article, the lack of spare parts, literature and technology in Czechoslovakia forced geeks to solve it themselves: by improvisation and what we would today call “hacking.”  Hobbyist projects of one person or a small party was eventually taken over by a state-owned enterprise, which then began to manufacture and deliver to stores with some minor modifications. These projects most often involved a variety of peripherals that could only be found in the Czechoslovakia with great difficulty.

Much like the production of components, the production of peripherals was also distributed throughout the eastern block so that each country was specializing in certain types of peripherals. For example, East Germany produced matrix printers, and Bulgaria made floppy disks drives. This meant industrial enterprises had to wait for vital computer parts, because the production in another country was not sufficient to cover even the local requirements, let alone the home user.

Continue reading “Peripherals Behind The Iron Curtain”

Hacklet 42 – Mouse Projects

Ever since [Douglas Engelbart] and his team came up with the computer mouse, hackers, makers, and engineers have been creating ways to change and improve the design. Even the original mouse was something of a hack, built form a block of wood, a button, and two encoder wheels. The wire exited toward the user’s wrist, making the device look like it had a tail. Even after all these years, folks are still working to make the perfect pointing device. This week’s Hacklet highlights some of the best mouse projects on Hackaday.io!

mouseballzWe start with [s_sudhar] and ORB – A 3D gaming mouse. Orb uses accelerometers and gyros to track its location in 3D space. The popular MPU-6050 chip provides all the sensors to create an Inertial Measurement Unit (IMU). The controller is an Arduino Micro, which provides the USB interface to a PC with the help of Arduino’s MouseKeyboard library. Two micro switches handle button duties. The original Orb was built up in a cardboard box. [S_sudhar] created a more advanced version housed in a 3D printed sphere with two buttons. The translucent joint between the two halves of the sphere is just begging for some RGB LEDs. We can already see them flashing red when you’re getting shot in Team Fortress 2!

mouse-wheelAnyone who has used X-Windows with a three button mouse knows how maddening the modern clickable center scroll wheel can be. You can’t click the wheel without it rolling, and causing all sorts of mayhem. There are plenty of software solutions and window manager mods to work around this, but [mclien] wanted a real three button mouse with a side scroll wheel. He didn’t want just any mouse though – it had to be a Silicon Graphics International (SGI) 3 button unit. His project 3-buttonmouse with seperate wheel used a dremel, drill press, and glue to transplant the electronics of a 3 button scrolling mouse into the classic SGI plastics. The final wheel placement did work – but it didn’t quite fit [mclien’s] hand. It did fit one of his friends hands perfectly though. So well in fact that the friend borrowed [mclien’s] creation. Neither the mouse nor the friend have been seen since!

jimmy[Jay-t] decided that mice are for more than pointing, so he built Jimmy the mouse bot. Jimmy is a robot built from an old Commodore Amiga two button mouse. His brain is a Parallax Propeller processor. Two outrigger mounted gear motors help Jimmy drive around. Jimmy has plenty of sensors, including infrared object detectors, switches, and a GPS module from Adafruit. Jimmy may be the world’s first homing mousebot. [Jay-t] does all his interactive testing with Tachyon Forth on the Prop. The great thing about having an 8 core processor is that there is plenty of room for expansion. Even with all these sensors, Jimmy is still only using 3 cores!


clovis

Finally we at [Clovis Fritzen] and the Wireless Batteryless Mouse. This is our favorite type of project – the kind that has just been uploaded. [Clovis] plans to use a movement based system to charge up a supercapacitor – eliminating the need for batteries or wires. He’s also hoping to use an accelerometer to detect the mouse’s position rather than a power-hungry optical system. The details are still sparse, because he’s just started the project! These are exactly the type of projects that get us thinking. How will [Clovis] translate movement to energy? Will it be weights, like a self-winding watch? Maybe pizeo elements in the buttons. Will people mind having to jiggle their mouse to get it working once that capacitor is discharged? One thing we’re sure of, [Clovis] has a proven track record of implementing projects like his weather station. Get in there and help with your own ideas, or simply follow along with us and see how this one turns out.

Not satisfied? Want more mousy goodness? Check out our freshly minted mouse and pointer projects list!

That’s about all the time we have for this week’s Hacklet. As always, see you next week. Same hack time, same hack channel, bringing you the best of Hackaday.io! 

The Teensy Development Board

Plug Into USB, Get A Reverse Shell

Computers blindly trust USB devices connected to them. There’s no pop-up to confirm a device was plugged in, and no validation of whether the device should be trusted. This lets you do some nefarious things with a simple USB microcontroller.

We’ve recently seen two examples of this: the USBdriveby and the Teensyterpreter. Both devices are based on the Teensy development board. When connected to a computer, they act as a Human Interface Device to emulate a keyboard and mouse.

The USBdriveby targets OS X. When connected, it changes the DNS server settings to a custom IP, to allow for DNS spoofing of the victim’s machine. This is possible without a password through the OS X System Preferences, but it requires emulating both keystrokes and clicks. AppleScript is used to position the window in a known location, then the buttons can be reliably clicked by code running on the Teensy. After modifying DNS, a reverse shell is opened using netcat. This allows for remote code execution on the machine.

The Teensyterpreter gives a reverse shell on Windows machines. It runs command prompt as administrator, then enters a one-liner to fire up the reverse shell using Powershell. The process happens in under a minute, and works on all Windows versions newer than XP.

With a $20 microcontroller board you can quickly fire up remote shells for… “support purposes”. We’d like to see the two projects merge into a single codebase that supports both operating systems. Bonus points if you can do it on our Trinket Pro. Video demos of both projects after the break.

Continue reading “Plug Into USB, Get A Reverse Shell”

Head Mouse

Right Hand Loses Job As Head-Mouse Enters Mousing Arena

Moving the cursor around your computer screen is an everyday occurrence that we humans do not give much of a second thought to. But what if you didn’t have to move your hands from the keyboard anymore? Sure there are keyboards with Track Point or even track pads not to far from the keys, which isn’t too bad. What if you could just slightly point your face in the desired direction the mouse would move? The [Sci-Spot] folks wondered that same question and came up with a DIY Head Mouse.

The concept is pretty darn simple; a web cam is mounted to the user’s head and points at the computer screen. Mounted on top of the screen is one IR LED. Our eyes can not see the IR light so it is not annoying or distracting. The camera, however, is filtered to only see IR by placing a couple of layers of camera film negative over the lens. Before you go complaining about strapping a camera to your noggin just think of building it into a hat, which we’ve seen used for adaptive technologies like this PS3 controller.

Custom software was written to move the mouse cursor; see the black window in the above dialog box? That represents the webcam’s field of view and the white spot is the IR LED. When the user’s head moves, the IR LED moves in relation to the camera’s field of view, in turn telling the computer to move the cursor a certain amount. There are a couple of options available like ‘magnification’ which changes how much the cursor moves with a given amount of head movement and ‘deadzone’ that ignores extremely small movements that can result from breathing.

There is no mention of how button clicks are recorded but we think a couple of buttons right below the space bar would be great. The control software is available for download on the Sci-Spot page for those who want to make their own.

Rapid Fire Mod For A Wireless Mouse

Rapid Fire Wireless Mouse

Sometimes changing your computer mouse can be uncomfortable for a while until you get used to the replacement. It may also take some time to get used to new features or the lack of features the new mouse has. [Jon] bought an awesome wireless mouse that he really likes but it is missing one critical feature: rapid fire for gaming. He previously modded his old wired mouse to have a rapid fire button using a 555 timer. That worked fine as the mouse ran off the USB’s 5 volts, and that’s the voltage the 555 timer needed. The new wireless mouse has a 1.5 volt battery and can not support the 555 timer. What’s a gamer to do?

[Jon] searched around the ‘net but could not find any wireless rapid fire mods. Eventually, he did find a low-voltage variation called the LMC555 and ordered a few for his project. The new wireless mouse was taken apart in order to find out how the mouse buttons work. In this case, the signal pin is pulled low when the mouse button is pushed. Now that it is known how the mouse button works, just a couple of resistors, a capacitor, an NPN transistor and a push button switch are all that are necessary to finish up this mod. When the push button is pressed, the LMC555 timer activates the transistor in order to ground the mouse button signal pin. This happens to the tune of 1236 times a minute! That is a lot of rapid firing.

The few components were soldered up neatly and packed into the limited spare area inside the mouse. A hole drilled in the side of the mouse’s housing holds the new rapid fire push button in an ergonomically pleasing location.

Earlier, we mentioned [Jon] has done this mod before on a wired mouse. He learned about that project here on Hackaday. Check it out if your wired mouse is craving a rapid fire button.

Video after the break…

Continue reading “Rapid Fire Mod For A Wireless Mouse”