Slim And Classy Word Clock Shows The Weather Too

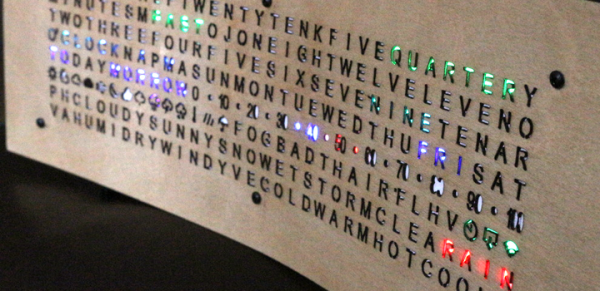
Word clocks are a neat twist on traditional timepiece user interfaces. Spelling out the time with words and phrases rather than numerals fancies up a clock nicely. And if you add the current weather and forecast to the display, you get this attractive and handy word-based time and weather display.

For this clock, one of the many custom builds on [GMG]’s site that betray a certain passion for unusual timepieces, an 8×32 array of Neopixels lives behind a laser-cut sheet of steam-bent birch plywood. Each pixel is masked by either an alphanumeric character or an icon representing weather conditions. An ESP8266 fetches time and weather data and drives the display serially, controlling the color of each cell and building up the display. The video below shows the clock doing its thing.

Sure, we’ve featured plenty of word clocks before, even some with weather display, but we like the slim and understated design of this build. We’re particularly impressed by the lengths [GMG] took in packing as much capability into the 256-pixel display as possible, like the way “today” and “tomorrow” overlap. And if you’ve got an eye for detail, you might spot what gets displayed when it’s over 80° and 80% relative humidity.

Continue reading “Slim And Classy Word Clock Shows The Weather Too”

Beautiful Weather Station Uses Acrylic, RGB LED, And And ESP8266

Everyone knows there’s form and there’s function. It isn’t fair, but people do judge on appearance, sometimes even overriding all other concerns. So while your Makerspace buddies might be impressed by your weather station built on a breadboard, your significant other probably isn’t. [Dennisv15] took an ordinary looking weather station design with a 0.96″ display and turned into an attractive desk piece with a much larger display and an artistic–and functional–enclosure.

The acrylic cloud lights up thanks to an RGB LED Neopixel strip and can indicate weather trends at a glance: red for warmer, blue for colder, flashing for inclement weather. The project was truly multidisciplinary, using a laser cutter to produce the body and the stand, a 3D-printed display bezel, and a PCB to make it easy to build.

Continue reading “Beautiful Weather Station Uses Acrylic, RGB LED, And And ESP8266”

Faking A Hollow State Device

There’s been a resurgence of interest in vacuum tubes. Even if you do think audio sounds better through a tube, you have to admit the care and feeding of filaments and plate voltages isn’t trivial. [Ed Nisley] decided to sidestep all that and just build an objet d’art that looks like a tube.

A burned out halogen bulb stands in for the tube, and a ceramic base holds the bulb. It also conceals–what else–an Arduino. The Arduino drives a knock-off Neopixel LED hidden in a faux plate cap. The result is a glass envelope bathed in a cold blue and purple glow that changes under software control.

We’d really like to see this kind of tube inside some rebuilt piece of tube gear. Or maybe Korg should offer LED lighting options for their recent tube in a chip form factor. If you really want to be a top-tier tube hacker, you can always try your hand at repair.

Quickie WiFi Scanner

File this project under “Getting Stuff Done” rather than “Shiniest Things”. [filid] works with a local free-WiFi access group, and wanted to map out the signal strength (RSSI) and coverage of their installations. This is a trivial task for an ESP8266, and it was even easier for [filid] because he had already written some WiFi scanner code for the same hardware.

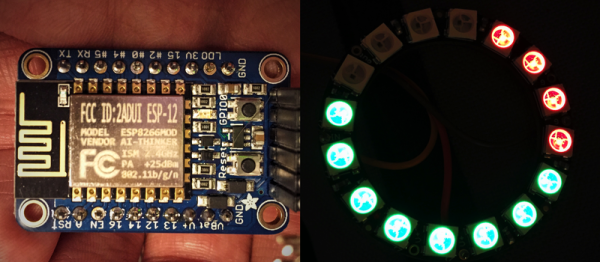
Basically, the device is a Neopixel ring connected to an ESP8266. If it detects a router that’s part of the Freifunk München network, it displays the RSSI on the ring in an attractive circular “bargraph”. When it doesn’t detect a Freifunk node, it displays the number of WiFi routers that it finds. It dumps a lot more detail over the serial port.

The code is short and sweet. Take a look if you’re just getting started with networking using the Arduino firmware on an ESP. Even if you don’t live in Munich, you’ll be able to tweak it to your own situation in a few seconds.

We want to see a GPS and an SD card added to this one, for a standalone wardriving-with-purpose setup. And while we admit that the small form-factor is probably appropriate for this project, how much cooler would it be if it glowed blue like Bilbo’s “Sting”?

Driving WS2811 LEDs With…VGA?

We thought we’d seen it all. All the ways to drive WS2811/2812 “Neopixel” LEDs, that is. And then [Steve Hardy] comes up with a new one: hacking a computer’s VGA output to drive 500 WS2811s in a string. And it’s quite a hack. You can check out the video (it’s worth enduring the horrible wind noise) below the break.

bits[Steve]’s big realization was that he could send the digital data that the Neopixels needed by carefully selecting a resolution and clock rate for the VGA to match the timings that the WS2811 modules wanted. A resolution of 840×1000 at 28MHz produces 70 pixels per WS2811 bit, or 12 bits per line. This means two VGA lines need to be sent for the RGB triple for each LED, hence the 1000 rows.

There are some further tricks before [Steve] got around to writing a custom OpenGL shader that converts regular graphics to his strange black-and-white bit pattern to drive the LEDs, but you’re going to have to read [Steve’s] blog for all that. If you’re waiting for a full code write-up, [Steve] says that one’s pending.

We’re just stoked to see the computing power that lies within a video card used for other purposes. Once you think of the VGA output as a general-purpose high speed (analog!) output, it opens up a whole bunch of possibilities if you can write the corresponding video software. As [Steve] points out, he’s only using the red channel right now — he could trivially add another 1000 LEDs just by tweaking his video code.

Continue reading “Driving WS2811 LEDs With…VGA?”

Break Your Wrist? Twitter-Enable That Plaster Cast

Plaster casts are blank canvases for friends and family to post their get well messages. But if it’s holiday season, adding blinky LED lights to them is called for. When [Dr Lucy Rogers] hurt her hand, she put a twitter enabled LED Christmas tree on her cast.

The hardware is plain simple – some RGB LEDs, an Arduino, a blue tooth module and a battery. The LEDs and wires formed the tree, and all the parts were attached to the plaster cast using Velcro. This allowed the electronics to be removed during future X-ray scans. The fun part was in connecting the LEDs to the #CheerLights project. CheerLights is an “Internet of Things” project that allows people’s lights all across the world to synchronize to one color set by a Tweet. To program the Arduino, she used code written by [James Macfarlane] which allowed the LED color to be set to any Cheerlights color seen in blue tooth UART data.

Connectivity is coordinated using MQTT — lightweight standard popular with connected devices. By connecting the MQTT feed to the cheerlights topic from [Andy Stanford-Clark’s] MQTT feed (mqtt://iot.eclipse.org with the topic cheerlights) the lights respond to tweets (Tweet #cheerlights and a color). The LED colors can also be selected via the phone from the color picker tool in the controller, or directly via the UART. If the Bluetooth connection is lost, the LEDs change colors randomly. Obviously, delegates had great fun when she brought her Twitter enabled LED blinky lights plaster cast arm to a conference. It’s not as fun unless you share your accomplishments with others!

Chromatic Clocks With A Steampunk Twist

There’s nothing like a good clock project, and tacking the steampunk modifier on it only makes it better. [José] built a steampunk clock that does it much better than just gluing some gears on an enclosure and calling it a day. This build includes glowing jewels displaying the time in different colors while displaying the a steampunker’s prowess with a pipe cutter.

The body of the clock is a piece of finely lacquered wood, hiding a perfboard construction with a DS3231 real time clock, a DHT22 temperature and humidity sensor, and a light sensor for dimming the WS2812 LEDs according to the ambient light level.

The rest of the clock is a bunch of 12mm copper pipe, elbows, and t couplers. The end of these pipes are capped off with marbles, with the RGB LEDs behind each of the ‘digits’ of the clock. This is a chromatic clock, with the digits 0 through 9 assigned a different color, based on the resistor color code scheme with exceptions for black and brown. Once you’ve figured out how to tell time with this clock, you should have no problem finding that single 56k resistor in your junk box.

You can check out the video of the clock below.

Continue reading “Chromatic Clocks With A Steampunk Twist”