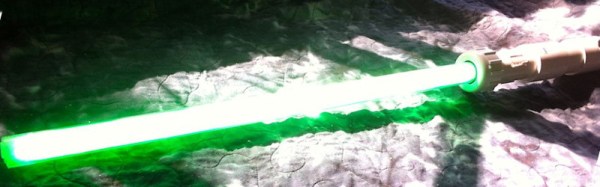
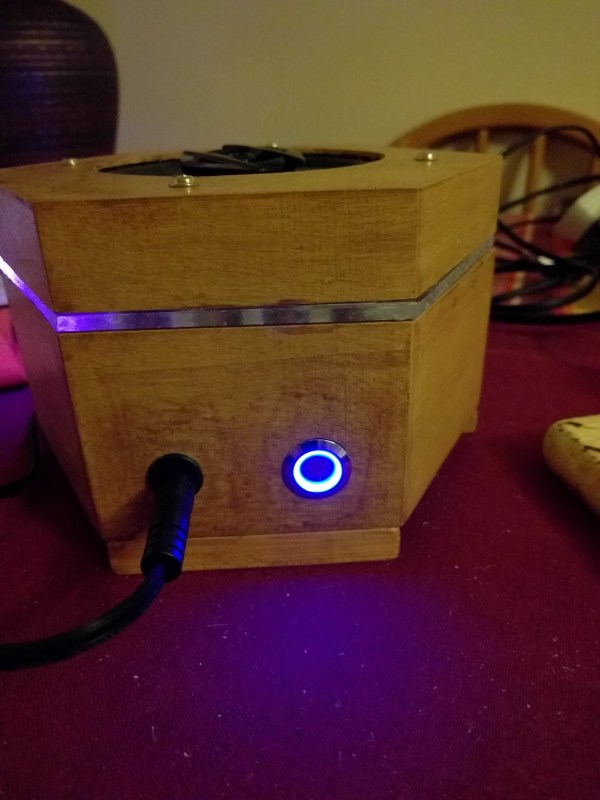
7 Segment Display Using Neopixel Rings

There’s something about clocks — sooner or later, every hacker wants to build one. And we end up seeing all kinds of display techniques being used to show time. For the simplest of builds, 7-segment display modules usually get dug up from the parts bin. If you have a bunch of “smart” LED’s (WS2812’s, APA102’s), then building your own custom 7-segment modules isn’t too difficult either. [rhoalt] had neither, but he did have several 8 LED Neopixel rings lying around. So he thought of experimenting with those, and built a ‘Binoctular’ LED clock which uses the Neopixel rings as 7 segment displays.

figure-eight-segment-displays
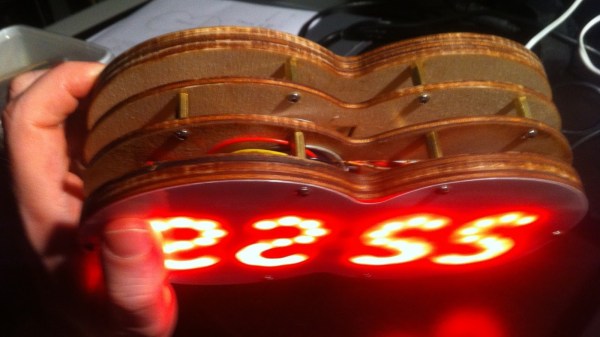
Each digit is made using one pair of Neopixel rings, stacked to form a figure of eight. All the digits are composed of arcs, so readability isn’t the best but it’s not hard either. [rhoalt] does mention that the display is easier to read via blurred camera images rather than visually, which isn’t surprising. We’re long used to seeing numbers composed of straight line segments, so arc segmented digits do look weird. But we wouldn’t have known this if [rhoalt] hadn’t shown us, right ? Maybe a thicker diffuser with separator baffles may improve the readability.

The rest of the build is pretty plain vanilla — an Arduino Nano clone, a DS3231 RTC, a Lithium battery, and some buttons, all housed together in a laser cut enclosure which follows the figure of eight design brief. And as usual, once you’ve built one, it’s time to improve and make a better version.

Building The Brightest Light Sabre In The World

If you are looking for a Star Wars light sabre, sometimes your choices can be a little disappointing. “Replica” sabres from toy and novelty vendors may superficially look the part, but with their tinny speakers and lacklustre show of LEDs they often have less of the Force about them and more of the Farce.

[Jeremy Lee] offers a solution; he’s built what he claims to be the brightest light sabre in the world. That’s a bold assertion, and one which we think might even throw down a gauntlet to other sabre builders and spark an arms race among Jedi wannabes.

The super-bright sabre uses a 144 LED double-sided strip of Neopixels in a polycarbonate tube, with a DC to DC converter powered by a 1000mAH LiPo battery. Sound effects come from a SparkFun Pro Micro powering a 2W speaker through a small audio amplifier. The handle meanwhile is constructed from PVC pipe fittings.

His first attempt at the sabre had the LEDs at full power, and promptly melted his tube. Thus the final version runs at 40% of its maximum rating, with a “burst” mode for those moments at which combat demands it.

His write-up is a series of posts, with plenty of video at all points. It might seem odd to show you the shortest of them here at only a few seconds long, but since the unique selling point is its brightness we think the best way to show that is at night.

Continue reading “Building The Brightest Light Sabre In The World”

Who Could Resist A Color Coded Clock?

[Luc] wanted to make a clock like no other. He knows that the territory is well-trod, especially in the area of minimalist design. Undeterred, [Luc] came up with a fresh design that uses the resistor color code to display the time. He’s calling it the Nerd’s Ultimate Watch.

It doesn’t get much more minimalist than four RGB LEDs. Each one illuminates in the color that represents the digit in the current time. For instance, I’m typing this sentence at 1:37PM. The clock uses 24-hour time, so let’s call it 13:37. Using resistor color code time, that’s 1, 3, 3, 7, or brown, orange, orange, violet.
Continue reading “Who Could Resist A Color Coded Clock?”

Realize The Truth… There Is No Word Clock

Do you always look at it encoded? – Well you have to. The image translators work for the construct program.

Word clocks are supposed to de-encode time into a more readable format. Luckily [Xose Pérez] managed to recover the encoded time signal of the simulation we are all living in with his word clock that displays time using a stylish Matrix code animation.

[Xose] already built his own versions of [Philippe Chrétien’s] Fibonacci Clock and [Jeremy Williams’s] Game Frame, and while doing so he designed a nice little PCB. It’s powered by an ATmega328p, features an RTC with backup battery, an SD-card socket, and it’s ready to drive a bunch of WS2812Bs aka NeoPixels. Since he still had a few spare copies of his design in stock, his new word clock is also driven by this board.

Continue reading “Realize The Truth… There Is No Word Clock”

Wake Up With A NeoPixel Sunrise Alarm Clock

Like many of us, [Lee] wakes up every morning grumpy and tired. Once he decided to try to do something about it, he settled on making a sunrise alarm clock using NeoPixels. Over the course of thirty minutes the clock illuminates 60 NeoPixels one by one in blue mode to simulate a sunrise.

The clock has three modes: 30-minute sunrise, analog time display, and a seconds counter that uses the full RGB range of the LEDs to light up one for each passing second. It runs on an Arduino Pro Mini knockoff and an RTC module for the sake of simplicity. [Lee] chained NeoPixel strips together in five rows of eight, which allowed him to use a 3×5 font to display the time. The only other electronics are passives to protect the LEDs.

NeoPixels are great, but powering them becomes an issue pretty quickly. [Lee] did the math and figured that he would need 3.4 A to drive everything. He found a 3-outlet USB power adapter that delivers 3.4 A total while shopping at IKEA for an enclosure. [Lee] took his first Instructable from beginner to intermediate level by cracking the adapter open and using two of the USB ports wired in parallel to provide 5 V at 3.4 A. [Lee] has the code available along with detailed instructions for replicating this build. Be sure to check out the demo after the break.

We love a good clock build around here, especially when they involve Blinkenlights. For those less interested in building an alarm clock, here’s a word clock that pulls time and weather data with an ESP8266.

Continue reading “Wake Up With A NeoPixel Sunrise Alarm Clock”

Warm Up Your Small Talk With A Thermometer Scarf

Just how cold is it out there? This giant thermometer scarf is a fantastic entry-level wearables project. It’s sure to strike up conversations that move past the topic of weather.

The scarf is built around a FLORA, a Neopixel ring that represents the bulb, and a short length of Neopixels to show the temperature in Fahrenheit and Celsius. Temperature sensing is done with a poorly documented DHT11 that gave [caitlinsdad] the fits until he found Adafruit’s library for them.To make the scarf, [caitlinsdad] used a nice cozy micro-fleece. He built a pocket for the electronics and padded it with polyester fiber fill to diffuse the LEDs. This makes the lights blur and run together, resembling a mercury thermometer.

Once it was up and running, [caitlinsdad] figured out the temperature scale based on the DHT11 readings and marked it out on the scarf with a permanent marker. [caitlinsdad] has a few mods in mind for this project. For instance, it would be easy to add haptic feedback to keep you from being exposed for too long. Another wearable in the same spirit is this hat that has a sunblock reminder system.

Continue reading “Warm Up Your Small Talk With A Thermometer Scarf”

TweetHeart Shows You Some Love

[Stacey] wanted a more interesting way to monitor events related to her Twitter account. What she ended up with is a beautiful animated heart light.

TweetboxShe started out by designing the enclosure. Having access to a laser cutter, she opted to make it out of thin plywood. [Stacey] used an online tool called BoxMaker to design the actual box. The tool is very simple to use. You simply plug in the dimensions of the box and it will provide you with a two dimensional template you can use with your laser cutter. The resulting plywood pieces fit together like a puzzle. The heart piece is made from frosted acrylic and was also cut by the laser.

To light up the heart, [Stacey] opted to use NeoPixels. These are like many of the RGB LED strips we’ve seen in the past, though the pixel density is higher than most. She cut up the LED strip into the appropriate sizes and glued them to a piece of plywood in a rough heart shape. She tested the lights during each step so she would know exactly when any errors were made.

[Stacey] opted to use a SparkCore to control the LEDs. This had the advantage of including WiFi connectivity out of the box.  [Stacey] started with NeoPixel example programs, but quickly realized they all relied on the Delay function. This was a problem for her, because she needed to constantly watch for new Twitter events. She ended up having to write her own functions that relied on interrupts instead.

[Stacey] then wrote a Node.js script to monitor twitter and control the Spark. The script watches for specific events, such as one of [Stacey’s] tweets being re-tweeted, or a user unfollowing [Stacey]. The script then sends a message to the Spark to tell it which event just occurred. The Spark will then repeat the event until a new one occurs. Check out the demonstration video below. Continue reading “TweetHeart Shows You Some Love”