Hackaday Prize Entry: Autorouters Are For The Weak

[Yann]’s DYPLED entry into this year’s Hackaday Prize isn’t very useful to most people. It’s a tiny module that connects to a 16-bit parallel bus, and displays a hexadecimal number on a few LEDs. It’s useful if you’re diagnosing a problem on a computer from 1982, but just barely. The real wonder here is how [Yann] is doing this cheaply and easily using some weird techniques and strange parts.

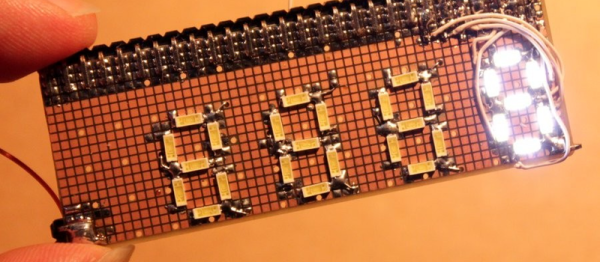
The display for this tiny device is an array of 36 LEDs, arranged into a set of five seven-segment displays. Homebrew seven-segment displays are cool, but how is he driving it? Not with a microcontroller, that’s for sure. Instead, [Yann] is using an old trick of using parallel memory to store the patterns of the seven-segment displays. This parallel memory comes in the form of a two megabit Flash chip, with the data inputs tied to the 16-bit input on the board and the data outputs connected directly to the LEDs. It’s a brute force approach, but it works.

There are a few additional features for this tiny board, including a switch to display a 16-bit bus in hexadecimal or decimal, signed or unsigned, and a pot to change how bright the LEDs are. The most amazing part is how [Yann] managed to fit all of this on a very, very small PCB. Most of that trick is due to using a thin, small TSSOP package for the Flash memory, but fitting this circuit onto a two layer board is amazing work, and a great entry for the Hackaday Prize.

Wake Up With A NeoPixel Sunrise Alarm Clock

Like many of us, [Lee] wakes up every morning grumpy and tired. Once he decided to try to do something about it, he settled on making a sunrise alarm clock using NeoPixels. Over the course of thirty minutes the clock illuminates 60 NeoPixels one by one in blue mode to simulate a sunrise.

The clock has three modes: 30-minute sunrise, analog time display, and a seconds counter that uses the full RGB range of the LEDs to light up one for each passing second. It runs on an Arduino Pro Mini knockoff and an RTC module for the sake of simplicity. [Lee] chained NeoPixel strips together in five rows of eight, which allowed him to use a 3×5 font to display the time. The only other electronics are passives to protect the LEDs.

NeoPixels are great, but powering them becomes an issue pretty quickly. [Lee] did the math and figured that he would need 3.4 A to drive everything. He found a 3-outlet USB power adapter that delivers 3.4 A total while shopping at IKEA for an enclosure. [Lee] took his first Instructable from beginner to intermediate level by cracking the adapter open and using two of the USB ports wired in parallel to provide 5 V at 3.4 A. [Lee] has the code available along with detailed instructions for replicating this build. Be sure to check out the demo after the break.

We love a good clock build around here, especially when they involve Blinkenlights. For those less interested in building an alarm clock, here’s a word clock that pulls time and weather data with an ESP8266.

Continue reading “Wake Up With A NeoPixel Sunrise Alarm Clock”

Stick Balances Itself With Reaction Wheels

The inverted pendulum is a pretty classic dynamics problem and reaction wheels are cool. That’s why we like [Mike Rouleau]’s self-balancing stick.

The video, viewable after the break, was fairly sparse on details, but he furnished some in the comments. The little black box on the top is a GY-521 Gyroscope module. It sends its data to an Arduino attached to the black cord which trails off the screen. The Arduino does its mathemagic and then uses a motor controller to drive the reaction wheels at the correct speeds.
Continue reading “Stick Balances Itself With Reaction Wheels”

Pimoroni Wash Their Hands Of Arduino

One of the big stories of last year was the fracture of the official Arduino supply into two competing organisations at daggers drawn, each headed by a different faction with its origins in the team that gave us the popular single board computers. Since then we’ve had Arduinos from Arduino LLC (the [Massimo] Arduino.cc, arguably the ‘original’, and Arduino trademark holder in the United States) and Arduino SRL (the [Musto] Arduino.org, and owner of the Arduino trademark everywhere except the US) , two websites, two forks of the IDE, and “real” Arduino boards available under a couple of names depending on where in the world you live due to a flurry of legal manoeuvres. Yes. it’s confusing.

Today came news of a supplier throwing its hands up in despair  at the demands imposed on them as part of this debacle. Pimoroni, famous as supplier of Raspberry Pi goodies, has put up a blog post explaining why they will henceforth no longer be selling Arduinos. They took the side of Arduino LLC, and the blog post details their extensive trials and delays in making contact with the company before eventually being told they would have to agree to purchase substantial stocks both Arduino and Genuino branded versions of identical products and agree to sell them through separate supply channels for both Europe and the rest of the world before they could proceed. This is not a practical proposition for a small company, and the Pimoroni people deliver a very pithy explanation of exactly why towards the bottom of their post.

We’ve covered the Arduino versus Arduino debacle extensively in the past, this is simply the latest in a long line of stories. Pimoroni have hit the nail on the head when they make the point that the customers and suppliers really don’t care about spats between the various inheritors of the Arduino legacy, they just want an Arduino. And with so many other Arduino-compatible boards available they don’t have to look very hard to find one if the right shade of blue solder-resist or the shape of the map of Italy on the back isn’t a special concern. Can we be the only ones wishing something like this might knock a bit of sense into the various parties?

EMF Camp 2016, A Personal Review

If I can offer one piece of advice to the Hackaday readership, it is this: Never, ever, be the sole member of your hackerspace’s board that owns a large station wagon, unless you relish the thought of packing an entire hacker camp village into your vehicle and transporting it halfway across the country in the blazing August heat.

I’ve done my laundry, aired my tent, and just sorted the contents of a brace of Tesco bags into several categories: rubbish, food, camping gear and interesting stuff. As I write this, yesterday was teardown day for Electromagnetic Field 2016, an event that bills itself as “a non-profit UK camping festival for those with an inquisitive mind or an interest in making things: hackers, artists, geeks, crafters, scientists, and engineers”, and this is a personal account of the event from the point of view of both being part of the Oxford Hackspace village and of waving the flag for Hackaday and Tindie.

Continue reading “EMF Camp 2016, A Personal Review”

Electroloom Throws In The Towel

The once successful Kickstarter and National Science Foundation (NSF) research grant winner Electroloom is saying “Thanks and Farewell” to its backers, supporters, and sponsors. The startup ran out of funding while developing printer-like machine that uses electrospinning to automatedly produce ready-to-use garments.

Electroloom has been an ambitious project to explore if electrospinning could be made viable for garment manufacturing. The process that uses a high voltage to transform a resinous liquid into non-woven fabric was originally invented for textile fabrication, although its low throughput has always been a limiting factor. The method was mostly used in laboratory and medical applications. In 2014, Electroloom began developing a process that would bring the technology back to its fibrous roots, building an amazing prototype machine that could print an entire shirt in one piece. Electroloom’s Kickstarter campaign was funded in 2015, and earlier this year, an NSF research grant was awarded to the startup.

Continue reading “Electroloom Throws In The Towel”

Tearing Into Delta Sigma ADCs Part 2

In part one, I compared the different Analog to Digital Converters (ADC) and the roles and properties of Delta Sigma ADC’s. I covered a lot of the theory behind these devices, so in this installment, I set out to find a design or two that would help me demonstrate the important points like oversampling, noise shaping and the relationship between the signal-to-noise ratio and resolution.

Modulator Implementation

modulatorCheck out part one to see the block diagrams of what what got us to here. The schematics shown below are of a couple of implementations that I played with depicting a single-order and a dual-order Delta Sigma modulators.

schematicBasically I used a clock enabled, high speed comparator, with two polarities in case I got it the logic backwards in my current state of burn out to grey matter ratio. The video includes the actual schematic used.

Since I wasn’t designing for production I accepted the need for three voltages since my bench supply was capable of providing them and this widget is destined for the drawer with the other widgets made for just a few minutes of video time anyway. Continue reading “Tearing Into Delta Sigma ADCs Part 2”