Linux On Your NES Classic Edition

Nintendo look as though they may have something of a hit on their hands with their latest console offering. It’s not the next in the line of high-end consoles with immersive VR or silicon that wouldn’t have looked out of place in last year’s supercomputer, instead it’s an homage to one of their past greats. The NES Classic Edition is a reboot of the 1980s console with the familiar styling albeit a bit smaller, and 30 of the best NES games included.

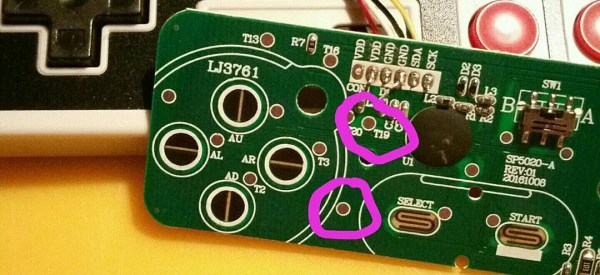
You do not, however, get an original NES with a 6502 derived processor, and a stack of game cartridges. In the Classic Edition is a modern emulator, running on very modern hardware. We’re told it contains an Allwinner R16 quad-core Cortex A7 SoC, 256Mb of RAM, and 512Mb of Flash. That’s a capable system, and unsurprisingly any hacking potential it may have has attracted some interest. Reddit user [freenesclassic] for example has been investigating its potential as a Linux machine, and has put up a post showing the progress so far. It is known that there is already some form of Linux underpinning the console because Nintendo have released a set of sources as part of their compliance with the terms of the relevant open-source licences. That and the availability of a serial port via pads on the PCB gives hope that a more open distro can be installed on it.

We’re taken through the process of starting the machine up with the serial port connected to a PC, and getting it into the Allwinner FEL mode for low-level flashing work. Then we’re shown the process of loading a custom U-Boot, from which in theory a kernel of your choice can be loaded.

Of course, it’s not quite that simple. There is still some way to go before the device’s Flash can be accessed so for now, all that is possible is to use the RAM, and the current state of play has a kernel panic as it is unable to mount a filesystem. However this is a new piece of hardware in its first few days after launch, so this is very much a work in progress. We are sure that this device will in time be opened up as a fully hackable piece of hardware, and we look forward to covering the interesting things people do with it when that has happened.

If you are interested in the NES Classic, take a look at it on Nintendo’s web site. Meanwhile, here at Hackaday as a quick look at our past stories tagged “nes” shows, we’ve covered a huge number of projects involving the platform in the past.

Thanks [Doc Oct] for the tip.

Original NES console header image: Evan-Amos [Public domain], via Wikimedia Commons.

Pi Cart: 2,400 Games In One

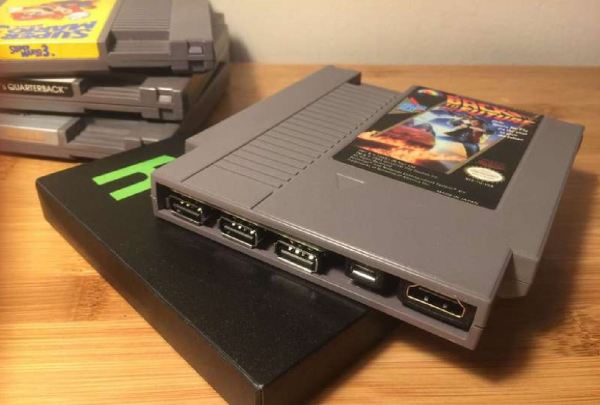
What’s the quickest way to turn one game into 2,400? Cram a Raspberry Pi Zero running RetroPie into an NES cartridge and call it Pi Cart.

This elegant little build requires no soldering — provided you have good cable management skills and the right parts. To this end, [Zach] remarks that finding a USB adapter — the other main component — small enough to fit inside the cartridge required tedious trial and error, so he’s helpfully linked one he assures will work. One could skip this step, but the potential for couch co-op is probably worth the effort.

Another sticking point might be Nintendo’s use of security screws; if you have the appropriate bit or screwdriver, awesome, otherwise you might have to improvise. Cutting back some of the plastic to widen the cartridge opening creates enough room to hot glue in the USB hub, a micro USB port for power, and an HDMI port in the resulting gap. If you opted to shorten the cables, fitting it all inside should be simple, but you may have to play a bit of Tetris with the layout to ensure everything fits.

Continue reading “Pi Cart: 2,400 Games In One”

One Home Made NES To Rule Them All

The Nintendo Entertainment System, or Famicom depending on where in the world you live, is a console that occupies a special place in the hearts of people of a certain age. If you lived in a country that Nintendo didn’t ship its consoles to in the late ’80s and early ’90s though, you might think that it would be an experience that would have passed you by. Eastern Europeans for instance didn’t officially meet Mario for years.

A Pegasus NES clone. Ktoso the Ryba [Public domain], via Wikimedia Commons.
Fortunately for them there was an industry of Chinese and Taiwanese clone makers whose products were readily available in those markets. For the countries without official Nintendo products it is these consoles and their brand names that have achieved cult gaming status rather than the real thing.

In Poland, [phanick] wanted to recreate his youth by building his own clone console (Polish Language, English translation via Google Translate). His chosen target was the Pegasus, the Taiwanese NES clone that was the must-have console for early ’90s Poles.

But he wasn’t just satisfied with building a Pegasus clone. Along the way the project expanded to include support for 72-pin NES cartridges as well as the 60-pin Pegasus ones, and the ability to play both PAL and NTSC games. For this dual-system support he had to include both sets of processor and graphics chip variants, along with logic to switch between them. He goes into some detail on the tribulations of achieving this switch.

The result is a very impressive and well-executed piece of work. The PAL games have a letterbox effect with black bars at top and bottom of the screen, while the NTSC games have slightly washed-out colours. But if you were a gamer of the day you’ll see these as simply part of the genuine experience.

He’s posted a descriptive video which we’ve embedded below the break, but with non-English commentary. It is however still worth watching even without understanding the audio, for its view of the completed board and gameplay.

Continue reading “One Home Made NES To Rule Them All”

Porting NES To The ESP32

There’s an elephant in the room when it comes to the Raspberry Pi Zero. The Pi Zero is an immensely popular single board computer, but out of stock issues for the first year may be due to one simple fact: you can run a Nintendo emulator on it. Instead of cool projects like clusters, CNC controllers, and Linux-based throwies, all the potential for the Pi Zero was initially wasted on rescuing the princess.

Espressif has a new chip coming out, the ESP32, and it’s a miraculous Internet of Things thing. It’s cheap, exceptionally powerful, and although we expect the stock issues to be fixed faster than the Pi Zero, there’s still a danger: if the ESP32 can emulate an NES, it may be too popular. This was the hypothetical supply issue I posited in this week’s Hackaday Links post just twenty-four hours ago.

Hackaday fellow, Hackaday Supercon speaker, Espressif employee, and generally awesome dude [Sprite_tm] just ported an NES emulator to the ESP32. It seems Espressif really knows how to sell chips: just give one of your engineers a YouTube channel.

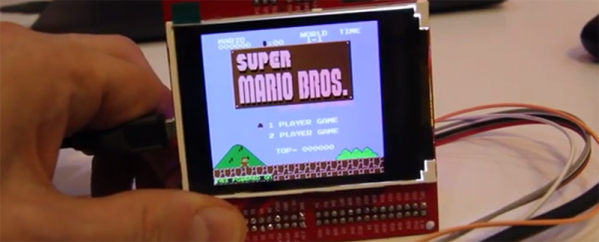
This build began when [Sprite] walked into his office yesterday and found a new board waiting for him to test. This board features the ESP-WROOM-32 module and breaks out a few of the pins to a microSD card, an FT2232 USB/UART module, JTAG support, a bunch of GPIOs, and a 320×240 LCD on the back. [Sprite]’s job for the day was to test this board, but he reads Hackaday with a cup of coffee every morning (like any civilized hacker) and took the links post as a challenge. The result is porting an NES emulator to the ESP32.

The ESP-32-NESEMU is built on the Nofrendo emulator, and when it comes to emulation, the ESP32 is more than capable of keeping the frame rate up. According to [Sprite], the display is the bottleneck; the SPI-powered display doesn’t quite update fast enough. [Sprite] didn’t have enough time to work on the sound, either, but the source for the project is available, even if this dev board isn’t.

Right now, you can order an ESP32; mine are stuck on a container ship a few miles from the port of Long Beach. Supply is still an issue, and now [Sprite] has ensured the ESP32 will be the most popular embedded development platform in recent memory. All of this happened in the space of 24 hours. This is awesome.

Continue reading “Porting NES To The ESP32”

NES Zapper: Improved With Lasers

The Zapper gun from the original Nintendo was ahead of its time. That time, though, was around 30 years ago and the iconic controller won’t even work with most modern televisions. With a little tinkering they can be made to work, but if you want to go in a different direction they can be made to do all kinds of other things, too. For example, this one can shoot green lasers and be used as a mouse.

The laser pointer was installed in the gun using a set of 3D printed rings to make sure the alignment was correct. It’s powered with a Sparkfun battery pack and control board which all fit into the gun’s case. The laser isn’t where the gun really shines, though. There’s a Wiimote shoved in there too that allows the gun to be used as a mouse pointer when using it with a projector. Be sure to check out the video below to see it in action. Nothing like mixing a little bit of modern Nintendo with a classic!

The Wiimote is a great platform for interacting with a computer. Since the Wii was released it’s been relatively easy to interface with them via Bluetooth. One of the classic Wiimote hacks is using an IR pen and projector to create a Smart Board of sorts for a fraction of the price. They’ve also been used with some pretty interesting VR displays.

Continue reading “NES Zapper: Improved With Lasers”

Tricking Duck Hunt To See A Modern LCD TV As CRT

A must-have peripheral for games consoles of the 1980s and 1990s was the light gun. A lens and photo cell mounted in a gun-like plastic case, the console could calculate where on the screen it was pointing when its trigger was pressed by flashing the screen white and sensing the timing at which the on-screen flying spot triggered the photo cell.

Unfortunately light gun games hail from the era of CRT TVs, they do not work with modern LCDs as my colleague [Will Sweatman] eloquently illustrated late last year. Whereas a CRT displayed the dot on its screen in perfect synchronization with the console output, an LCD captures a whole frame, processes it and displays it in one go. All timing is lost, and the console can no longer sense position.

[Charlie] has attacked this problem with some more recent technology and a bit of lateral thinking, and has successfully brought light gun games back to life. He senses where the gun is pointing using a Wiimote with its sensor bar on top of the TV through a Raspberry Pi, and feeds the positional information to an Arduino. He then takes the video signal from the console and strips out its sync pulses which also go to the Arduino. Knowing both position and timing, the Arduino can then flash a white LED stuck to the end of the light gun barrel at the exact moment that part of the CRT would have been lit up, and as far as the game is concerned it has received the input it is expecting.

He explains the timing problem and his solution in the video below the break. He then shows us gameplay on a wide variety of consoles from the era using the device. More information and his code can be found on his GitHub repository.

Continue reading “Tricking Duck Hunt To See A Modern LCD TV As CRT”

HoloLens NES Emulator For Augmented Retro Gaming

[Andrew Peterson] was looking for a way to indulge in his retro gaming passions in a more contemporary manner. His 3D NES emulator “N3S” for Windows brings Nintendo classics to the HoloLens, turning pixels into voxels, and Super Mario into an augmented reality gingerbread man.

To run NES games on the HoloLens, [Andrew’s] emulator uses the Nestopia libretro core. Since AR glasses cry for an augmentation of the game itself, the N3S re-emulates the NES’ picture processing unit (PPU), allowing it to interpret a Nintendo game’s graphics in a 3D space. [Andrew] also put together a comprehensive explanation of how the original Nintendo PPU works, and how he re-implemented it for the HoloLens.

The current version of the N3S PPU emulator automatically generates voxels by simply extruding the original pattern data from the game’s ROM, but [Andrew] is thinking about more features. Users could sculpt their own 3D versions of the original graphic elements in an inbuilt editor, and model sets could then be made available in an online database. From there, players would just download 3D mods for their favorite games and play them on the HoloLens.

According to [Andrew], the emulator reaches the limits of what the current pre-production version of the HoloLens can render fluently, so the future of this project may depend on future hardware generations. Nevertheless, the HoloLens screen capture [Andrew] recorded makes us crave for more augmented retro gaming. Enjoy the video!