The King Of All Game Genies In An Arduino

While Nintendo is making a killing on nostalgic old consoles, there is a small but dedicated group of hackers still working with the original equipment. Since the original NES was rolled out in the 80s, though, there are a few shortcomings with the technology. Now, though, we have Arduinos, cheap memory, and interesting toolchains. What can we do with this? Absolutely anything we want, like playing modern video games on this antiquated system. [uXe] added dual-port memory to his ancient NES console, opening up the door to using the NES as a sort of video terminal for an Arduino. Of course, this is now also the King of All Game Genies and an interesting weekend project to boot.

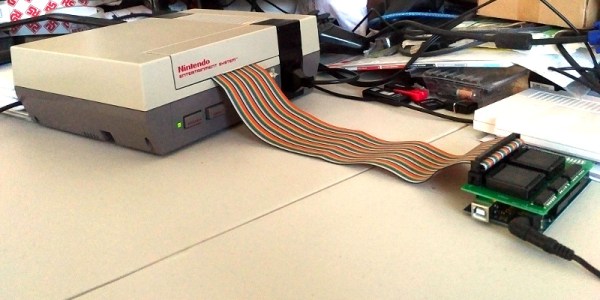
Most NES cartridges have two bits of memory, the PRG and CHR ROMs. [uXe] is breaking out the cartridge connector onto an exceptionally wide rainbow ribbon cable, and bringing it into a custom Arduino Mega shield loaded up with two 16K dual-port RAM chips. These RAM chips effectively replace the PRG and CHR ROMs Since these are dual-port RAM chips, they can be written to by the Arduino and read by the NES simultaneously.

The NES sees one port of the RAM and can read and write from it while the Arduino still has access to make changes to the other post while that’s happening. A trick like this opens up a whole world of possibilities, most obviously with tiling and other graphics tricks that can push beyond the console’s original capabilities. [uXe] is currently playing Arduboy games on the NES — a really neat trick to pull off. Well done [uXe]!

Be sure to check out the video below of the NES running some games from the Arduboy system. It seems to integrate seamlessly into the hardware, so if you’ve always had a burning desire to fix crappy graphics on some of your favorite games, or run some special piece of software on an NES, now might just be your time to shine.

Continue reading “The King Of All Game Genies In An Arduino”

An Old Video Game Controller On Even Older Computer

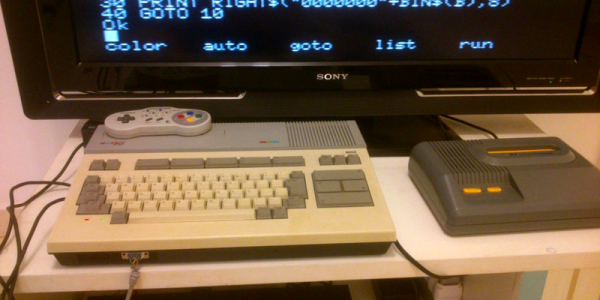
For those of us not old enough to remember, and also probably living in the States, there was a relatively obscure computer built by Microsoft in the early 80s that had the strong Commodore/Atari vibe of computers that were produced before PCs took over. It was known as the MSX and only saw limited release in the US, although was popular in Japan and elsewhere. If you happen to have one of these and you’d like to play some video games on it, though, there’s now a driver (of sorts) for SNES controllers.

While the usefulness of this hack for others may not help too many people, the simplicity of the project is elegant for such “ancient” technology. The project takes advantage of some quirks in BASIC for reading a touch-pad digitizer connected to the joystick port using the SPI protocol. This is similar enough to the protocol used by NES/SNES controllers that it’s about as plug-and-play as 80s and 90s hardware can get. From there, the old game pad can be used for anything that the MSX joystick could be used for.

We’ve seen a handful of projects involving the MSX, so while it’s not as popular as Apple or Commodore, it’s not entirely forgotten, either. In fact, this isn’t even the first time someone has retrofitted a newer gaming controller to an MSX: the Wii Nunchuck already works for these machines.

Hackaday Prize Entry: Gaming Done Tiny With Keymu

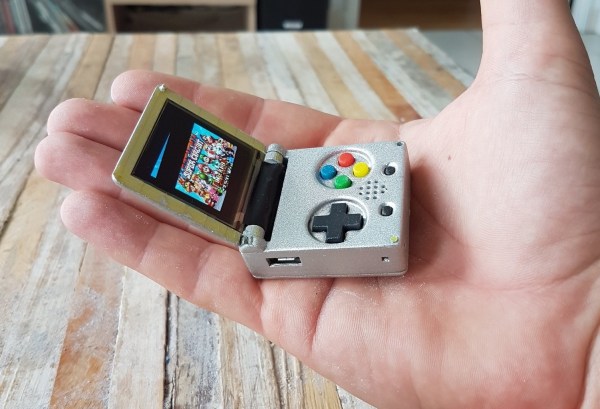
The world’s tiniest Game Boy Color, introduced at the 2016 Hackaday SuperConference, is a work of art. This microscopic game console inspired [c.invent] to create how own gaming handheld. His Keymu project on hackaday.io describes an open source, keychain-sized gaming handheld that its builder claims is really the world’s tiniest. How did he make it smaller? It’s a miniature Game Boy Advance SP, and it folds up in a handy clamshell case.

While he’s a Pi fan, [c.invent] felt the Pi Zero was too big and clunky for what he had in mind–a keychain-sized handheld. Only the Intel Edison was compact enough. He began with a custom PCB with a connector for the Edison’s fragile ribbon cable, then added an 1.5″ OLED display and an 11.7mm speaker, all powered by a 220 mAh lithium battery. [c.invent] also created inside a custom folding 3D-printed case that protects the Keymu’s electronics from keys and pocket lint.

Unlike the mini Game Boy Color, [c.invent] aims to create a fully fledged emulation console. The Edison incorporates a Linux distribution that allowing it to install emulators for GameBoy Color, GBA, NES, and SNES.

Radio Decoding Swiss Army Knife In A NES Controller

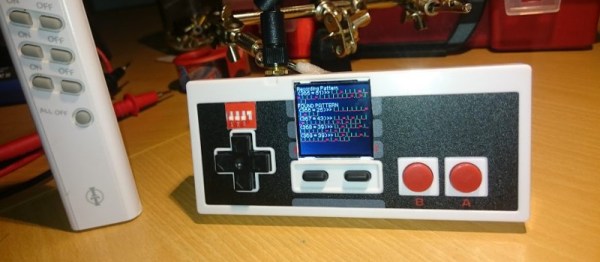
If you wanted to name a few things that hackers love, you couldn’t go wrong by listing off vintage console controllers, the ESP system-on-chip platform, and pocket tools for signal capture and analysis. Combine all of these, and you get the ESP32Thang.

At its heart, the ESP32Thang is based around a simple concept – take an ESP32, wire up a bunch of interesting sensors and modules, add an LCD, and cram it all in a NES controller which helpfully provides some buttons for input. [Mighty Breadboard] shows off the device’s basic functionality by using an RFM69HW module to allow the recording and replay of simple OOK signals on the 433 MHz band. This is a band typically used by all sorts of unlicenced radio gear – think home IoT devices, wireless doorbells and the like. If you want to debug these systems when you’re out and about, this is the tool for you.

This is a fairly straightforward build at the lower end of complexity, but it gets the job done with style. The next natural step up is a Raspberry Pi with a full software defined radio attached, built into a Nintendo DS. If you build one, be sure to let us know. This project might serve as some inspiration.

With the wide availability of SPI and I2C modules these days, combined with the ease of programming provided by the Arduino environment, this is a project that just about any hacker could tackle after passing the blinking LED stage. The fact that integrating such hardware is so simple these days is truly a testament to the fact that we are standing on the shoulders of giants.

Nintoaster: The Next Generation

The original Nintendo Entertainment System is affectionately called “the toaster” due to the way the cartridge is inserted. [MrBananaHump] decided to take things a bit literally and installed a NES inside an actual toaster. This isn’t [MrBananaHump’s] design, the Nintoaster comes to us from [vomitsaw], who also built the SuperNintoaster. Since [vomitsaw] was kind enough to document his original build, [MrBananaHump] was able to build upon it.

The target toaster for this build was a plastic Sunbeam model found at a thrift store for $5. [MrBananaHump] gutted the toaster and cleaned out years of toast crumbs. The Nintendo mainboard would fit perfectly inside a toaster, except for two things – the RF Modulator and the expansion port. The expansion port was never used in the US version of the NES so it can be desoldered and removed. The RF also needs to be desoldered and relocated.

By far the biggest job in this casemod is hand-wiring each of the 72 pins for the cartridge port. It’s a tedious job, and it probably won’t look pretty. Keep your wires short, and things will probably work thanks to the relatively low clock speed of the NES.

The cartridge goes in one toast slot. [MrBananaHump] mounted his controller ports, power and reset buttons in the second slot. A bit of expanded metal grid completes the slot. Sure, it’s not exactly pretty inside, but with the case on, this becomes a rather nice looking build.

We’ve seen numerous Nintendo casemods over the years, just one other example is this N64 in an N64 controller.

A DIY NES Advantage Controller For The NES Classic

If you were a child of the ’80s, there is a good chance that you had a Nintendo console in your youth, the classic 8-bit NES. And if you were one of those NES owners, it’s therefore probably that the peripheral you lusted after was Nintendo’s arcade-inspired Advantage controller. This replaced the game pad with a full-size arcade joystick and buttons, and has become an expensive and sought-after accessory in the years since.

[Bbtinkerer] has a NES Classic, and having gone through more than one joystick that just wasn’t up to the pressures of intensive gaming, decided to have a go at building one himself. The Advantage was the obvious model to copy, and thanks to the Wii Retropad Adapter project, he was able to do so.

Faithful to the original in its layout, the new Advantage clone features a Turbo mode for rapid fire, though rather than the buttons you’d have had in the ’80s this model features a toggle switch. The joystick mechanism used was a Sanwa JLF, and the buttons were Sanwa OBSF-30s. He’s posted a video showing the finished item being put through its paces.

Continue reading “A DIY NES Advantage Controller For The NES Classic”

Giant Solderless LEGO NES Controller Gives Everyone Tiny Hands

If you were thinking “I should spend $130 on LEGO bricks and build a giant USB NES controller just to see what that would be like,” but you were afraid of spending that much money, [BrownDogGadgets] has you covered. He built a giant NES controller out of LEGO. The controller is designed in LEGO Digital Designer, which lets you create a virtual model, then get a full list of parts which can be ordered online.

The electronics are based on a Teensy LC programmed to appear as a USB keyboard, and the buttons are standard push buttons. The insides are wired together with nylon conductive tape. LEGO was an appropriate choice because the Teensy and switches are built on top of LEGO compatible PCBs, so components are just snapped in place. The system is called Crazy Circuits and is a pretty neat way to turn electronics into a universal and reusable system.

If that controller is too big, they’ve also used the same circuit with some laser cut parts for your own controller. If you do want to go even bigger, take a look at [Baron von Brunk’s] LEGO NES controller, which used the electronics from a real controller.

Continue reading “Giant Solderless LEGO NES Controller Gives Everyone Tiny Hands”