Pokemon Blue Becomes An IDE

With WiFi, Wonder Trade, and new Pokemon that are freakin’ keys, you’d think the latest generation of everyone’s reason to own a Nintendo portable is where all the action is, right? Apparently not, because Pokemon Blue just became a development tool for the Game Boy.

Despite all notions of sanity, this isn’t the first time we’ve seen someone program a Game Boy from inside a first generation Pokemon game. Around this time last year, [bortreb] posted a tool assisted run that deposited and threw away in-game items to write to the Game Boy’s RAM. Using this method, [bortreb] was able to craft a chiptune version of the My Little Pony theme inside Pokemon Yellow.

A year later, [TheZZAZZGlitch] has gone above and beyond what [bortreb] did. Instead of a tool assisted run, [ZZAZZ]’s hack can be done manually on a real Game Boy. This trick works by using an underflow glitch to obtain item ‘8F’ in the player’s inventory. Here’s a great tutorial for doing that. With this 8F item, a few items can be tossed and a ‘programming’ mode is activated where code can be written to RAM by walking to an X Y position on the map, using the 8F item, and writing a program byte by byte.

The maximum amount of code that can be written to the Game Boy RAM is 254 bytes, just large enough for [TheZZAZZGlitch] to write a very, very simple version of Akranoid, Breakout, or one-player Pong. Not much, but very, very impressive.

Video of [ZZAZZ] ‘jailbreaking’ his copy of Pokemon Blue available below.
Continue reading “Pokemon Blue Becomes An IDE” →

Original NES Advantage Controller Stuffed With Clone NES

famiclone-inside-NES-advantage

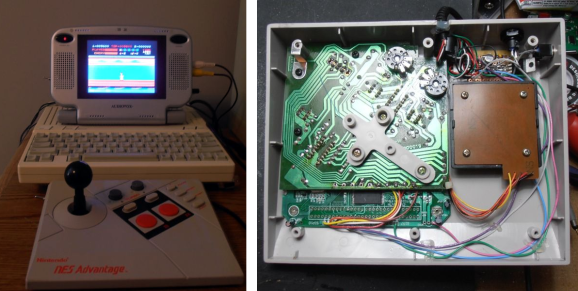
Like all good hackers [Osgeld] makes regular appearances at the thrift store to scavenge for raw materials. This summer he was lucky enough to come across a couple of NES clone games. These are controllers that emulate the original Nintendo Entertainment System by connecting to a television using composite video. The mechanics of the controllers were pretty much shot, but he knew he could do something with the boards inside. It was a small gamble at a dollar apiece anyway.

As you can see above, he upgraded a vintage NES Advantage controller by stuffing it full of the emulator hardware. To start he disassembled the arcade-like peripheral and gave everything a thorough cleaning. Since he was going to be soldering onto the PCBs anyway he upgraded the controller by swapping out the original switches for a different set of tactile switches. The large base provided plenty of room for [Osgeld] to fit the emulator (with included ROMs) and now he’s Playing with Power.

The NES Advantage is a very nostalgic controller. Even the Ghostbusters hacked on it!

Aluminum Unibody Nintendo 64

NES1

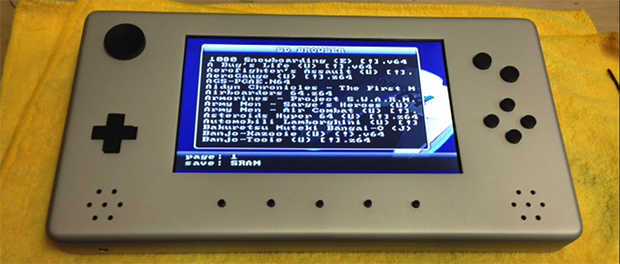
[Travis] wanted us to take a look at his N64 portable to see if it could be featured on Hackaday. By the looks of it, we’re going to say hell yeah. Everything on this portable N64, down to the buttons, is milled from aluminum. It’s an amazing build that raises the bar of what a portabalized game system can be.

Inside this anodized enclosure is the circuit board from an original N64. To cut down on the size, [Travis] milled a new heat sink for the CPU and GPU. All the games – quite possibly all the games ever released for the N64 – are stored on an SD card and accessed through an EverDrive 64. Two 5000 mAh Lipo batteries provide three hours of play time on a beautiful high-res screen.

What’s even more amazing is that [Travis] machined all the parts on an exceedingly small, manual mini-mill. Truly a portabalized console for the ages.

You can check out a gallery of pics [Travis] sent in and his demo video below.

Continue reading “Aluminum Unibody Nintendo 64” →

Functional NES Controller Coffee Table

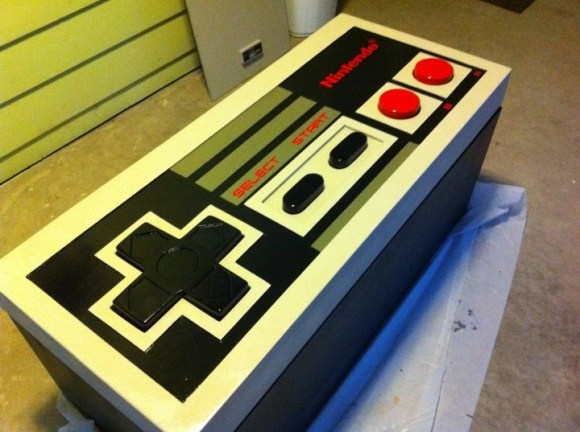
For reddit user [the_masked_cabana], button mashing has taken on a whole new meaning.  His gigantic NES controller coffee table makes it hard to punch in the Konami code without breaking a sweat.

Even before discussing the electricals, this is one impressive build.  Each component was cut from multiple layers of MDF and assembled with screws, glue, and putty.  Once they were sanded smooth, he used layers of carefully applied Krylon paint to achieve a plastic sheen that is remarkably faithful to its 5″ counterpart.  For the more precise lettering, custom cut vinyl stickers did the trick.

Of course, looking the part is only half the battle.  Tearing apart an original NES controller, he soldered wires to the button connections and ran them to eight arcade style buttons located under the replica button covers.  A collection of bolts and springs keep everything aligned and produce the right kind of tactile feedback to the user.  A removable cable in the back provides the connection to the console.

If a four foot NES controller isn’t practical enough for you, he also added some storage space in the base and a removable glass cover that converts the controller into a coffee table.  For more details on the build, check out the reddit discussion.  You can also find an eerily similar working NES controller table in this geeky coffee table roundup from five years ago.

The 14th Game For The Nintendo Power Pad

[youtube=http://www.youtube.com/watch?v=6x23TWrInpI&w=580]

Released 25 years ago, the Nintendo Power Pad, a plastic mat that plugged into an NES, saw very limited success despite its prevalence in basements and attics. In total, only six games for the Power Pad were released in North America, and only 13 worldwide. The guys over at cyborgDino thought they should celebrate the sliver anniversary of the Power Pad by creating its 14th game, using an Arduino and a bit of playing around in Unity 3D.

The first order of business was to read the button inputs on the Power Pad. Like all NES peripherals, the Power Pad stores the state of its buttons in a shift register that can be easily read out with an Arduino. With a bit of help from the UnoJoy library, it was a relatively simple matter to make the Power Pad work as intended.

The video game cyborgDino created is called Axis. It’s a bit like a cross between Pong and a tower defense game; plant your feet on the right buttons, and a shield pops up, protecting your square in the middle of the screen from bouncing balls. It’s the 14th game ever created for the Power Pad, so that’s got to count for something.

Video of the game below.

Continue reading “The 14th Game For The Nintendo Power Pad” →

FPGA Plays Mario Like A Champ

fpga-controls-mario-bros

This isn’t an FPGA emulating Mario Bros., it’s an FPGA playing the game by analyzing the video and sending controller commands. It’s a final project for an engineering course. The ECE5760 Advanced FPGA course over at Cornell University that always provides entertainment for us every time the final projects are due.

Developed by team members [Jeremy Blum], [Jason Wright], and [Sima Mitra], the video parsing is a hack. To get things working they converted the NES’s 240p video signal to VGA. This resulted in a rolling frame show in the demo video. It also messes with the aspect ratio and causes a few other headaches but the FPGA still manages to interpret the image correctly.

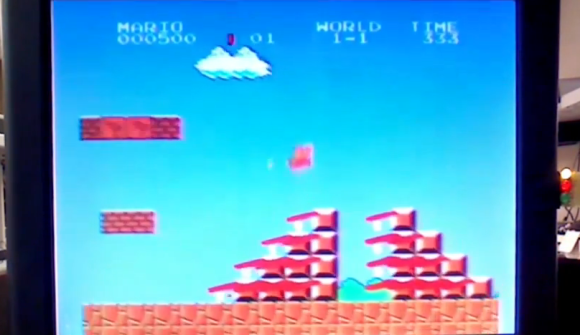
Look closely at the screen capture above and you’ll see some stuff that shouldn’t be there. The team developed a set of tests used to determine obstacles in Mario’s way. The red lines signify blocks he will have to jump over. This also works for pits that he needs to avoid, with a different set of tests to detect moving enemies. Once it knows what to do the FPGA emulates the controller signals necessary, pushing them to the vintage gaming console to see him safely to the end of the first level.

We think this is more hard-core than some other autonomous Mario playing hacks just because it patches into the original console hardware instead of using an emulator.

Continue reading “FPGA Plays Mario Like A Champ” →

Reading Game Boy Carts With I2C

rasgame

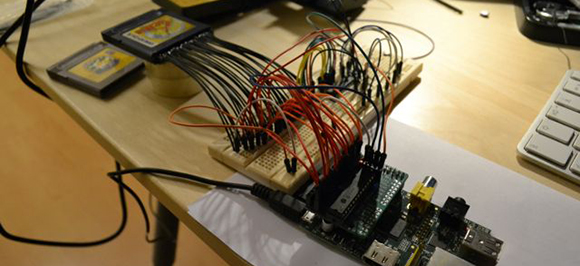
After seeing a Game Boy emulator for the first time, [Thijs] was amazed. A small box with just a handful of electronics that turns a Game Boy cartridge into a file able to be run on an emulator is simply magical. [Thijs] has learned a lot about GB and GBC cartridges in the mean time, but still thinks the only way to really learn something is to roll up your sleeves and get your hands dirty. Thus was born [Thijs]’ Game Boy cartridge dumper, powered by a pair of I2C port expanders and a Raspberry Pi.

Inspired by a build to dump ROMs off Super Nintendo games with the help of a Raspberry Pi, [Thijs] grabbed all the hardware necessary to create his own GB cart dumper. A DS Lite cartridge adapter provided the physical connection and a pair of MCP23017 I/O expanders – one soldered to a Slice of PI/O board – provided the electrical connections.

In the end, [Thijs] managed to dump the ROMs off the Japanese editions of Pokemon Yellow and Gold in about 13 minutes. This is a much slower transfer rate of 26 minutes per SNES cart in the post that gave [Thijs] the inspiration for this build. Still, [Thijs] will probably be the first to say he’s learned a lot from this build, especially after some problems with dumping the right banks from the cartridge.