Living Hinges At The Next Level

First of all, a living hinge is not a biological entity nor does it move on its own. Think of the top of a Tic Tac container where the lid and the cover are a single piece, and the thin plastic holding them together flexes to allow you to reach the candies disguised as mints. [Xiaoyu “Rayne” Zheng] at Virginia Tech designed a method of multimaterial programmable additive manufacturing which is fancy-ese for printing with more than one type of material.

The process works under the premise of printing a 3D latticework, similar to the “FILL” function of a consumer printer. Each segment of material is determined by the software and mixed on the spot by the printer and cured before moving onto the next segment. Like building a bridge one beam at a time, if that bridge were meant for tardigrades and many beams were fabricated each minute. Mixing up each segment as needed means that a different recipe results in a different rigidity, so it is possible to make a robotic leg with stiff “bones” and flexible “joints.”

We love printing in different materials, even if it is only one medium at a time. Printing in metal is useful and could be consumer level soon, but you can print in chocolate right now.

Via Phys.org. Thank you again for the tip, [Qes].

Quick And Dirty MIDI Interface With USBASP

[Robson Couto] recently found himself in need of MIDI interface for a project he was working on, but didn’t want to buy one just to use it once; we’ve all been there. Being the creative fellow that he is, he decided to come up with something that not only used the parts he had on-hand but could be completed in one afternoon. Truly a hacker after our own hearts.

Searching around online, he found documentation for using an ATtiny microcontroller as a MIDI interface using V-USB. He figured it shouldn’t be too difficult to adapt that project to run on one of the many USBASP programmers he had laying around, and got to work updating the code.

Originally written for the ATtiny2313, [Robson] first had to change around the pin configuration so it would work on the ATmega8 in the USBASP, and also updated the USB-V implementation to the latest version. With the code updated, he programmed one of the USBASP adapters with a second one by connecting them together and putting a jumper on the J2 header.

He had the software sorted, but there was still a bit of hardware work to do. To provide isolation for the MIDI device, he put together a small circuit utilizing a 6N137 optoisolator and a couple of passive components on a piece of perf board. It’s not pretty, but it does fit right into the programming connector on the USBASP. He could have fired up his PCB CNC but thought it was a bit overkill for such a simple board.

[Robson] notes that he hasn’t implemented MIDI output with his adapter, but that the code and the chip are perfectly capable of it if you need it for your project. Finding the schematic to hook up to the programmer’s TX pin is left as an exercise for the reader.

If you don’t have a USBASP in the parts bin, we’ve seen a very similar trick done with an Arduino clone in the past.

Weather Station Is A Tutorial In Low Power Design

Building your own weather station is a fun project in itself, but building it to be self-sufficient and off-grid adds another set of challenges to the mix. You’ll need a battery and a solar panel to power the station, which means adding at least a regulator and charge controller to your build. If the panel and battery are small, you’ll also need to make some power-saving tweaks to the code as well. (Google Translate from Italian) The tricks that [Danilo Larizza] uses in his build are useful for more than just weather stations though, they’ll be perfect for anyone trying to optimize their off-grid projects for battery and solar panel size.

When it comes to power conservation, the low-hanging fruit is plucked first. [Danilo] set the measurement intervals to as long as possible and put the microcontroller (a NodeMCU) to sleep in between. Removing the power from the sensors when the microcontroller was asleep was another easy step, but the device was still crashing overnight. Then he turned to a hardware solution and added a more efficient battery charger to the setup, which saved even more power. This is all the more impressive because the station communicates via WiFi which is notoriously difficult to run in low-power applications.

Besides the low power optimizations, the weather station itself is interesting for its relative simplicity. It could be built with things most of us have knocking around. Best of all, [Danilo] published the source code on his site, so most of the hard work has been done already. If you’re thinking he seems a little familiar, it’s because we’ve featured some of his projects before, like his cheap WiFi extender antenna and his homemade hybrid tube amplifier.

Redesigning The Musical Keyboard With Light-Up Buttons

A piano’s keyboard doesn’t make sense. If you want to want to play an F major chord, just hit an F, an A, and a C — all white keys, all in a row. If you want to play a B major chord, you hit B, a D#, and an F#. One white key, then two black ones. The piano keyboard is not isomorphic, meaning chords of the same quality have different shapes. For their entry into the Hackaday Prize, [CSCircuits] and their crew are working on a keyboard that makes chords intuitive. It’s called the Kord Kontroller, and it’s a device that would also look good hooked up to Ableton.

The layout of the Kord Kontroller puts all the scale degrees arranged in the circle of fifths in the top of the keyboard. To play 90% of western music, you’ll hit one button for a I chord, move one button to the left for a IV chord, and two buttons to the right for a V chord. Chord quality is determined by the bottom of the keyboard, with buttons for flat thirds, fourths, ninths, elevenths and fourteenths replacing or augmenting notes in the chords you want to play. Since this is effectively a MIDI controller, there are buttons to change octaves and modes.

As far as hardware goes, this keyboard is constructed out of Adafruit Trellis modules that are a 4×4 grid of silicone buttons and LEDs that can be connected together and put on a single I2C bus. The enclosure wraps these buttons up into a single 3D printed grid of button holes, and with a bit of work and hot glue, everything looks as it should.

It’s an interesting musical device, and was named as a finalist in the Musical Instrument Challenge. You can check out a demo video with a jam sesh below.

Continue reading “Redesigning The Musical Keyboard With Light-Up Buttons”

Stepper Motor Mods Improve CNC Flat Coil Winder

Finding just the right off-the-shelf part to complete a project is a satisfying experience – buy it, bolt it on, get on with business. Things don’t always work out so easily, though, which often requires the even more satisfying experience of modifying an existing part to do the job. Modifying a stepper motor by drilling a hole down its shaft probably qualifies for the satisfying mod of the year award.

That’s what [Russ] did to make needed improvements to his CNC flat-coil winder, which uses a modified delta-style 3D-printer to roll fine magnet wire out onto adhesive paper to form beautiful coils of various sizes and shapes. [Russ] has been tweaking his design since we featured it and coming up with better and better coils. While experimenting, the passive roller at the business end proved to be a liability. The problem was that the contact point lagged behind the center axis of the delta, leading to problems with the G-code. [Russ] figured that a new tool with the contact point at the dead center would help. The downside would be having to actively swivel the tool in concert with the X- and Y-axis movements. The video below shows his mods, which include disassembling the NEMA-17 stepper and drilling out the shaft to pass the coil wire. [Russ] also spent some time reversing the rotor in the frame and provided a small preload spring to keep the coil roller in contact with the paper.

A real-time coil winding session starts at the 21:18 mark, and we’ve got to admit it’s oddly soothing to watch. We’re not sure exactly what [Russ] intends to do with these coils, and by his own admission, neither is he. But it’s still pretty cool to see, and the stepper motor mods are a neat trick to keep in mind.

Continue reading “Stepper Motor Mods Improve CNC Flat Coil Winder”

Launchpad MIDI Controller Put To Work With Python

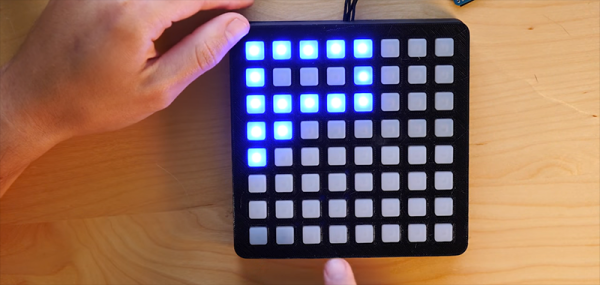
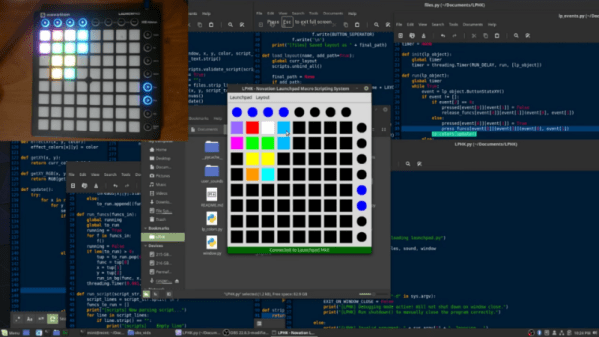
For Hackaday readers who might not spend their free time spinning electronic beats at raves, the Launchpad by Novation is a popular peripheral for creating digital music with tools such as Ableton Live. It’s 8×8 grid of RGB LED backlit buttons are used to trigger different beats and clips by sending MIDI commands to the computer over USB. While not a strict requirement for performing digital music, it also helps that it looks like you’re flying a spaceship when using it.

It’s definitely a slick piece of gear, but the limited stock functionality means you’re unlikely to see one outside of the Beat Laboratory. Though that might change soon thanks to LPHK, created by [Ella Jameson]. She’s created a program in Python that allows you to use the Novation Launchpad as a general purpose input device. But rather than taking the easy way out by just turning the hardware into a USB HID device or something along those lines, LPHK implements an impressive set of features including its own internal scripting language.

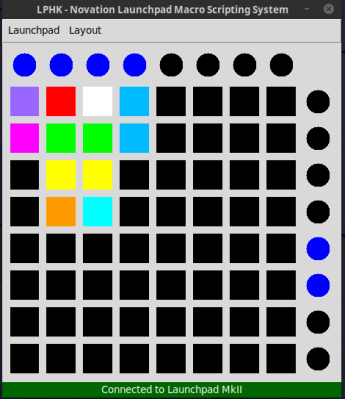
In the video after the break, [Ella] walks us through some basic use cases, such as launching programs or controlling the system volume with individual buttons. LPKH has a GUI which provides a virtual representation of the Launchpad, and allows configuring each button’s color and function as well as saving and loading complete layouts.

For more advanced functionality, LPHK utilizes a scripting language that was inspired by the Hak5 USB Rubber Ducky. Scripts are written with plain English commands and very simple syntax, meaning you don’t need to have any programming experience to create your own functions. There’s also a script scheduling system with visual feedback right on the board: if a button is pulsing red it means it has a script waiting for its turn to execute. When the key is rapidly flashing the script is actively running. A second tap of the button will either remove it from the queue or kill the running script, depending on what the status was when you hit it.

[Ella] makes it clear this software is still a work in progress; it’s not as polished as she’d like and still has bugs, but it’s definitely functional for anyone who’s looking to wring a bit more functionality out of their $150 Launchpad. She’s actively looking for beta testers and feedback, so if you’ve already got one of these boards give it a shot and let her know what you think.

In the past we’ve seen hackers fiddling with the open source API Novation released for their Launchpad controllers, but overall there hasn’t been a lot of work done with these devices. Perhaps that will soon change with powerful software like this in development.

Continue reading “Launchpad MIDI Controller Put To Work With Python”

Green LED Means GO For Supercon Badge Hacking

In addition to great speakers and enlightening workshops at Supercon, we have an area set aside for attendees to hack on their conference badges. There is no prerequisite beyond having a badge and a willingness to get hands-on. From hardware beginners to professional embedded system developers, we welcome all skill levels!

The image above is a free-form LED light sculpture by [4C1dBurn], who had just learned to solder and this is how a new skill was put into practice. In the background is the badge hacking arena: 7 tables set up in a row with 6 seats per table. The doors opened at 9AM and almost all the seats were filled by 9:30AM. There’s a constant flow as people leave to attend a talk or workshop, and others arrive to fill the vacancy.

In our hardware hacking overview, we shared an example of an LED array controlled by badge using shift registers. Several badge hackers built on top of this idea. [X] is making a version for surface mount LEDs, and [macegr]’s variant incorporated an USB-to-serial adapter on board to reduce wire clutter. He calls it a “quality of life improvement” and we think it’s brilliant.

Any reduction in wire clutter can only help with the many glorious explosions of wires scattered about. This particular example is a work-in-progress by [carfucar] turning a badge into wireless remote for a large array of WS2812B LED strips.

Heeding our call to action in the hardware hacking overview, there are at least two efforts underway to add wireless communication capability to the badge. [Preston] is making good progress teaching a badge to talk to an AVR-IoT module. [morgan] and [Ben] are building a mesh network using ESP32s. If it gets up and running, they’ve brought a bunch of ESP32s to add more nodes to their network.

For the talks currently on stage, go to the Supercon event page and click “Livestream” in the upper right corner for the official live stream. Badge hacking will continue all through Supercon, parts of which will be visible through unofficial livestream of badge hacking from attendees like [X]’s robot [Sharon].