One of our favorite retro-computing YouTubers, [Clint] from LGR, found himself a very interesting Fujitsu keyboard while thrift store shopping. It was a beautiful unit, but confusing, as this keyboard comes with an 8-pin DIN connector. A 5-pin DIN plug or 6-pin Mini-DIN would be easy to work with, but what was this odd connection? Turns out the Fujitsu N860-2500-T111 came with an Olympus CV-100 Video Processor, which was designed for medical imaging, potentially among other uses. And as often happened with old specialized hardware, the keyboard used a proprietary protocol for sending keystrokes.
[Clint] put out a call for anyone that could help him build an adapter, and [Andy] from Element14 answered the call. But this problem requires more than an adapter, mainly because the Fujitsu doesn’t have key rollover. It’s one key at a time, and that just doesn’t work for the sort of things [Clint] shows off on LGR. So, the electronic guts of the keyboard were removed, to be replaced with a Raspberry Pi Pico, wired directly to the keyboard matrix.
A few days ago we covered a project that brought Ethernet connectivity to the Raspberry Pi Pico using little more than some twisted pair and a RJ-45 connector. It was a neat trick, but not exactly ready for widespread adoption. Looking to improve on things a bit, [tvlad1234] has taken that project’s code and rewritten it into a friendly library you can use with any RP2040 board.
In case you missed it, the initial demo did 10BASE-T transmission by bit-banging with the PIO, and was able to send UDP messages to devices on the wired LAN. It was an impressive accomplishment, but its code didn’t make it easy to build your project around it. This new library makes UDP messaging as easy as a printf, offloading all non-PIO-managed Ethernet signal work onto the RP2040’s second CPU core. The library even generates a random MAC address out of your flash chip’s serial number!
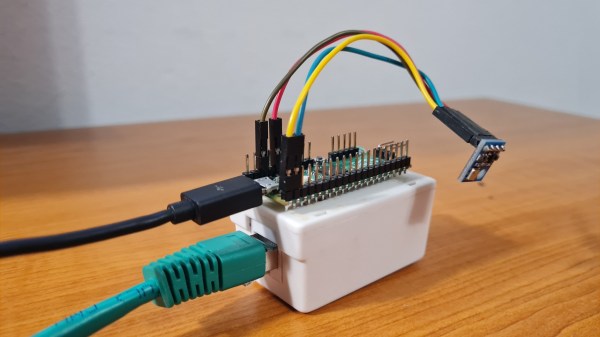
As a demonstration of the new library, [tvlad1234] has put together a simple Ethernet-connected temperature monitor using the BMP085 or BMP180 sensor connect over I2C. If you feel like you could use an Ethernet transmit-only sensor in your life, browsing the source code would be a great start.
Whilst the Raspberry Pi RP2040 is quite a capable little chip, on the whole it’s nothing really special compared to the big brand offerings. But, the PIO peripheral is a bit special, and its inclusion was clearly a masterstroke of foresight, because it has bestowed the platform all kinds of capabilities that would be really hard to do any other way, especially for the price.
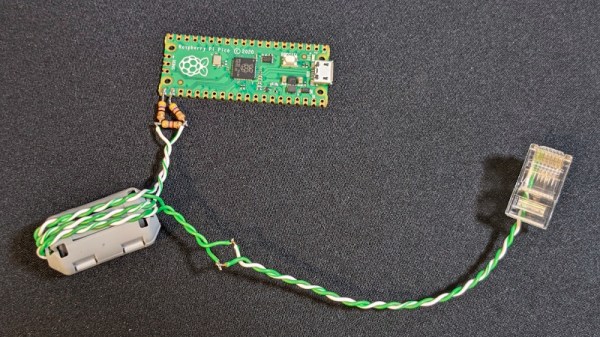
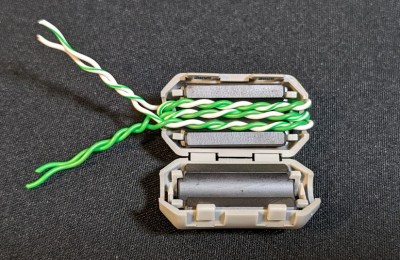
Our focus this time is on Ethernet, utilizing the PIO as a simple serialiser to push out a pre-formatted bitstream. [kingyo] so far has managed to implement the Pico-10BASE-T providing the bare minimum of UDP transmission (GitHub project) using only a handful of resistors as a proof of concept. For a safer implementation it is more usual to couple such a thing magnetically, and [kingyo] does show construction of a rudimentary pulse transformer, although off the shelf parts are obviously available for this. For the sake of completeness, it is also possible to capacitively couple Ethernet hardware (checkout this Micrel app note for starters) but it isn’t done all that much in practice.
UDP is a simple Ethernet protocol for transferring application data. Being connection-less, payload data are simply formatted into a packet buffer up front. This is all fine, until you realize that the packets are pretty long and the bitrate can be quite high for a low-cost uC, which is why devices with dedicated Ethernet MAC functionality have a specific hardware serialiser-deserialiser (SERDES) block just for this function.
Like many small uC devices, the RP2040 does not have a MAC function built in, but it does have the PIO, and that can easily be programmed to perform the SERDES function in only a handful of lines of code, albeit only currently operating at 10 MBit/sec. This will cause some connectivity problems for modern switch hardware, as they will likely no longer support this low speed, but that’s easily solved by snagging some older switch hardware off eBay.
As for the UDP receive, that is promised for the future, but for getting data out of a remote device over a wired network, Pico-10BASE-T is a pretty good starting point. We’ve seen a few projects before that utilize the PIO to generate high speed signals, such as DVI, albeit with a heavy dose of overclocking needed. If you want a bit more of an intro to all things Pico, you could do worse than check out this video series we highlighted a while back.
Older readers and those with an interest in retrocomputing may remember the days when a computer might well have booted into a BASIC interpreter. It was simultaneously a general purpose device that could run any software it would load, and also a development environment. Not something that can be said for today’s development boards which typically require a host computer on which to write code. Have we lost something along the way? Perhaps an answer to that question can be found in [lurk101]’s self-hosted development environment for the Raspberry Pi Pico.
It presents itself as a shell, with a flash file system, a port of the vi editor, and a C compiler. We might think of vi as being more at home on a UNIX-derived system, but in this case it’s a port of the vi included in BusyBox. Meanwhile the compiler comes from amacc project.
Of course, this still requires a terminal of some type which in practice will mean a host computer. But the feat is nevertheless an interesting one, and we can see that it might not be impossible given the Pico’s surprising versatility to being some of the terminal features onto the chip itself.
If you live in a home with a garage door opener, you may have experienced one or more inevitable moments. You pull up to your home, you press the button on the garage door opener, and… nothing. Or you can’t find the garage door opener. Or you have to mash the button repeatedly to get a response. Or… you get the idea. Thanks to [Core Electronics] however, you now have the basis for using a much better device to control your own garage door: Your phone. You can see the tutorial on the web or in video format below the break.
[Michael] at [Core electronics] was tired of dealing with the inconsistencies and inconveniences of a poorly built remote for his garage door opener. When he inspected the controller board on the garage door opener itself, he found that it was already configured to allow three buttons to be connected: Up, Down, and Stop. Continue reading “IOT Garage Door Opener Makes For Excellent Beginner IOT Project”→
Well, that didn’t go quite as we expected, did it? Wind the clock back 365 days, and the world seemed to be breathing a collective sigh of relief after making it through 2020 in one piece. Folks started getting their COVID-19 vaccines, and in-person events started tentatively putting new dates on the calendar. After a rough year, it seemed like there was finally some light at the end of the tunnel.
Turns out, it was just a another train. New variants of everyone’s favorite acute respiratory syndrome have kept the pandemic rolling, and in many parts of the world, the last month or so has seen more new cases of the virus than at any point during 2020. This is the part of the Twilight Zone episode were we realize that not only have we not escaped the danger, we didn’t even understand the scope of it to begin with.
Case in point, the chip shortages. We can’t blame it entirely on the pandemic, but it certainly hasn’t helped matters. From video game systems to cars, production has crawled to a standstill as manufacturers fight to get their hands on integrated circuits that were once plentiful. It’s not just a problem for industry either, things have gotten so bad that there’s a good chance most of the people reading this have found themselves unable to get their hands on a part or two these last few months. If you were working on a hobby project, it’s a temporary annoyance. But for those who planned on finally bringing their latest big idea to market, we’ve heard tales of heartbreaking delays and costly redesigns.
It would be easy to look at the last twelve months and see nothing but disappointment, but that’s hardly the attitude you want to have at the beginning of the year. So let’s take the high road, and look back on some of the highlights from 2021 as we turn a hopeful eye towards the future.
For a couple of years, embedded developer and Rust addict [Jonathan Pallant] aka [theJPster] has been working on a simple computer which he calls the Neotron. The idea is to make a computer that is not only easy to use but easy to understand as well. He describes it as a CP/M- or DOS-like operating system for small ARM microcontrollers. His most recent project is powered by a Raspberry Pi RP2040 Pico and built in the format of a microATX motherboard. This board packs a lot of features for a Pico-based design, including 12-bit color VGA and seven expansion slots. See his GitHub repository for a full list of specifications, and all the files needed to build your own — it is an Open Source project after all.
Besides the Neotron Pico itself, a couple of gems caught our eye in this well-documented project. [theJPster] was running out of I/O pins on the Pico, and didn’t have enough left over for all the peripherals’ chip selects. Check out how he uses an MCP23S17 SPI-bus I/O expander and a tri-state buffer to solve the problem.
On a more meta level, we are intrigued by his use of GitHub Actions. Per the standard concept of repositories, they shouldn’t contain the results of a build, be that an executable binary or Gerber files. Distribution of the build products is typically handled outside of GitHub, using something like GitHub’s Large File Storage service, or just ignoring convention altogether and putting them in the repo anyway. [theJPster] uses another method, employing GitHub Actions to generate the files needed for PCB fabrication, for example.
The Neotron Pico is the latest in a series of boards made to run Neotron OS. Previous boards include: