Automatic Turntable Makes Photogrammetry A Cinch

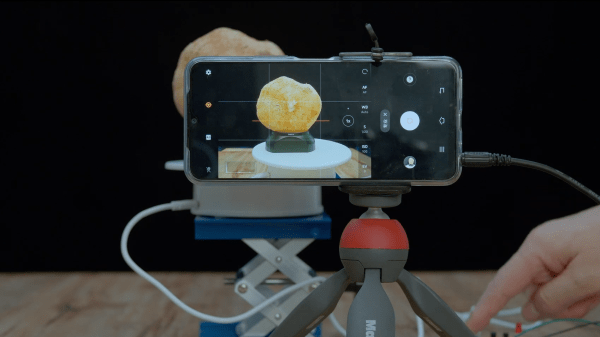
Photogrammetry is a great way to produce accurate 3D models of real objects. A turntable is often a common tool used in this work as it helps image an object from all angles. [Peter Lin] wanted a way to run the photogrammetry process with minimal human intervention, and set about building an automated turntable setup.

The build relies on a smartphone to take images of the physical object. The phone is triggered to take photos by an ESP8266, which fires the shutter via the phone’s audio socket. The microcontroller then turns the turntable on for a short period of time after each shot, rotating it by a set angle.

The build still requires objects to be repositioned in various orientations on the turntable now and then, in order to capture the top and bottom areas that would otherwise be obscured. However, the grunt work of taking the photos and rotating the objects is now entirely automated.

It’s a useful build for anyone that finds themselves regularly imaging objects to create 3D models. The results of [Peter]’s rig look great, and as a bonus come with life-like textures ready to go. We’ve seen some other great photogrammetry builds before, too. Video after the break.

Continue reading “Automatic Turntable Makes Photogrammetry A Cinch”

3D Objects Without Scanning

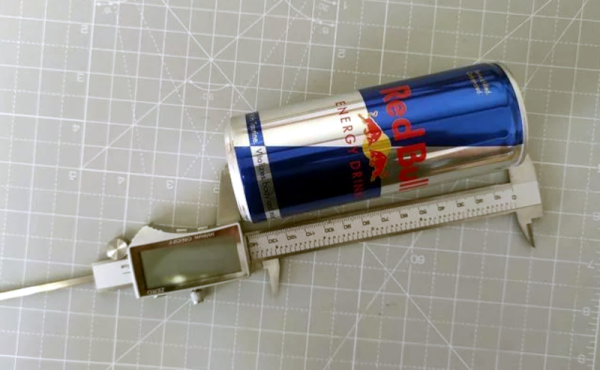
There are many scanners — both commercial and homemade — that can take a variety of scans or images of a 3D object and convert it into something like a 3D printable file. When the process works, it works well, but the results can be finicky at best and will require a lot of manual tuning. According to [Samuel Garbett], you might as well just draw your own model using Blender. He shows you how using a Red Bull can which, granted, isn’t exactly the most complicated thing ever, but it isn’t the simplest either.

He does take one photo of the can, so there is a camera involved at some point. He also takes measurements using calipers, something you probably already have laying around.

Since it is just a can, there aren’t many required pictures or measurements as, say, a starship model. Once you have the measurements, of course, you could use the tool of your choice and since we aren’t very adept with Blender, we might have used something we think is easier like FreeCAD or OpenSCAD. However, Blender has a lot of power, so we suspect making the jump from can to the USS Enterprise might be more realistic for a Blender user.

Besides, it is good to see how other tools work and we were surprised that Blender could be relatively simple to use. Every time we see [Jared’s] channel, we think we should learn more about Blender. But if you have your heart set on a real scanner, there are plenty of open source designs you can print.

Design A Custom Enclosure Using Modelling Clay And Photogrammetry

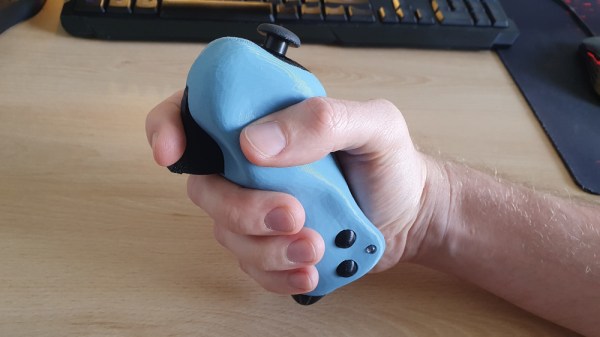
When it comes to designing enclosures which aren’t simple boxes or other basic shapes, the design process tends to get somewhat tedious and involved as the number of measurements to be transferred into the CAD program begins to skyrocket. One possible shortcut here is detailed by [Sebastian Sokolowski], who describes a process that combines modelling clay with photogrammetry.

[Sebastian] covers the design of a hand-held controller that should fit ergonomically when grasped. This starts off with the electronics and mechanical components that have to fit inside the controller: inside a CAD tool (demonstrated in Fusion 360), these components are arranged with a simple box enclosure around them. This box is then 3D printed and with modelling clay the desired shape of the controller is created around this box.

With a modelling clay version of the controller ready, it is photographed from as many angles as possible before these photos are processed by the open source Meshroom tool into a 3D model. After fixing up some issues in the mesh and knocking down the vertex count on this model so that the CAD tool doesn’t suffer a seizure importing it, it’s ready for final processing.

Within the CAD tool all that is left now is to refine the imported model to refine its outer shape and to create the inner details for mounting the electronics, switches and other components.

Continue reading “Design A Custom Enclosure Using Modelling Clay And Photogrammetry”

Art of 3D printer in the middle of printing a Hackaday Jolly Wrencher logo

What To Expect From 3D Scanning, And How To Work With It

3D scanning and 3D printing may sound like a natural match for one another, but they don’t always play together as easily and nicely as one would hope. I’ll explain what one can expect by highlighting three use cases the average hacker encounters, and how well they do (or don’t) work. With this, you’ll have a better idea of how 3D scanning can meet your part design and 3D printing needs.

How Well Some Things (Don’t) Work

Most 3D printing enthusiasts sooner or later become interested in whether 3D scanning can make their lives and projects easier. Here are a three different intersections of 3D scanning, 3D printing, and CAD along with a few words on how well each can be expected to work.

Goal Examples and Details Does it work?
Use scans to make copies of an object.
  • 3D scan something, then 3D print copies.
  • Objects might be functional things like fixtures or appliance parts, or artistic objects like sculptures.
Mostly yes, but depends on the object
Make a CAD model from a source object.
  • The goal is a 1:1 model, for part engineering purposes.
  • Use 3D scanning instead of creating the object in CAD.
Not Really
Digitize inconvenient or troublesome shapes.
  • Obtain an accurate model of complex shapes that can’t easily be measured or modeled any other way.
  • Examples: dashboards, sculptures, large objects, objects that are attached to something else or can’t be easily moved, body parts like heads or faces, and objects with many curves.
  • Useful to make sure a 3D printed object will fit into or on something else.
  • Creating a CAD model of a part for engineering purposes is not the goal.
Yes, but it depends

In all of these cases, one wants a 3D model of an object, and that’s exactly what 3D scanning creates, so what’s the problem? The problem is that not all 3D models are alike and useful for the same things.

Continue reading “What To Expect From 3D Scanning, And How To Work With It”

Nintendo Headquarters Plaques

3D Print A Piece Of Nintendo History Before The Real One Is Gone

Nintendo wasn’t always in the videogames business. Long before Mario, the company was one of the foremost producers of Hanafuda playing cards in Japan. From 1930 until 1959, Nintendo ran its printing business from a four-story art deco style building that featured distinctive plaques at the front entrance. We now have a chance to print those former Nintendo HQ plaques at home thanks to [Mr. Talida] who shared some 3D models on Twitter. Talida, a self-described “retro video game archivist”, recreated the plaques via photogrammetry from a number of reference photos he took from a visit to the Kyoto site late last year.

These 3D models come at a crucial time as the old Nintendo HQ building, which sat dormant for years, is set to be turned into a boutique hotel next year. According to JPC, the hotel will feature twenty rooms, a restaurant, and a gym and is expected to be completed by summer 2021 (although that estimate was from the “before” times). The renovation is expected to retain as much of the original exterior’s appearance as possible, but the Nintendo plaques almost assuredly will not be included. For a first-person tour of the former Nintendo headquarters building, there is a video from the world2529 YouTube channel provided below.

It is encouraging to see examples of this DIY-style of historical preservation. Many companies have proven themselves to be less-than-stellar stewards of their own history. Though if his Twitter timeline is any indication, [Mr. Talida] is up to something further with this photogrammetry project. A video export exhibiting a fully textured 3D model of the old Nintendo headquarters’ entrance was published recently along with the words, “What have I done.”

Continue reading “3D Print A Piece Of Nintendo History Before The Real One Is Gone”

OpenScan 3D Scans All Of The (Small) Things

The OpenScan project has been updated quite a bit since its inception. OpenScan is an open source, Arduino or Raspberry Pi-based 3D scanner for small objects that uses 3D printed hardware and some common electronic components to create 3D scans using photogrammetry; a process by which a series of still images from different angles are used to create a 3D point cloud of an object, which can then be used to generate a 3D model.

Feature visualization overlays detected features onto the camera preview to help judge quality. Broadly speaking, green is good.

Photogrammetry is a somewhat involved process that relies on consistent conditions, so going through the whole process only to find out the results aren’t up to snuff can be tiresome. Happily, OpenScan offers some interesting new functions such as feature visualization via the web interface, which helps a user judge scan quality and make changes to optimize results without having to blindly cross their fingers quite so much. OpenScan remains a one-person project by [Thomas], who is clearly motivated to improve his design and we’re delighted to see it getting updates.

Embedded below is a video that walks through the installation and web interface. It’s a fairly long and comprehensive, but if you like you can skip directly to [Thomas] demonstrating the interface around the 8:22 mark, or watch it below. Interested in your own unit? [Thomas] has an e-shop for parts and the GitHub repository is right here; the project also has its own subreddit.

Continue reading “OpenScan 3D Scans All Of The (Small) Things”

Handheld 3D Scanning, Using Raspberry Pi 4 And Intel RealSense Camera

Raspberry Pi 4 (with USB 3.0) and Intel RealSense D415 depth sensing camera.

When the Raspberry Pi 4 came out, [Frank Zhao] saw the potential to make a realtime 3D scanner that was completely handheld and self-contained. The device has an Intel RealSense D415 depth-sensing camera as the main sensor, which uses two IR cameras and an RGB camera along with the Raspberry Pi 4. The Pi uses a piece of software called RTAB-Map — intended for robotic applications — to take care of using the data from the camera to map the environment in 3D and localize itself within that 3D space. Everything gets recorded in realtime.

This handheld device can act as a 3D scanner because the data gathered by RTAB-Map consists of a point cloud of an area as well as depth information. When combined with the origin of the sensing unit (i.e. the location of the camera within that area) it can export a point cloud into a mesh and even apply a texture derived from the camera footage. An example is shown below the break.
Continue reading “Handheld 3D Scanning, Using Raspberry Pi 4 And Intel RealSense Camera”