More bad news from Mars this week, and this time not just from Perseverance. Last week the eagerly anticipated first flight of the helicopter Ingenuity was delayed for a couple of days after failing a full-speed spin-up test of its rotors. That appears to have been a bigger deal than initially thought, as it required a significant rewrite of the helicopter’s software. That meant testing, of course, and subsequent upload to the UAV, which at 174 million miles away takes a bit of doing. The good news is that they were able to complete the full-speed rotor test without the full program upload, so we’re one step closer to flight, which may take place as early as Monday morning.
Meanwhile, over at Elysium Planitia, the Mars InSight lander has troubles of its own. The geophysical laboratory, which has been trying to explore the inner structure of Mars since landing in 2018, entered an “emergency hibernation” state this week because of a lack of sufficient power generation. Unlike the radioisotope-powered Perseverance rover, InSight relies on a pair of solar panels for its electricity, and those panels are being obscured by Martian dust. The panels normally get blown clean by Martian winds, but things have been calm lately and the dust has really built up. If this seems like deja vu all over again, it’s probably because a planet-wide dust storm is what killed the plucky Opportunity rover back in 2018. Here’s hoping the wind picks up a little and InSight can get back to work.
Funny what crops up in one’s newsfeed, especially when one is responsible for putting out content that populates others’ newsfeeds. We recently took a look at the dangers of “zinc fever”, a flu-like illness that can crop up after inhaling gasses produced by molten zinc. That resulted in stumbling across an article from last year about mild steel welding fumes being classified as a human carcinogen. This comes from the Health and Safety Executive, a UK government agency concerned with workplace health issues. The release is an interesting read, and it suggests that mild steel fumes can cause not only lung cancer but kidney cancer. The announcement is mainly concerned with British workplaces, of course, but there are some interesting tidbits in there, such as the fact that welding fumes make dust particles so small that they can reach down into the very lowest reaches of lungs, the alveoli where gas exchange occurs. It’s enough to make one invest in PAPR or some kind of fume extractor.
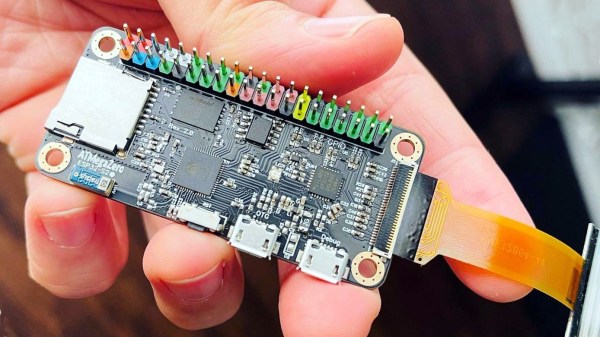
For those of a certain vintage, our first computer was probably something that bore little resemblance to a PC or laptop. It was likely a single-board affair or something like a C64, and acquiring the essential bit of hardware usually left little in the budget for a proper monitor. Little 12″ B&W TVs were a dime a dozen, though, and easily — if grainily — enlisted into service as a monitor by way of an RF modulator. To recreate a little of that magic with modern hardware, Hackaday contributor Adam Zeloof came up with the PiMod Zero, an RF-modulator hat for the Raspberry Pi Zero that turns the component video into an NTSC analog signal. He’s open-sourced the design files, or there’s a CrowdSupply campaign for those who prefer to buy.
And finally, if you somehow traveled back in time to the 1940s with a laptop, how long would it have taken you to crack the Enigma code? Longer than you think, at least according to Dr. Mike Pound over at Computerphile, who released a fascinating video on how Enigma worked and what it took for Turing and the gang at Bletchley to crack the code. We knew some of the details of Enigma’s workings before seeing this video, but Mike’s explanation was really good. And, his explanation of the shortcut method he used to decode an Enigma message made the whole process clearer to us than it’s ever been. Interesting stuff.
Continue reading “Hackaday Links: April 18, 2021” →