Watering circuit

Solar Powered Circuit Waters Your Plants


If you want your plants to stay healthy, you need to make sure they stay watered. [Dimbit] decided to build his own solar powered circuit to help automatically keep his plants healthy. Like many things, there is more than one way to skin this cat. [Dimbit] had seen other similar projects before, but he wanted to make his smarter than the average watering project. He also wanted it to use very little energy.

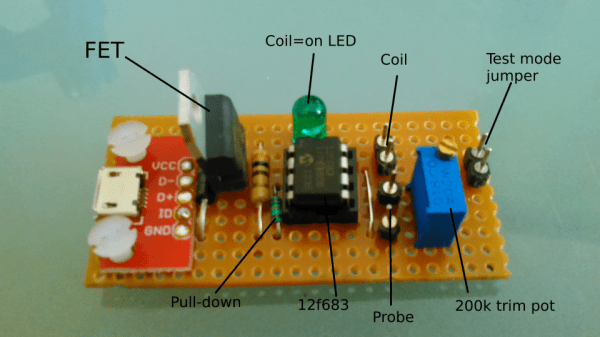
[Dimbit] first tackled the power supply. He suspected he wouldn’t need much more than 5V for his project. He was able to build his own solar power supply by using four off-the-shelf solar garden lamps. These lamps each have their own low quality solar panel and AAA NiMH cell. [Dimbit] designed and 3D printed his own plastic stand to hold all of the solar cells in place. All of the cells and batteries are connected in series to increase the voltage.

Next [Dimbit] needed an electronically controllable water valve. He looked around but was unable to find anything readily available that would work with very little energy. He tried all different combinations of custom parts and off-the-shelf parts but just couldn’t make something with a perfect seal. The solution came from an unlikely source.

One day, when [Dimbit] ran out of laundry detergent, he noticed that the detergent bottle cap had a perfect hole that should be sealable with a steel ball bearing. He then designed his own electromagnet using a bolt, some magnet wire, and a custom 3D printed housing. This all fit together with the detergent cap to make a functional low power water valve.

The actual circuit runs on a Microchip PIC microcontroller. The system is designed to sleep for approximately nine minutes at a time. After the sleep cycle, it wakes up and tests a probe that sits in the soil. If the resistance is low enough, the PIC knows that the plants need water. It then opens the custom valve to release about two teaspoons of water from a gravity-fed system. After a few cycles, even very dry soil can reach the correct moisture level. Be sure to watch the video of the functioning system below. Continue reading “Solar Powered Circuit Waters Your Plants”

Checking Email With The ESP8266

Ever so slowly, everyone’s favorite WiFi adapter is making its way into Internet-enabled projects. [jimeer01] created a device that reads the subject and sender lines from the latest email in his inbox and displays it on an LCD using the ESP8266 WiFi chip.

[jimeer] is using a ByPic for writing to the LCD and querying an inbox through an ESP8266 module. The ByPic is a board built around the BV_Basic firmware, stuffing a PIC microcontroller in an Arduino form factor and giving it a BASIC interpreter. Because this board isn’t ‘compile and flash’ like an Arduino, it’s perfectly suited for changing WiFi configurations and IMAP server credentials on the fly.

The device grabs the latest email in an inbox and displays the date, sender, and subject on the display. After scrolling through those lines, the PIC hits the ESP8266 to query the server again, grabbing the latest email, and repeating the whole process again, all without needing to connect the device to a computer. Video below.

Continue reading “Checking Email With The ESP8266”

This Analog Cambot Plays Outside The Lines

There are quite a few flavors of line following robot. No matter how they’re made, most are built for speed and accuracy. The Cambot by [Jorge Fernandez] however makes use of a traditional video camera to read visual input instead of the reflective sensors we’re used to seeing in these types of robots. Because of this it lacks those swift and agile qualities, but scores points with its unique analog design, over-sized tricycle wheels, and stylish RCA jacks poking out on the side.

Coupled with a PIC 16F84A microcontroller, [Fernandez] divides the video input from the camera into 625 lines. The PIC is responsible for scanning horizontally across these lines and translating the proportions of black and white into PWM pulses. The duration these proportions are seen by the camera determines the PWM frequency fed to the left and right servo motors driving the robot.

As far as line-followers go, this is a refreshing retro approach to the concept. [Hernandez] outlines the finesse about driving his cambot on his blog (an English translation can be read here) and provides a complete schematic for those who are interested in whipping up their own quirky little machine.

Continue reading “This Analog Cambot Plays Outside The Lines”

Prove Your Geek Cred With A Binary Watch

Binary Wrist Watch

After just one prototype, [Elia] has finished his super awesome Binary Wrist Watch.

He designed the PCB in KiCad, using a template for the PIC he found in a standard library — unfortunately it turns out the SSOP-20 PIC footprint in this library was actually a TSSOP-20. Confusingly enough, there was also a TSSOP-20 footprint in the library. Luckily it’s just a few millimeters off so [Elia] was able to just bend the pins in a bit before reflow soldering it in place.

The trickiest part of the project was actually making the wristband. He tried several different styles before settling on a paracord braid design he found on Instructables.

We especially like his quote at the end of the project:

Although not having worn the watch in the presence of normal humans, I can already guarantee that now everyone will be able to easily identify me as a nerd.

Acceptance is the first step in realizing you have an addiction, right?

[via Dangerous Prototypes]

PIC Up A NeoPixel Ring And C What You Can Do Using This Tutorial

lit ringAs [Shahriar] points out in the introductory matter to his latest video at The Signal Path, Arduinos are a great way for a beginner to dig into all kinds of electronic excitement, but they do so at the cost of isolating that beginner from the nitty gritty of microcontrollers. Here, [Shahriar] gives a very thorough walkthrough of a 60-neopixel ring starting with the guts and glory of a single RGB LED. He then shows how that ring can easily be programmed using a PIC and some C.

[Shahriar]’s eval board is a simple setup that he’s used for other projects. It’s based on the PIC18F4550 which he’s programming with an ICD-U64. The PIC is powered through USB, but he’s using a separate switching supply to power the ring itself since he would need ~60mA per RGB to make them burn white at full brightness.

He’s written a simple header file that pulls in the 18F4550 library, sets the fuses, and defines some constants specific to the ring size. As he explains in the video, the PIC can create a 48MHz internal clock from a 20Mhz crystal and he sets up this delay in the header as well. The main code deals with waveform generation, and [Shahriar] does a great job explaining how this is handled with a single pin. Before he lights up the ring, he puts his scope on the assigned GPIO pin to show that although the datasheet is wrong about the un-delayed width of the low period for a zero bit, it still works to program the LEDs.

[Shahriar] has the code available on his site. He is also holding a giveaway open to US residents: simply comment on his blog post or on the video at YouTube and you could win either a TPI Scope Plus 440 with probes and a manual or a Tektronix TDS2232 with GPIB. He’ll even pay the shipping.

Continue reading “PIC Up A NeoPixel Ring And C What You Can Do Using This Tutorial”

Servo Stock, The Future Of 3D Printers

printer
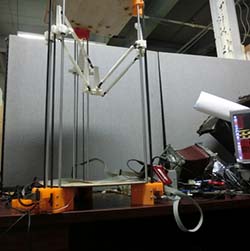
If you think about it, the RepRaps and other commercial 3D printers we have today are nothing like the printers that will be found in the workshops of the future. They’re more expensive than they need to be, and despite the RepRap project being around for a few years now, no one has cracked the nut of closed loop control yet. [mad hephaestus], [Alex], and [Will] over on the Hackaday Projects site are working on the future of 3D printing with the Servo Stock, a delta printer using servos and closed loop control to build a printer for about a quarter of the price as a traditional 3D printer.

The printer itself is a Kossel derivative that is highly modified to show off some interesting tech. Instead of steppers, the printer has three axes controlled by servos. On each axis is a small board containing a magnetic encoder, and a continuous rotation servo. With this setup, the guys are able to get 4096 steps per revolution with closed loop control that can drive the servo to with ±2 ticks.

The electronics and firmware are a clean sheet redesign of the usual 3D printer loadout. The motherboard uses a Pic32 running at 80MHz. Even the communication between the host and printer has been completely redesigned. Instead of Gcode, the team is using the Bowler protocol, a system of sending packets over serial, TCP/IP, or just about any other communications protocol you can think of.

Below is a video of the ServoStock interpreting Gcode on a computer and sending the codes and kinematics to the printer. It seems to work well, and using cheap servos and cut down electronics means this project might just be the first to break the $200 barrier for a ready to run 3D printer.

Continue reading “Servo Stock, The Future Of 3D Printers”

Breaking Open The Quirky Nimbus

Nimbus

The Nimbus is a little Internet-connected device put out by a company called Quirky. It features four analog dials, each with graphic LCDs, with WiFi connectivity to show you how many tweets you’ve made in the past day. You know, in case you forgot, or something.

[Edu] didn’t find the social media-oriented Nimbus very useful, but Internet connected analog gauges are just so cool, so out came the screwdriver and the writing of new firmware commenced.

Inside the Nimbus there’s an SPI Flash, PIC micro, and an Electric Imp, a tiny ARM microcontroller and WiFi adapter stuffed inside an SD card. The Imp is always tied to a cloud service, in this case, a Quirky-lined cloud, but the folks at Quirky were keen to help [Edu] in his quest for better firmware.

After figuring out all the traces, [Edu] wrote a simple firmware that can control everything there is to control – the dials, displays, two buttons, and a speaker. So far he’s put some graphics on the display and PWM’d the theme from Monkey Island. This is just scratching the surface of what the device can do – [Edu] can still make use of the WiFi connectivity, and those dials can do much more than spin around in circles.

Monkey Island video below.

Continue reading “Breaking Open The Quirky Nimbus”