Hackaday Prize Entry: Crowdsourced Tactile Interfaces

Your microwave, your TV, and almost the entire inventory of Best Buy have one thing in common: they all uses membrane switches for user interaction, and that means these devices are inaccessible for the blind. This project for the Hackaday Prize is going to change that by building a crowdsourced effort to design Braille keypads for thousands of appliances.

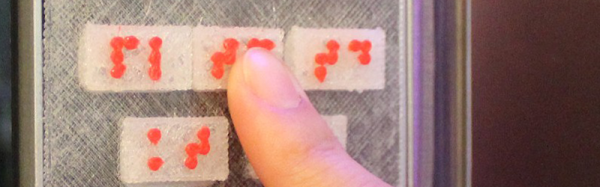
There are two aspects of this project that are exceptionally interesting, the least of which is how to make Braille keypads for a microwave. This is done with a 3D printer using a flexible or semi-flexible filament. These keypads are designed to overlay the membrane keypad on consumer electronic devices, and the initial testing reveals these keypads are robust and useful enough for blind users.

A 3D printed overlay for a microwave is simple, though. The big question is how these overlays are designed. For this, the project suggests a crowdsourced effort of hundreds of designers turning photographs of keypads into Braille overlays. The process begins with a few pictures of a keypad with a reference object – for example, a dollar bill. These photographs are scaled to the correct dimensions, a few outlines are made, and the buttons with Braille text are designed. It’s a brilliant use of people who have just enough experience in Photoshop to be useful, and since this is a crowdsourced effort, work isn’t duplicated. The keypad overlays for one specific make and model of microwave can be printed over and over again, bootstrapping an effort to make membrane keypads useful for all blind people.

Making An Espresso Pot In The Machine Shop

[This Old Tony] was cleaning up his metal shop after his yearly flirtation with woodworking when he found himself hankering for a nice coffee. He was, however, completely without a coffee making apparatus. We imagine there was a hasty round of consulting with his inanimate friends [Optimus Prime] and [Stefan Gotteswinter Brush] before he decided the only logical option was to make his own.

So, he brought out two chunks of aluminum from somewhere in his shop, modeled up his plan in SolidWorks, and got to work.  It was designed to be a moka style espresso pot sized around both the size of stock he had, and three purchased parts: the gasket, funnel, and filter. The base and top were cut on a combination of lathe and mill. He had some good tips on working with deep thin walled parts. He also used his CNC to cut out some parts, like the lid and handle. The spout was interesting, as it was made by building up a glob of metal using a welder and then shaped afterward.

As usual the video is of [This Old Tony]’s exceptional quality. After quite a lot of work he rinsed out most of the metal chips and WD40, packed it with coffee, and put it on the stove. Success! It wasn’t long before the black stuff was bubbling into the top chamber ready for consumption.

Very, Very Tiny X86 Systems

The most interesting market for Intel in recent years has been very, very small form factor PCs. ARM is eating them alive, of course, but there are still places where very small and very low power x86 boards make sense. The latest release from SolidRun is the smallest we’ve seen yet. The SolidPC Q4 is one of the smallest x86 implementation you can find. It’s based around the MicroSoM, a module even smaller than a Raspberry Pi, and built around a carrier board that has all the ports you could ever want from the tiniest PC ever.

The SolidPC Q4 is technically only a carrier board featuring a microSD slot, Displayport, HDMI 1.4B, two RJ45 ports with the option for PoE, three USB 3.0 Host ports, jacks for mic and stereo sound, and an M.2 2230 connector for a wireless module. The interesting part of this launch is the MicroSoM, a System on Module based on Intel’s Braswell architecture. Two models are offered, based on the quad-core Atom E8000 and the Pentium N3710. Both modules feature up to 8GB of DDR3L RAM and 4GB of eMMC Flash.

The interesting part of this launch is the MicroSoM, a System on Module based on Intel’s Braswell architecture. Two models are offered, based on the quad-core Atom E8000 and the Pentium N3710. Both modules feature up to 8GB of DDR3L RAM and 4GB of eMMC Flash. The size of these modules is 52.8mm by 40mm, or just a shade larger than the stick-of-gum-sized Raspberry Pi Zero.

The SolidPC isn’t intended to be a Raspberry Pi competitor. While those cheap ARM boards are finding a lot of great uses in industry, they’re no replacement for a small, x86 single board computer. The pricing for this module starts at $157 according to the product literature, with a topped out configuration running somewhere between $300 and $350, depending on options like a heatsink, enclosure, or power adapter. If you want a small single board computer with drivers for everything, there aren’t many other options: you certainly wouldn’t pick a no-name Allwinner board.

Qualcomm Looks To Gobble Up NXP

Remember when we talked about NXP merging with Freescale to move into the top ten semiconductor companies? Yeah, that was just eighteen months ago and just barely closed before the new year. Now it looks like Qualcomm wants to acquire NXP to the tune of $30 billion.

You’re most likely familiar with Qualcomm as a cellphone silicon company. The acquisition of NXP opens up a lot of additional markets with their portfolio of chips — automotive among them thanks to the Freescale merger. Now you should be asking yourself just how big Qualcomm is already. What’s perhaps most interesting is that, as mostly a wireless chip company, Qualcomm is ranked number three in worldwide semiconductor sales. Adding NXP — a behemoth now in the top ten — adds at least 30% to Qualcomm’s numbers.

And so here we are, one step close to a monolithic chip fab that produces all computing power for the human race. Yippie!

Lock Up Your Raspberry Pi With Google Authenticator

Raspberry Pi boards (or any of the many similar boards) are handy to leave at odd places to talk to the network and collect data, control things, or do whatever other tasks you need a tiny fanless computer to do. Of course, any time you have a computer on a network, you are inviting hackers (and not our kind of hackers) to break in.

We recently looked at how to tunnel ssh using a reverse proxy via Pagekite so you can connect to a Pi even through firewalls and at dynamic IP addresses. How do you stop a bad guy from trying to log in repeatedly until they have access? This can work on any Linux machine, but for this tutorial I’ll use Raspberry Pi as the example device. In all cases, knowing how to set up adequate ssh security is paramount for anything you drop onto a network.

Continue reading “Lock Up Your Raspberry Pi With Google Authenticator”

Cellular Automata Explorer

Well all know cellular automata from Conway’s Game of Life which simulates cellular evolution using rules based on the state of all eight adjacent cells. [Gavin] has been having fun playing with elementary cellular automata in his spare time. Unlike Conway’s Game, elementary automata uses just the left and right neighbors of a cell to determine the next cell ahead in the row. Despite this comparative simplicity, some really complex patterns emerge, including a Turing-complete one.

[Gavin] started off doing the calculations by hand for fun. He made some nice worksheets for this. As we can easily imagine, doing the calculations by hand got boring fast. It wasn’t long before his thoughts turned to automating his cellular automata. So, he put together an automatic cellular automator. (We admit, we are having a bit of fun with this.)

This could have been a quick software project but half the fun is seeing the simulations on a purpose-built ecosystem. The files to build the device are hosted on Thingiverse. Like other cellular automata projects, it uses LED matrices to display the data. An Arduino acts as the brain and some really cool retro switches from the world’s most ridiculously organized electronics collection finish the look of the project.

To use, enter the starting condition with the switches at the bottom. The code on the Arduino then computes and displays the pattern on the matrix. Pretty cool and way faster than doing it by hand.