SamplerBox Uses Raspberry Pi 2 To Make Music

[JosephErnest] wanted a cost-effective alternative to the commercially available MIDI samplers and expanders on the market. He also wanted to avoid being tethered to a computer all the time. His solution is the SamplerBox, a standalone drop-and-play sampler that costs less than 100 euros to make. Simply insert an SD card with your sample set in WAV format, boot it up, and play it through your keyboard or MIDI controller to your heart’s content!

[JosephErnest] used a Raspberry Pi 2 in the SamplerBox because it provided higher performance. He wasn’t thrilled with the sound quality of its built-in soundcard, so he installed a USB DAC PCM2704 (an older model, but any USB DAC will do) to output the audio. He also installed a USB card reader to make switching SD cards containing sampler sets easier while keeping the Pi 2’s own microUSB card exclusively for the OS and software. Both a DIN MIDI connector and USB are included as MIDI inputs in the design. If you only plan to use a USB, the MIDI connector can be omitted from the build. The software is written in Python and cython which allows the Pi 2 to have over 128-voice polyphony. Users can also create their own sample sets to use with the SamplerBox. Preset changes can be made on the fly. All we need to rock out are some music lessons!

Continue reading “SamplerBox Uses Raspberry Pi 2 To Make Music”

Eye-Controlled Wheelchair Advances From Talented Teenage Hackers

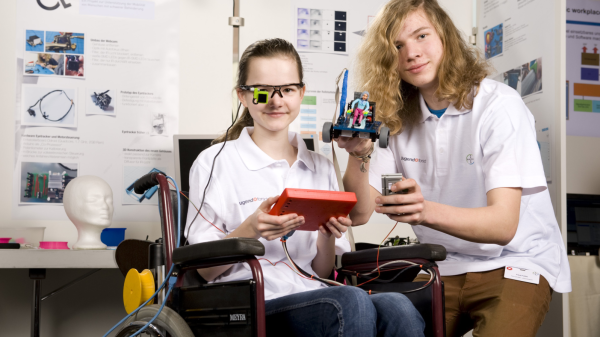
[Myrijam Stoetzer] and her friend [Paul Foltin], 14 and 15 years old kids from Duisburg, Germany are working on a eye movement controller wheel chair. They were inspired by the Eyewriter Project which we’ve been following for a long time. Eyewriter was built for Tony Quan a.k.a Tempt1 by his friends. In 2003, Tempt1 was diagnosed with the degenerative nerve disorder ALS  and is now fully paralyzed except for his eyes, but has been able to use the EyeWriter to continue his art.

This is their first big leap moving up from Lego Mindstorms. The eye tracker part consists of a safety glass frame, a regular webcam, and IR SMD LEDs. They removed the IR blocking filter from the webcam to make it work in all lighting conditions. The image processing is handled by an Odroid U3 – a compact, low cost ARM Quad Core SBC capable of running Ubuntu, Android, and other Linux OS systems. They initially tried the Raspberry Pi which managed to do just about 3fps, compared to 13~15fps from the Odroid. The code is written in Python and uses OpenCV libraries. They are learning Python on the go. An Arduino is used to control the motor via an H-bridge controller, and also to calibrate the eye tracker. Potentiometers connected to the Arduino’s analog ports allow adjusting the tracker to individual requirements.

The web cam video stream is filtered to obtain the pupil position, and this is compared to four presets for forward, reverse, left and right. The presets can be adjusted using the potentiometers. An enable switch, manually activated at present is used to ensure the wheel chair moves only when commanded. Their plan is to later replace this switch with tongue activation or maybe cheek muscle twitch detection.

First tests were on a small mockup robotic platform. After winning a local competition, they bought a second-hand wheel chair and started all over again. This time, they tried the Raspberry Pi 2 model B, and it was able to work at about 8~9fps. Not as well as the Odroid, but at half the cost, it seemed like a workable solution since their aim is to make it as cheap as possible. They would appreciate receiving any help to improve the performance – maybe improving their code or utilising all the four cores more efficiently. For the bigger wheelchair, they used recycled car windshield wiper motors and some relays to switch them. They also used a 3D printer to print an enclosure for the camera and wheels to help turn the wheelchair. Further details are also available on [Myrijam]’s blog. They documented their build (German, pdf) and have their sights set on the German National Science Fair. The team is working on English translation of the documentation and will release all design files and source code under a CC by NC license soon.

Hackaday Links Column Banner

Hackaday Links: May 3, 2015

Everybody loves How It’s Made, right? How about 3D printers? The third greatest thing to come out of Canada featured Lulzbot in their most recent episode. It’s eight minutes of fun, but shame the puns weren’t better. Robertson drives and the Avro Arrow, if you’re wondering.

Speaking of 3D printers, a lot of printers are made of aluminum extrusion. Has anyone tried something like this? It’s an idea that’s been around for a while but we can’t seem to find anyone actually using 3D printed extrusion.

CastARs are shipping out, and someone made a holodeck with retroreflective material. It’s an inflatable dome that’s attached to a regular ‘ol tent that works as a positive pressure airlock. If you’re looking to replicate this, try it with hexagons and pentagons. That should be easier than the orange-slice gores.

For some reason we can’t comprehend, USB ports are now power ports. There’s still a lot of stuff that uses 9 and 12V, and for that there’s the USB 912. It’ll work better with one of those USB battery packs.

Want to see what the Raspberry Pi 2 looks like with a Flir? NOQ2 has you covered.

Remember the Speccy? In the manual, there was an exercise left to the reader: reproduce [Mahler]’s first symphony with the BEEP command. It took a Raspberry Pi (only for synchronizing several Speccys), but it’s finally done.

Raspberry Pi And Kindle Together Again

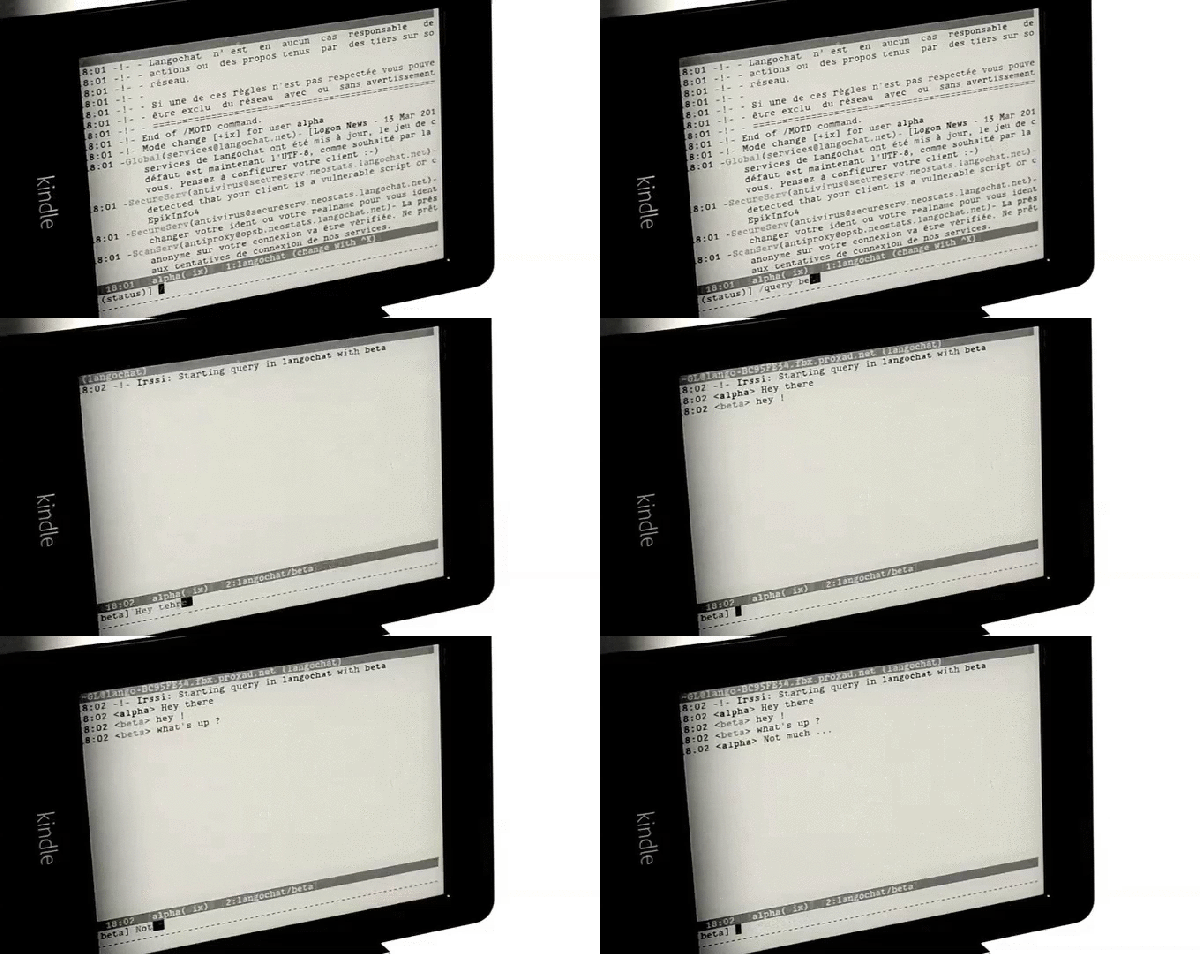
We’ve seen a lot of projects recently that take advantage of the Raspberry Pi 2’s augmented abilities. With the increased processor power and double the memory, it puts a lot more utility in the user’s hands. The latest project that takes advantage of this is the Pi-nk, which combines a Pi with a Kindle for some text-based awesomeness. [Edit: Use the Wayback Machine.]

[Guillaume] has put together this detailed how-to which, unlike other builds we’ve seen in the past, uses wireless instead of USB for almost all of the connections, including the keyboard. Granted, this isn’t a new idea, but he’s presenting the way that he did it. To that end, all of the commands you’ll need to use are extremely well documented on the project page if you want to build your own. When everything is said and done, you’ll be SSHing into the Pi from the Kindle and using the popular “screen” program to get the Pi to use the Kindle as its display.

Additionally, [Guillaume] has posted some schematics for custom enclosures for the Pi-Kindle pair if you’re more ambitious. He points out that the e-ink display is great if the Pi is being run in text or command-line mode, and we’d have to agree. This is a very clean pairing of these devices and puts the strengths of both to great use!

DOTS Uses Paint To Control Raspberry Pi 2

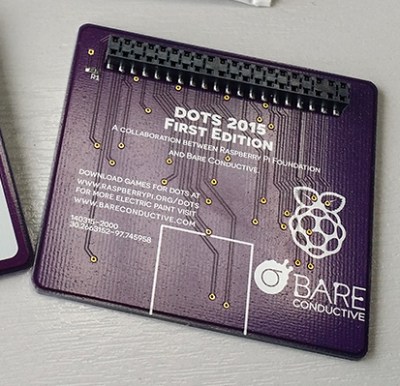
Two tables down from us at SXSW Create the Raspberry Pi foundation had a steady stream of kids playing Minecraft on Raspberry Pi, and picking up paint brushes. The painting activity was driven by a board they spun for the event that used conductive paint to control the Raspberry Pi 2.

rear-of-the-raspberry-pi-2The board uses the HAT form factor which it a fancy name for a shield (also a clever one as it stands for “Hardware Attached on Top”). You can see the back side of the board in this image. It utilizes an extremely low-profile surface mount pin socket.

The front side exposes several circular pads of copper which build up a “connect-the-dots” game that is played by painting conductive ink on the surface. This results in an airplane being pained on the board, as well as displayed on the computer. There is a set of pads that allow the user to select what color is painted on the monitor.

We like this as a different approach to education. Kids are more than used to tapping on a touchscreen, clicking a mouse, or pounding a keyboard. But conductive ink provides several learning opportunities; the paint simply connects the inner circle with the outer circle; one of these circles is the same on every single dot (ground); anything that connects these two parts of the dot together will result in input for the computer. Great stuff!

The foundation is taking the boards to Maker Faire Bay Area next month so stop by to see these in action. You can read about the production process for the DOTS board on the Raspberry Pi website. They’re giving away a few boards to software developers who want contribute to the project. And our video interview with [Matt Richardson] is found after the break.

Continue reading “DOTS Uses Paint To Control Raspberry Pi 2”

Moore’s Law Of Raspberry Pi Clusters

[James J. Guthrie] just published a rather formal announcement that his 4-node Raspberry Pi cluster greatly outperforms a 64-node version. Of course the differentiating factor is the version of the hardware. [James] is using the Raspberry Pi 2 while the larger version used the Model B.

We covered that original build almost three years ago. It’s a cluster called the Iridris Pi supercomputer. The difference is a 700 MHz single core versus the 900 Mhz quad-core with double-the ram. This let [James] benchmark his four-node-wonder at 3.048 gigaflops. You’re a bit fuzzy about what a gigaflops is exactly? So were we… it’s a billion floating point operations per second… which doesn’t matter to your human brain. It’s a ruler with which you can take one type of measurement. This is triple the performance at 1/16th the number of nodes. The cost difference is staggering with the Iridris ringing in at around £2500 and the light-weight 4-node built at just £120. That’s more than an order of magnitude.

Look, there’s nothing fancy to see in [James’] project announcement. Yet. But it seems somewhat monumental to stand back and think that a $35 computer aimed at education is being used to build clusters for crunching Ph.D. level research projects.

Raspberry Pi Controlled Chicken Door

We’re not sure if the Chickens know it yet, but they could be one of the reasons for all this IoT craze now a days. Look for chicken coop, and out come dozens of posts from the Hackaday chest.

Here’s another one from self confessed lazy engineer [Eric]. He didn’t want to wake up early to let his chickens out in the morning, or walk out to the coop to lock them up for the night to protect them from predators like Foxes, Raccoons and Opossum. So he built a Raspberry-Pi controlled chicken coop door that automates locking and unlocking. The details are clear from his video which you can watch after the break. The door mechanism looks inspired from an earlier anti-Raccoon gravity assist door.

The hardware (jpg image) is simple – a couple of hall sensors that detect the open/close status of the coop door that is driven by a DC motor via a bridge controller. The whole setup is controlled using a Raspberry-Pi and this is where the fun starts – because he can now add in all kinds of “feature creep”. Motion sensor, camera, light array, and anti-predator gizmos are all on his drawing board at the moment. Add in your feature requests in the comments below and let’s see if [Eric] can build the most advanced, complicated, gizmo filled chicken coop in the Universe. Combine that with this design, and it could even turn out to be the most beautiful too.

Continue reading “Raspberry Pi Controlled Chicken Door”