Raspi Contest To Get The Kids Programming

The Raspberry Pi was originally conceived as an educational platform. Much like the BBC Micros and Apple ][s of yore, the Raspi is designed to get kids into programming by giving them a very tiny but still useful computer. Truth be told, we haven’t seen any educational hacks involving the Raspberry Pi, most likely because makers and tinkerers like us have been buying up all the available boards. The Raspi team is trying to correct this problem by holding a summer programming contest aimed at kids under 18 years of age.

The rules are simple: there are two age brackets, under 13, and ages 14-18. The kid who writes the best piece of software for the Raspberry Pi gets $1000, with five $200 runners-up in each category.The contest will run for eight weeks, timed perfectly to coincide with summer vacation.

There will be a few more weekly contests the Raspi team will be holding in the future, but with eight weeks to complete a project we can’t wait to see all the neat stuff kids are going to make.


Refurbing A C64 With A Raspberry Pi

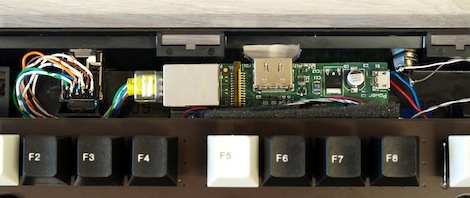
When [Carl] first heard of the Raspberry Pi, he immeidatly though how freakin tiny this board is compared to a Mini ITX motherboard. After ordering a Raspi, [Carl] decided to put his barely-larger-than-a-credit-card computer inside a Commodore 64.

[Carl]’s updated C64 functions exactly like the original – the 30-year-old keyboard works thanks to the help of a Keyrah keyboard and control port adapter. This adapter was soldered to a stripped USB cable, allowing [Carl] to keep the finished project looking very clean and tidy. Of course, the composite, HDMI, and Ethernet ports are broken out, allowing for this computer to connect to any network or TV.

For a final touch, [Carl] painted the case. He originally wanted to spray on a black, red, and purple motif to match the Raspi, but he eventually settled on a beige and red style. [Carl] really put together an awesome build, and for much, much less money than the rereleased C64 Windows-powered monstrosity goes for. You can check out the build log video after the break.

Continue reading “Refurbing A C64 With A Raspberry Pi”

Raspberry Pi Prototyping Boards Available At Adafruit

If you’re one of the lucky few with a Raspberry Pi, adafruit has two things you might be interested in if you’re into GPIO hacking.

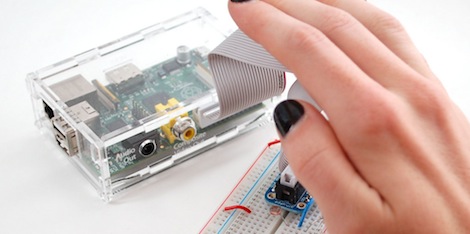
First up is the Pi Cobbler kit. It’s a 2×13 ribbon cable with a breakout PCB ready to attach to a solderless breadboard; perfect for playing around with (or cobbling together… get it?) the GPIO pins on your Raspi.

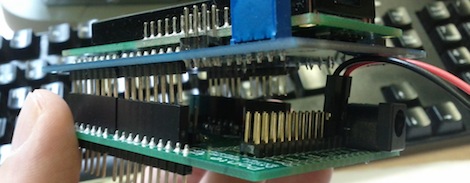
Next up is the Pi Plate kit that comes complete with enough perfboard space, screw terminals, and female headers to kill a yak. All the GPIO, I2C, and SPI pins are broken out on the Pi Plate, making it very easy to prototype a semi-permanent Raspi circuit.

They might be just prototyping boards now, but we expect these Pi Plates to quickly evolve into a truly useful device with the addition of a few level shifters, port expanders and a few ADCs and DAC thrown in for good measure. If you’re still on the fence and thinking about buying a Raspi, I ordered one last week from element14 and now have an expected ship date of November 5th. These things must be really popular.

Ti Chronos Watch Controls Raspberry Pi

[Mike Field] was working on interfacing his TI Chronos eZ430 watch with the Raspberry Pi. As things were going pretty well, he took a side-trip from his intended hack and implemented watch-based control for an RPi audio player.

It really comes as no surprise that this is possible, and even easy. After all, the RPi board has native USB capability for hosting the watch‘s RF dongle, and it’s running Linux which we know already works well with the Chronos platform. But we still love the thought of having automation controls strapped to our wrist!

mpg321 is the audio playback program used for this hack. It plays MP3 files using ALSA for sound, which does have a few hiccups on the RPi. [Mike] found workarounds and included them in the C program he uses to gather everything into one nice code package. Control depends on keypresses sent from the watch (meant for use with PowerPoint) which are translated by his code and pushed to the audio/mp3 programs.

Raspberry Pi Enclosure Turns It Into A Desktop PC

While you’re still waiting for your Raspberry Pi to be delivered, why not build an enclosure for it? This build comes from the fruitful workshop of [builttospec], and gives the Raspi a very nice case well-suited for being placed on your desktop.

Like most of [builttospec]’s case builds, this enclosure was made on a laser cutter out of acrylic and features everything you would expect in a good Raspi enclosure. All the hardware ports are available, and there’s also a slot for a GPIO ribbon cable, perfect for connecting an enclosed Raspi to whatever hardware project you’re working on.

One thing we’re loving about [builttospec]’s enclosure is the tasteful use of light pipes that funnel the light from the LED indicators on the Raspi to the surface of the case. Sure, they’re just a few bits of laser-cut polycarbonate, but its little touches like this that transform a good case build into a great one.

Files available on Thingiverse.

Penetration Testing With The Raspberry Pi

PwnPi is a penetration testing distribution rolled up for the Raspberry Pi platform. This should come as no surprise to anyone. The RPi board has a beefy processor, it’s relatively low power, has the option of the on-board NIC or a USB WiFi dongle, and it already has Linux kernel and desktop sources available to start from.

Now we will admit we’re a bit disappointed from this tip. Don’t get us wrong, the distro looks like it’s well done, and we’re sure there are a lot of folks out there who will be happy to have these tools to help test their network security. But this is a software only hack and we were expecting to see a nice little covert package that could be plugged into an outlet (SheevaPlug style), or a battery-powered module that can be plugged into an Ethernet port and hidden away.

Now you know what we want, don’t forget to send in a link once you pull it off.

[Thanks Scott]

Adding Heat Sinks To A Raspberry Pi

[Michael Dornisch] was surprised to find that the main processor of the Raspberry Pi reaches about 56 degrees Celsius (about 133 degrees F) while streaming video over the network. He thought it might help the longevity of the device if he was able to cool things off a bit. But why stop with just the processor? He added heat sinks to the SoC, Ethernet/USB chip, and voltage regulator.

From his parts bin he grabbed a small heat sink that was probably used on a graphics card. After measuring the three chips with his digital calipers he cut out the footprint he needed, resulting in three smaller heat sinks. We didn’t realize that thermal compound has enough gripping power to hold the sinks in place without any mechanical fastener, but apparently it does. [Michael] mentions that it’s possible to use other adhesives, like JB Weld. What’s important is that you use something (ie: thermal compound or a liquid adhesive) to prevent any air gap from coming between the chip surface and the aluminum.

He measured the result as a 17.3 degree C (31 degree F) drop in temperature. We looked around and it seems there’s no internal temperature sensor on the Broadcom chip so these surface readings will have to suffice. Do you think this will prolong the life of the board if it is used regularly to play back high quality video? We already know that these temperatures are within the specifications for the hardware.

[Thanks Simon]