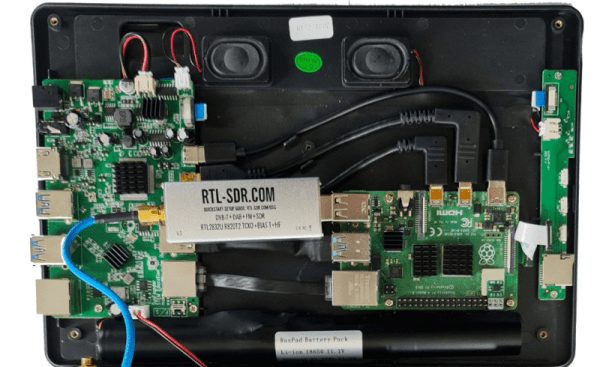
We always get excited when we buy a new tablet. But after a few months, it usually winds up at the bottom of a pile of papers on the credenza, a victim of not being as powerful as our desktop computers and not being as convenient as our phones. However, if you don’t mind a thick tablet, you can get the RasPad enclosure to fit around your own Raspberry Pi so it can be used as a tablet. Honestly, we weren’t that impressed until we saw [RTL-SDR] add an SDR dongle inside the case, making it a very portable Raspberry Pi SDR platform.
The box is a little interesting by itself, although be warned it costs over $200. For that price you get an LCD and driver board, a battery system, speakers, and an SD extension slot with some control buttons for volume and brightness. There’s a video of the whole setup (in German) below.
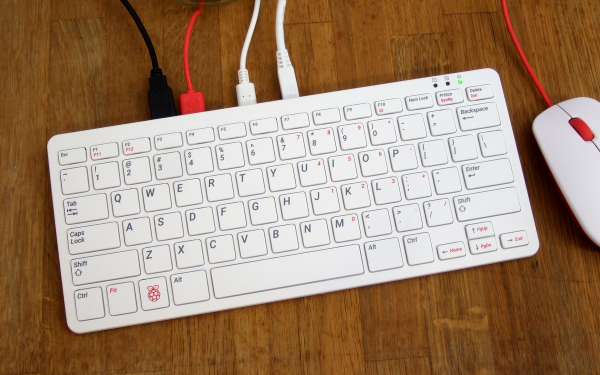
The Raspberry Pi 400 all-in-one computer is a neat little unit that is powerful enough to take on most humdrum computing tasks while doing an excellent job of freeing up valuable desktop space. But what about those moments when both the Pi and a PC are needed on the same desktop? How can the Pi and the bulky PC keyboard share the same space?
[Gadgetoid] may have the answer, with a clever bit of software that presents the Pi’s mouse and keyboard as peripherals on its USB-C power port. If your PC has a high-power USB socket that can run the Pi then it can use the small computer’s input devices just as well as the Pi itself can. It’s fair to say that the Pi 400’s keyboard is not it’s strongest point, but we can see some utility in the idea.
Running it is simply a case of running an executable from the Pi. Control can be wrested back to Raspberry Pi OS with a simple keystroke. Perhaps it’s not the ultimate desktop experience, but if you’re a die-hard Pi-head there’s plenty of appeal.
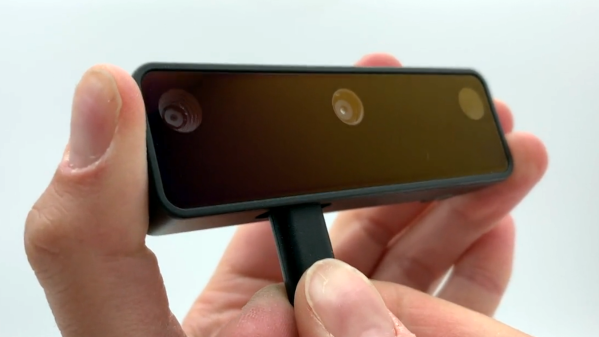
The OAK-D is an open-source, full-color depth sensing camera with embedded AI capabilities, and there is now a crowdfunding campaign for a newer, lighter version called the OAK-D Lite. The new model does everything the previous one could do, combining machine vision with stereo depth sensing and an ability to run highly complex image processing tasks all on-board, freeing the host from any of the overhead involved.
The OAK-D Lite camera is actually several elements together in one package: a full-color 4K camera, two greyscale cameras for stereo depth sensing, and onboard AI machine vision processing with Intel’s Movidius Myriad X processor. Tying it all together is an open-source software platform called DepthAI that wraps the camera’s functions and capabilities together into a unified whole.
The goal is to give embedded systems access to human-like visual perception in real-time, which at its core means detecting things, and identifying where they are in physical space. It does this with a combination of traditional machine vision functions (like edge detection and perspective correction), depth sensing, and the ability to plug in pre-trained convolutional neural network (CNN) models for complex tasks like object classification, pose estimation, or hand tracking in real-time.
So how is it used? Practically speaking, the OAK-D Lite is a USB device intended to be plugged into a host (running any OS), and the team has put a lot of work into making it as easy as possible. With the help of a downloadable application, the hardware can be up and running with examples in about half a minute. Integrating the device into other projects or products can be done in Python with the help of the DepthAI SDK, which provides functionality with minimal coding and configuration (and for more advanced users, there is also a full API for low-level access). Since the vision processing is all done on-board, even a Raspberry Pi Zero can be used effectively as a host.
There’s one more thing that improves the ease-of-use situation, and that’s the fact that support for the OAK-D Lite (as well as the previous OAK-D) has been added to a software suite called the Cortic Edge Platform (CEP). CEP is a block-based visual coding system that runs on a Raspberry Pi, and is aimed at anyone who wants to rapidly prototype with AI tools in a primarily visual interface, providing yet another way to glue a project together.
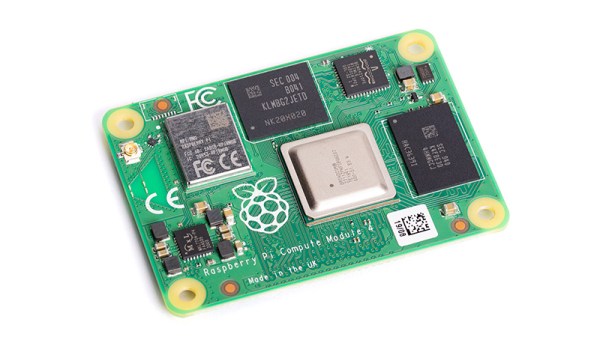
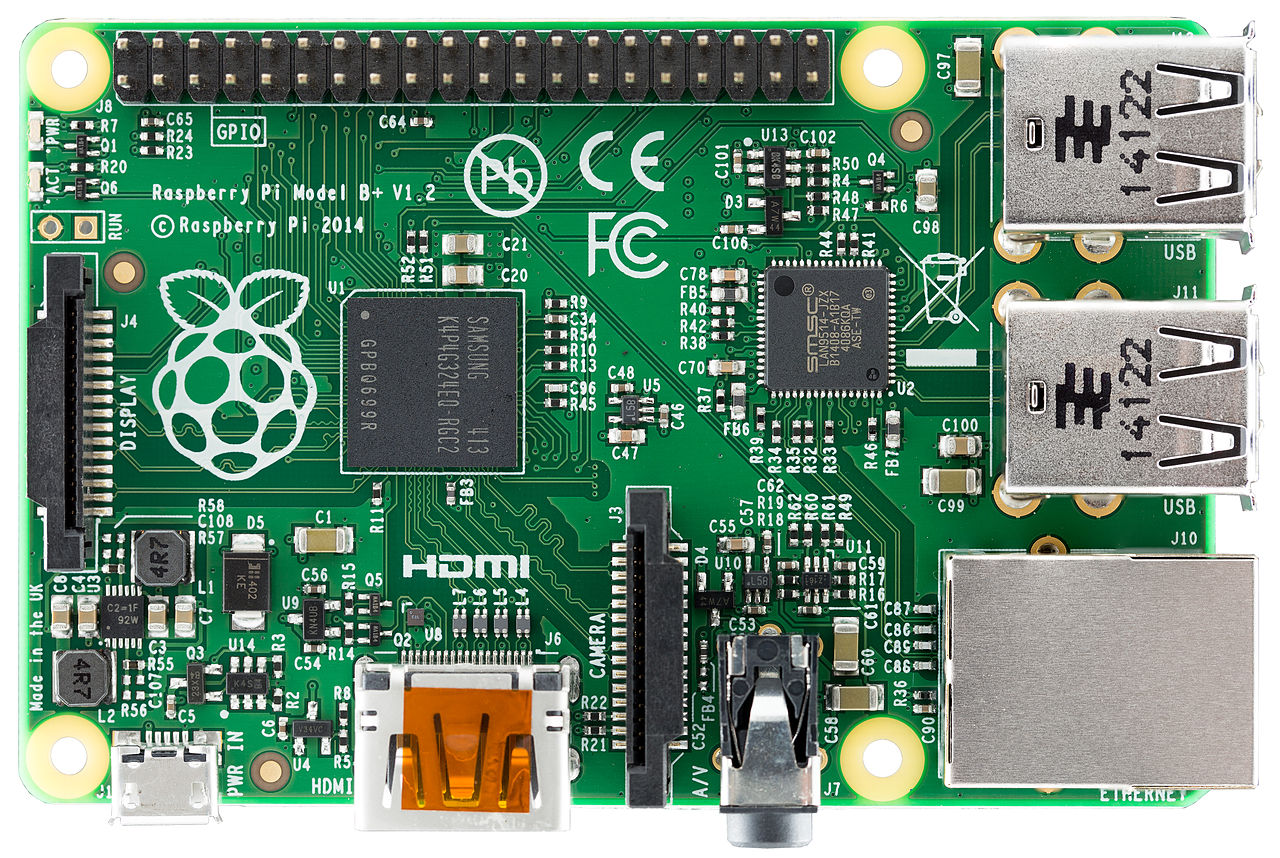
If we wanted to point to an epoch-making moment for our community, we’d take you back to February 29th, 2012. It was that day on which a small outfit in Cambridge put on the market the first batch of their new product. That outfit was what would become the Raspberry Pi Foundation, and the product was a run of 10,000 Chinese made versions of their very first single board computer, the Raspberry Pi Model B. With its BCM2835 SoC and 512 megabytes of memory it might not have been the first board that could run a Linux distribution from an SD card, but it was certainly the first that did so for pocket money prices. On that morning back in 2012 the unforseen demand for the new board brought down the websites of both the electronics distributors putting it on sale, and a now-legendary product was born. We’re now on version 4 of the Model B with specs upgraded in almost every sense, and something closer to the original can still be bought in the form of its svelte stablemate, the Pi Zero.
How Do You Evolve Without Casualties?
The original Pi Model B+ from 2014. The form factor has had a few minor changes, but hardware-wise the Pi 4 follows this pretty closely. Lucasbosch, CC BY-SA 3.0.
The problem with having spawned such a successful product line is this: with so many competitors and copies snapping at your heels, how do you improve upon it? It’s fair to say that sometimes its competitors have produced more capable hardware than the Pi of the moment, but they do so without the board from Cambridge’s ace in the hole: its uniquely well-supported Linux distribution, Raspberry Pi OS. It’s that combination of a powerful board and an operating system with the minimum of shocks and surprises that still makes the Pi the one to go for after all these years.
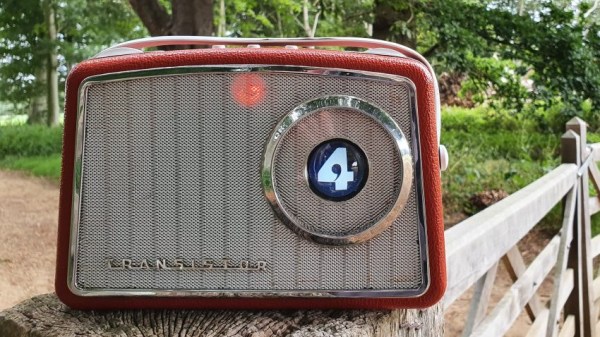
There’s nothing quite like vintage hardware, and the way it looks and works is something that can be worth celebrating. [Old Tech. New Spec] did that with his loving modification of a 1964 Dansette portable radio, bringing it into the modern era by giving it the ability to play Internet radio stations while keeping all the original controls and appearance. As he says, you’d hardly know it has been modified unless you turned it on.
A full color LCD behind a convex lens matches the radio’s aesthetic.
A real centerpiece of this conversion is that the inner part of the tuning dial has been replaced with a full color LCD display that shows, among other things, the logo of whatever Internet radio station is currently playing. The combination of LCD and convex lens looks fantastic, and blends beautifully into the aesthetic.
Inside the device is a Raspberry Pi, some simple Python scripts, and a Pirate Audio board. Together, they handle the job of audio streaming and output, displaying album art, and accepting inputs for playback controls. A large power bank ensures the result remains portable, and as usual with vintage hardware, there’s no worry about fitting everything inside. Watch it in action in the video embedded below. (And if the name of the audio board got you excited, but you’re disappointed to discover there’s no actual pirate broadcasting happening? Well, the Raspberry Pi can do that, too.)
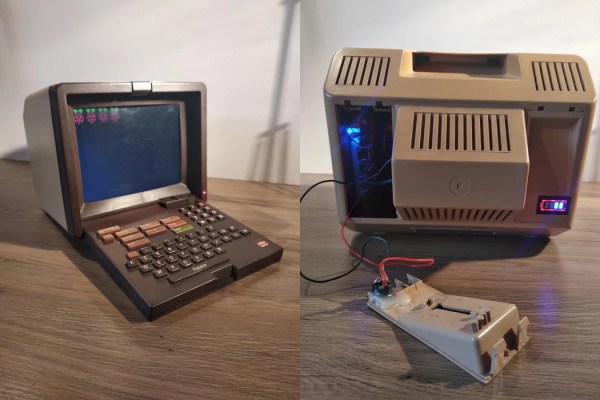
In 1980, France took a step into the future when the telecom companies introduced the Minitel system — a precursor to the Web where users could shop, buy train tickets, check stocks, and send and receive electronic mail through a small terminal. Minitel still had 10 million monthly connections in 2009, but the service was discontinued in 2012.
So, you can imagine how many Minitel terminals must be floating around at this point. [Gautchh] picked one up at a garage sale a while back and converted it into a battery-powered laptop for taking notes in class. Luckily for us, [Gautchh] recently open-sourced this project and has given us a wiring diagram, STLs, BOM, and a good look into the build process.
[Gautchh] started by gutting the Minitel, but saved the power button and the très chic power indicator that looks like a AA cell. The new 10.4″ LCD screen is held in place with four 3D-printed corner blocks and a bit of hot glue, and the original keyboard (which we’d love to clack on) is now wired up to an Arduino Pro Micro. The main brain — a Raspberry Pi 3B — is easily accessible through a handy little hatch in the back. Well, it looks like we’ve got a new ebay alert to set up.
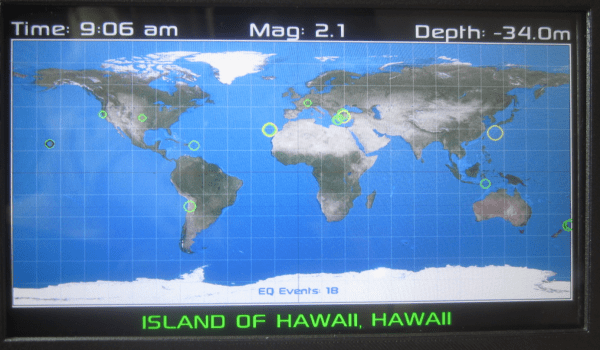
What do you do when you stumble across a website posting real-time earthquake data? Well, if you’re [Craig Lindley] you write some code to format it nicely onto a display, put it in a box, and watch it whilst making dinner.
[Craig] started off with coding in Forth on the ESP32, using ESP32Forth, but admits it didn’t go so well, ditching the ESP32 for a Raspberry Pi 3 he had lying around, and after a brief detour via C++, he settled on a Python implementation using Pygame.
A case was 3D printed, which he says worked OK, but needs a little tuning to be perfect. There is no shortage of casing options for the Pi with the official 7″ display, [Craig] suggests that it probably wasn’t worth the effort to 3D print the case and if he was building it again would likely use a commercially available option which had a better fit.
When developing the code, and watching it work, he noted clusters of earthquakes around Hawaii, then he found out Kilauea had just gone up. Wow.
For a similar take, check out this other recent build using an ESP32 and the same data source.