 Chances are, you take color for granted. Whether or not you give it much thought, color is key to distinguishing your surroundings. It helps you identify fire, brown recluse spiders, and the right resistor for the job.
In the spotlight this week is a 1950s educational film called “This is Color“. It also happens to be a delightful time capsule of consumer packaging from the atomic age. This film was made by the Interchemical Corporation, an industrial research lab and manufacturer of printing inks. As the narrator explains, consistent replication of pigments is an essential part of mass production. In order to conjure a particular pigment in the first place, one must first understand the nature of color and the physical properties of visible light.
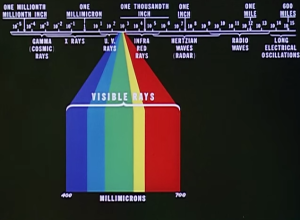 Each color that makes up the spectrum of visible rays has a particular wavelength. The five principal colors—red, yellow, green, blue, and violet—make possible thousands of shades and hues, but are only a small slice of the electromagnetic spectrum.
When light encounters a transparent material more dense than air, such as water or glass, it has to change direction and is bent by the surface. This is known as refraction. A straw placed in a glass of water will appear bent below the surface because the air and the water have different refractive indices. That is, the air and water will bend or refract different percentages of the light that permeates them. Continue reading “Retrotechtacular: Turn On The Magic Of Colored Light”
 As [Shahriar] points out in the introductory matter to