Basement Wood-Drying Kiln

Once upon a time, a woodworker met another woodworker who happened to have a tree business. They struck a deal stating that the first woodworker would dry the sawn boards provided by the second and both would share the lumber. That’s exactly what happened to [Tim], which led to his entry in The Hackaday Prize.

[Tim] does a great job explaining his build of the kiln itself, his controls, and the gist of running the thing. The idea is to pull moisture out of the wood at just the right speed. Otherwise, the boards might check on the outside, honeycomb on the inside, or bear residual tension. He’s using a dehumidifier to pump dry air into the kiln and a control system to both monitor the relative humidity in the kiln and to dry the stock down to a moisture content in the 6-8% range.

kiln controls
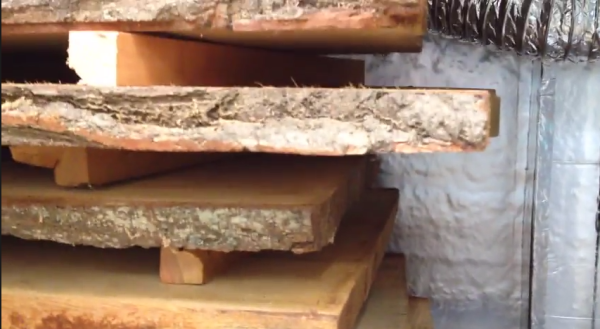
The kiln is built from slightly blemished pallet rack shelving that [Tim] cut to suit his needs. He skinned it with 1/2″ insulation boards sealed with aluminium tape and plans to add sheet metal to protect the insulation.

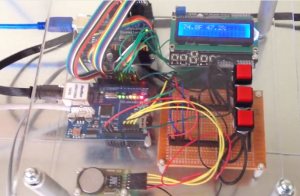
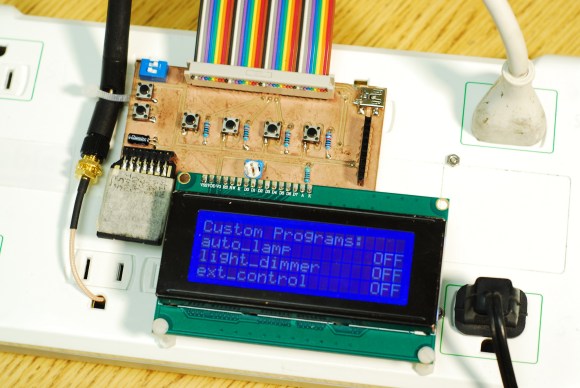
[Tim] wanted to control both a fan and the dehumidifier, monitor relative humidity in the kiln, log the data, and send it to the internets. For this, he has employed an Arduino Due, a DHT-22, an RTC, a relay board, an Ethernet shield, and an LCD to show what’s happening. The hardware is all working at this point, and the software is on its way. Check out his entry video below.


SpaceWrencherThis project is an official entry to The Hackaday Prize that sadly didn’t make the quarterfinal selection. It’s still a great project, and worthy of a Hackaday post on its own.


Continue reading “Basement Wood-Drying Kiln”

Topsy Turvy Clock Tells Confusing Time

Looking for a new clock but hate the fact that all the numbers are always in the correct order? Look no further than [Andy]’s topsy turvy clock which correctly tells time despite the fact that the numbers on the face of the clock are in random positions.

At first glance, the clock looks fairly normal despite the mixed-up numerals. Upon closer inspection, the clock is much more than it appears to be. A battery backed real-time clock keeps track of time, and a microcontroller turns the hands of the clock to where they need to be. The clock uses optical sensors to make sure the hands are in the correct starting position when it is first powered on.

Check out the video below for a better illustration of what the clock looks like when in operation. The hour hand is always pointing at the correct hour, and the minute hand starts every five minutes at the number it would have started at on a normal clock, i.e. at 1:15 the hour hand will point at “one” and the minute hand will point at “three”.

We love this very interesting and unique take. It was inspired by a few other clocks, including a version of the infamous Vetinari “random tick” clock which will drive you crazy in a different way.

Infinity Mirror Clock: There’s A Time Joke There Somewhere

Infinity Mirror Clock

We don’t think we’ve seen an Infinity Mirror Clock before, but we love this new twist on an old favorite. Different colors distinguish between seconds, minutes and hours, and an additional IR sensor detects when someone is directly in front of the clock and switches the LEDs off, allowing it to be used as a normal mirror. This build is the work of [Dushyant Ahuja], who is no stranger to hacking together clocks out of LEDs. You can tell how much progress he’s made with the mirror clock by taking a glance at his first project, which is an impressive creation held together by jumbles of wire and some glue.

[Dushyant] has stepped up his game for his new clock, attaching an LED strip along the inside of a circular frame to fashion the infinity mirror effect. The lights receive a signal from an attached homemade Arduino board, which is also connected to a real-time clock (RTC) module to keep time and to a Bluetooth module, which allows [Dushyant] to program the clock wirelessly rather than having to drag out some cords if the clock ever needs an adjustment.

Stick around after the jump for a quick demonstration video. The lights are dazzling to watch; [Dushyant] inserted a stainless steel plate at the center of the circle to reflect the outer rim of LEDs. After a quick rainbow effect, it looks like the mirror enters clock mode. See if you can figure out what time it is. For a more step-by-step overview of this project, swing by his Instructables page.

Continue reading “Infinity Mirror Clock: There’s A Time Joke There Somewhere”

A Laser Cut Word Clock

DIY laser cut word clock.

What is a word clock? A word clock is a clock that displays the time typographically that is also an interactive piece of art. Rather than buy one for $1500, [Buckeyeguy89] decided to build one as a present for his older brother. A very nice present indeed!

There are many different things that come into play when designing a word clock. The front panel is made from a laser cut piece of birch using the service from Ponoko. Additionally, white translucent pieces of acrylic were needed to keep each word’s light from bleeding into the neighboring letters. The hardware uses two Arduinos to control the LEDs and a DS3231 RTC for keeping accurate time. The results are very impressive, but it would sure make assembly easier if a custom PCB was used in the final version. For a one-off project, this makes a great birthday present.

The craftsmanship of this word clock is great, making it well suited for any home. What projects have you built that involve more than just electronics? Sometimes, quality aesthetics make all the difference.

Go On A Power Trip With Powerduino

powerduinoThings don’t always run the way we want them to or operate at the ideal temperature out of the box. Instead of spending extra for power controls that may or may not meet your needs, wouldn’t it make more sense to dial in the ideal level from the source? That’s what [dekuNukem] had in mind when he decided to make Powerduino, an arduino-compatible programmable power strip.

With Powerduino, [dekuNukem] can control the electrical consumption of all kinds of things without ever worrying about the irreversible deadliness of mains voltage. It actually uses a Teensy 3.1 which can be programmed with the Arduino IDE through the micro USB connector. He’s really tricked it out to the point of putting Kill A Watt meters to shame. A wi-fi module lets him control any of the outlets from anywhere, and the RTC module lets him make customized schedules for them. Powerduino has an SD card slot for logging energy consumption, and a 20 x 4 LCD screen makes it easy to directly interface with the power strip.

The Powerduino code is up on GitHub, and [dekuNukem]’s walkthrough video is after the jump.

Continue reading “Go On A Power Trip With Powerduino”

A Vibrating Timepiece

vibratingWatch

It may not look like much, but the above pictured device is [qquuiinn’s] handy little watch that indicates time through pulsed vibrations. Perhaps we should refrain from labeling it as a “watch,” however, considering it’s [qquuiinn’s] intention to remove the need to actually look at the thing. Vibrations occur in grandfather clock format, with one long vibration for each hour, accompanied by one, two, or three short pulses for the quarter-hour increments.

The design is straightforward, using an ATTiny85 for the brains along with a few analog components. The vibration motor sticks to the protoboard with some glue, joining the microcontroller, a coin cell battery, and a pushbutton on a small protoboard. The button allows for manual time requests; one press responds with the current time (approximated, probably) in vibrations. The build is a work in progress, and [qquuiinn] acknowledges the lack of an RTC (real-time clock) causes some drift in the timepiece’s accuracy. We suspect, however, that you’d address that problem—twice daily—when you replace the battery: it only lasts ten hours.

Making A UNIX Clock While Making A Few Mistakes Along The Way

unixclock

Sometimes the projects we think are easy to design are the ones on which we end up making the most mistakes. The UNIX clock that you see in the picture above is one of these projects. For our readers that don’t know it, UNIX time is the number of seconds since 00:00 on January 1st 1970. The clock that [James] designed is based on an Arduino Pro Mini board, an RTC chip to store the time, a custom made display board and two buttons to set the date/time.

One of the mistakes that [James] made was designing the boards on which will be soldered the seven-segment displays before actually choosing the ones he’ll use, as he was thinking they’d be all the same. The displays he ended up with had a different pitch and needed a different anode voltage, so he had to cut several traces on the PCBs and add another power supply. It also took [James] quite a while to remove the bits that his hackerspace’s laser didn’t cut through. We strongly advise a good look at his very detailed write-up if you are starting in the electronics world.

If you find this Unix time display too easy to read here’s one that’s a bit more of a challenge.