Skylight In Any Room

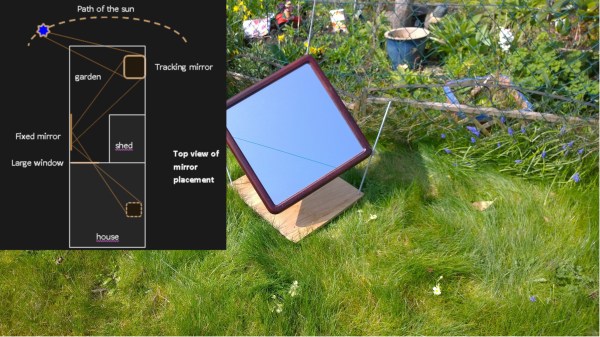
Despite a glut of introvert memes, humans need sunlight. If vitamin D isn’t your concern, the sun is a powerful heater, and it helps plants grow. Sadly for [mime], their house is not positioned well to capture all those yummy sunbeams. Luckily for us, their entry into the 2020 Hackaday Prize is their sun-tracking apparatus that redirects those powerful rays throughout the house. It uses a couple of mirrors to redirect the light around their shed and into the house. For those who work in a dim office, no amount of work is too great for a peek of natural sunlight.

Movie spoiler alert: We saw this trick in the 1985 movie Legend and it was enough to vanquish the Lord of Darkness.

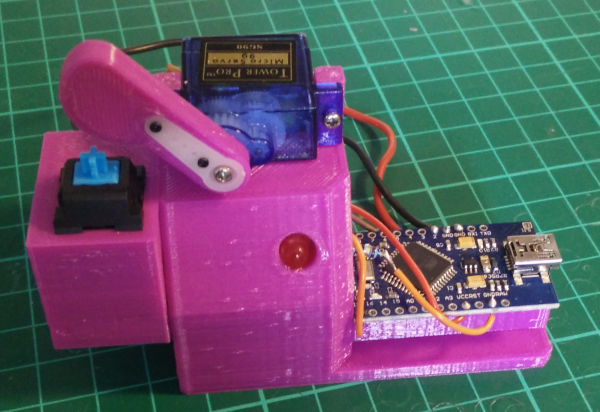
This project started in 2014 and sat on hiatus for more than five years, but it is back and prime for improvements fueled by half-a-decade of experience. The parts that aren’t likely to change are the threaded struts that adjust the positioning mirror’s angle, the driving motors, and power circuitry. Their first plan was to build a solar-powered controller with an Arduino, DC motors, and sun telemetry data, but now they’re leaning toward stepper motors and a computer in the house with a long cable. They are a finalist this year, so we will keep our eyes peeled for further development.

Open-Source Robotic Arm For All Purposes

A set of helping hands is a nice tool to have around the shop, especially if soldering or gluing small components is a common task. What we all really want, though, is a robotic arm. Sure, it could help us set up glue or solder but it can do virtually any other task it is assigned as well. A general-purpose tool like this might be out of reach of most of us, unless we have a 3D printer to make this open-source robotic arm at home.

The KAUDA Robotic Arm from [Giovanni Lerda] is a five-axis arm with a gripping tool and has a completely open-source set of schematics so it can be printed on any 3D printer. The robot arm uses three stepper motors and two servo motors, and is based on the Arduino MEGA 2560 for control. The electrical schematics are also open-source, so getting this one up and running is just an issue of printing, wiring, and implementing some software. To that end there are software examples available, and they can easily be modified to fit one’s robotic needs.

A project like this could be helpful for any number of other projects, or also just as a lesson in robotics for yourself or even in a classroom, since many schools now have their own 3D printers. With everything being open-source, this is a much simpler endeavor now than other projects we’ve seen that attempted to get robotic arms running again.

Continue reading “Open-Source Robotic Arm For All Purposes”

Encouragement Machine Battles Your Inner Bully

We would be preaching to the choir if we told you that fear is the action killer when it comes to the challenge of new projects in uncharted territory. Everyone who reads Hackaday knows that it takes mettle to forge through the self-doubt as we push ourselves to new engineering heights.

[JBV Creative] hears the voice, too: the one that says you can’t build that thing, it’s too difficult/useless. He knows that both creativity and anti-creativity stem from the same source — the powerful human mind that dreams up these projects in the first place.

The Encouragement Machine combines the two in a piece that engineers art from garbage, aka negative thoughts. It works by first acknowledging the most basal of discouraging thoughts — an important step of the process — and then it simply trims away the negativity.

This machine uses a stepper motor to feed receipt paper underneath a custom stamp that says YOU CAN’T DO IT. Then it passes the paper through a pair of servo-driven scissors that snip off the apostrophe-t.

Ironically or not, [JBV Creative] ran into a few issues with this build, but managed to muster up enough moxie to work through the problems without encouraging slips of paper. We have to wonder how much more smoothly the next project will go given all the positivity he now has on-demand.

[JBV] doesn’t delve into the electronics much, but it looks like an Arduino and a motor driver to us. We totally dig the design — it looks like an electrical substation or rocket launch pad that happens to have a Ferris wheel. Step right up and check out the build video after the break.

Generic encouragement is great all-purpose attitude adjuster, but what if you want more specific sentiments? Here’s an affirmation mirror that will help you believe whatever you program into the scrolling display.

Continue reading “Encouragement Machine Battles Your Inner Bully”

Moving Fridge Magnets Make For Unique Clock

We see a ton of clock projects around these parts, and being hackers, we love to feature them all. But every once in a while we stumble upon a great new way to display the time that really gets our attention and requires a closer look, such as this moving fridge magnet clock.

The fridge magnets [Craig Colvin] built this unique clock around are the colorful plastic kinds that have adorned the lower regions of refrigerators in toddler-filled households for ages. Instead of residing on a fridge, [Craig] laminated a sheet of white acrylic to a thin sheet of steel, to give the magnets something to hold onto. Moving the numbers is the job of a CoreXY-style mechanism. The belt-driven Cartesian movement maneuvers a head to to the right location to pick up a number; a servo in the head moves two powerful magnets into position under the number. The head then moves the number to the right spot, releases its magnets, and the number stays put on the board. You can see it in action in the video after the break.

While we love this as it is, it brings to mind some great mods. One can imagine the addition of letters to make a legit word clock, or to just add a calendar display. We’d also love to see these magnets in their natural habitat by building this into the door of a working fridge.

Continue reading “Moving Fridge Magnets Make For Unique Clock”

A Robotic Stylist For Your Lockdown Lengthened Locks

It’s perhaps easy to think that despite the rapid acceleration of technology that there are certain jobs that will never be automated out of existence. Generally the job said to be robot-proof is the one held by the person making the proclamation, we notice. But certainly the job of cutting and styling people’s hair could never be done by a robot, right?

We wouldn’t bet the farm on it, although judging by [Shane Wighton]’s quarantine haircut robot, it’ll be a while before the stylists of the world will be on the dole. Said to have sprung from the need to trim his boyishly long hair, the contraption is an object lesson recreating the subtle manual skills a stylist brings to every head they work on — there’s a reason it takes 1,500 hours or more of training to get a license, after all. [Shane] discovered this early, and realized that exactly replicating the manual dexterity of human hands was a non-starter. His cutting head uses a vacuum to stand the hair upright, 3D-printed fingers to grip a small bundle of hair, and servo-driven scissors to cut it to length. The angle of attack of the scissors can be adjusted through multiple axes, and the entire thing rotates on a hell-no-I’m-not-putting-my-head-in-that-thing mechanism.

To his great credit, [Shane] braved the machine as customer zero, after only a few non-conclusive life-safety tests with a dummy head and wig. We won’t spoil the ending, but suffice it to say that the thing actually worked with no bloodshed and only minimal damage to [Shane]’s style. The long-suffering [Mrs. Wighton], however, was not convinced to take a test drive.

In all seriousness, kudos to [Shane] for attacking such a complex problem. We love what he’s doing with his builds, like his basketball catcher and his robo-golf club, and we’re looking forward to more.

Continue reading “A Robotic Stylist For Your Lockdown Lengthened Locks”

Switch Tester Servo-Slaps Them ’til They Fail

[James] is designing an open-source 3D printed keyboard switch, with the end goal of building a keyboard with as many printed parts as possible. Since keyswitches are meant to be pressed quite often, the DIY switches ought to be tested just as rigorously as their commercial counterparts are at the factory. Maybe even more so.

The broken spring after 13,000+ automated boings.

Rather than wear out his fingers with millions of actuations, [James] built a robot to test switches until they fail. All he has to do is plug a switch in, and the servo-driven finger slowly presses the slider down until the contacts close, which lights the LED.

The system waits 100ms for the contacts to stop any tiny vibrations before releasing the slider. That Arduino on the side tracks the contact and release points and sends them to the PC to be graphed. If the switch fails to actuate or release, the tester stops altogether.

We love that this auto-tester works just fine for commercial switches, too — the bit that holds the switch is separate and attaches with screws, so you could have one for every footprint variant. [James] recently did his first test of a printed switch and it survived an astonishing 13,907 presses before the printed coil spring snapped.

One could argue that this doubles as a servo tester. If you want a dedicated device for that, this one can test up to sixteen at a time.

Continue reading “Switch Tester Servo-Slaps Them ’til They Fail”

Resistors Sorter Measures Values

We’ve all been there. A big bag of resistors all mixed up. Maybe you bought them cheap. Maybe your neatly organized drawers spilled. Of course, you can excruciatingly read the color codes one by one. Or use a meter. But either way, it is a tedious job. [Ishann’s] solution was to build an automatic sorter that directly measures the value using a voltage divider, rather than rely on machine vision as is often the case in these projects. That means it could be modified to do matching for precise circuits (e.g., sort out resistors all marked 1K that are more than a half-percent away from one nominal value).

There is a funnel that admits one resistor at a time into a test area where it is measured. A plate at the bottom rotates depending on the measured value. In the current implementation, the resistor either falls to the left or the right. It wouldn’t be hard to make a rotating tray with compartments for different values of resistance. It looks like you have to feed the machine one resistor at a time, and automating that sounds like a trick considering how jumbled loose axial components can be. Still, its a fun project that you probably have all the parts to make.

An Arduino powers the thing. An LCD screen and display control the action. If you want some practice handling material robotically, this is a great use of servos and gravity and it does serve a practical purpose.

We have seen many variations on this, including ones that read the color code. If you ever wanted to know where the color code for resistors came from, we took a trip to the past to find out earlier this year.

Continue reading “Resistors Sorter Measures Values”