Laser-Cut ArcSin Dress Is Wearable Math

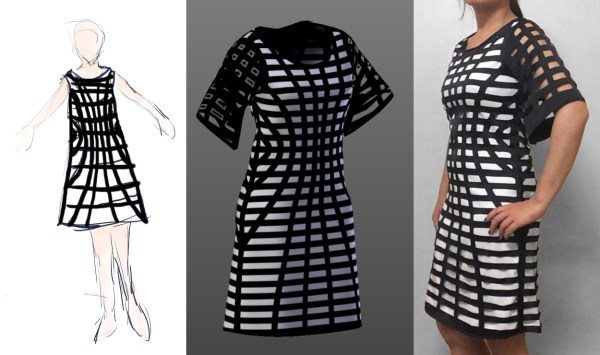
Using sewing simulation, 3D modeling and laser-cutting [Nancy Yi Liang] makes custom dresses that fit like a glove. Her project documentation walks us through all the steps from the first sketch to the final garment.

After sketching the design on paper, the design process moves into the digital domain, where an accurate 3D model of the wearer is required. [Nancy] created hers with Make Human, a free software that creates to-size avatars of humans from tape-measured parameters. Using the professional garment modeling software MarvelousDesigner (which offers a 30 day trial version), she then created the actual layout. The software allows her to design the cutting patterns, and then also drapes the fabric around the human model in a 3D garment simulation to check the fit. The result are the cutting patterns and a 3D model of the garment.

Continue reading “Laser-Cut ArcSin Dress Is Wearable Math”

Netflix And Chill – And Socks?

Waking up to spoilers in the last episode after falling asleep during the first episode of a Netflix binge-watching session ranks right up there on the list of first-world problems. Luckily there’s a solution in the form of a pair of Netflix enabled socks, which looks like a pretty neat wearable IoT project.

To be sure, calling these socks Netflix enabled is a bit of a stretch. Aside from the sock designs, which are based on popular Netflix original series, there’s nothing about the electronics that’s specific to the popular streaming service. These socks, with their Arduino Pro Trinket and accelerometer, detect when you stop moving and send an IR signal to do your bidding – pause the movie, kill the TV, or whatever. The electronic side of the build is pretty approachable – it’s just a couple of modules soldered together. The fiber arts side of the project might be a little outside the wheelhouse of the typical hardware hacker, but you can either team up with someone who knits – an experienced knitter, as socks are not a beginner’s pattern – or just slip the felt-clad hardware into your favorite comfy socks. We’d be a bit concerned about ESD protection for the hardware in the wooly environment, though.

“Netflix and chill” is the current version of last century’s “Watching the submarine races,” and as such the need for special socks or a custom Netflix switch for the occasion is a bit puzzling. Still, the underlying wearables idea is pretty good, with plenty of possibilities for expansion and repurposing.

Continue reading “Netflix And Chill – And Socks?”

Nyan Cat

Embroidered Nyan Cat Brings A Meme To The Real World

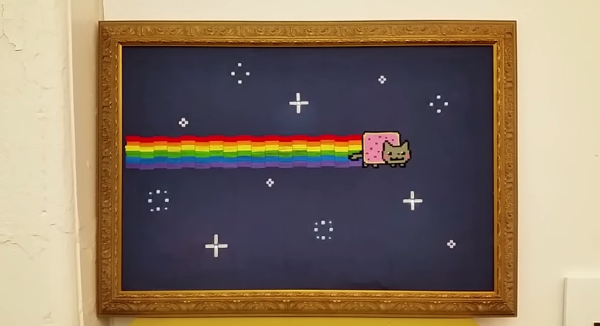
Have you ever come across an Internet meme and just thought to yourself, “I have to bring this into the physical world!” Well [0xb3nn] and [Knit Knit] did. They decided to take the classic nyan cat meme and bring it to life.

The frame is 24″ x 36″. Many hours went into the knitting process, but the result obviously turned out very well. The stars include 24 LED sequins to add a sparkling animation effect. These were sewn onto the back of the work using conductive thread. They are bright enough to shine through to the front where needed. These connect back to an Arduino Pro Mini 5V board.

The Arduino is also connected to a capacitive touch sensor. This allows the user to simply place their hand over the nyan cat image to start the animation. No need for physical buttons or switches to take away from the visual design. An Adafruit AudioFX sound board was used to play back a saved nyan cat theme song over a couple of speakers. The source code for this project is available on github. Be sure to watch the demo video below. Continue reading “Embroidered Nyan Cat Brings A Meme To The Real World”

Hacklet 31 – Software Tools

For every computer error, there are two human errors, and one of them is blaming the computer. Whenever a human blames a computer for something, there are two tools, and one of them is the computer.

Not all of your nifty tools need to be fancy robots, CNC machines, or nifty Robertson screwdrivers; a computer is equally capable of being a fantastic tool, provided it has the right software. For this week’s Hacklet, we’re going through some of the best software tools on hackaday.io.

6653681421957570397[Alan] was inspired to build a software tool for making sewing patterns. Sewing patterns are usually designed for the ‘average’ person, but if you’re making custom wearables, you should end up with a piece of clothing that fits perfectly.

The first project [Alan] is using this tool for is a fleece cap that fits the contour of his head. He captured a 3D mesh of his head, imported the mesh into Blender, and unwrapped the resulting mesh. The two halves of the hat were then plotted with a Silhouette Cameo, cut out of fleece, and sewn together. The result is a beanie that fits perfectly around [Alan]’s head. It’s an extremely cool and novel application of 3D modeling, and if you ever need to wrap a 3D object with a 2D material, this is the project you want to check out.

5869061407871295021 And you thought the autorouter in Eagle was bad.

[Anderson] built a tool called Pyrite that will take a schematic and build a layout in three-dimensional space. He calls them Volumetric Circuits, and it’s basically the point-to-point wiring found in old radios and amplifiers taken to the next level. We featured this project before, and there haven’t been many updates since then. Maybe giving [Anderson]’s project a few skulls will help motivate him to get back to the project.

133031421839442989 Not satisfied with the existing free and open source CAM programs, [Snegovick] started work on his own.

[Snegovick] calls his project BCAM, and it’s exactly what you need to mill holes in PCBs, cut gears with a CNC router, engrave plastic, and anything else a 2.5 axis CNC machine can do. The project is written in Python, and yes, the source is available. Supported operations include drilling, path following, offset path following, and pocketing.

Write enough microcontroller projects, and you’ll eventually come up with your own library of common code that does one thing and one thing well. If you’re smart, you’ll reuse that code in future projects. [ericwazhung] is cutting through the hard part of developing all this code and released some things that are useful in a whole lot of projects.

Included in the commonCode library are the usual ‘heartbeat LED’, non-blocking input, a standard interface for AVR timers, bitmaps of text characters, DC motor control, and a whole bunch more. Extremely useful in any event.

That’s it for this round of the Hacklet, bringing you the best hackaday.io has to offer.

Arduino CNC Sewing Machine

Arduino Controlled Sewing Machine Increases Stitch Options

[Andrew] is bringing his old mechanical sewing machine into the 21st century by adding an Arduino control module. Originally, his Alfa sewing machine could only do a straight stitch or a zig-zag of varying widths. Since this was an old sewing machine, all of the controls were knobs and levers. RC car servos were installed in the sewing machine and now are solely responsible for controlling, in real time, the horizontal movement of the needle and the amount of stroke of the feed dogs (the metal components responsible for advancing the fabric through the sewing machine). There is also a switch on the needle bar that feeds back to the Arduino when the needle is in the full-up position.

With full control of the stitch width and fabric advance, it is possible to come up with some awesome stitch patterns that were not possible on this machine before. Each of the stitch patterns are pre-programmed in the Arduino. Right now it is possible to control the sewing machine over the Arduino’s serial USB connection but the workflow for such an operation is in its infancy. [Andrew] plans on making this sewing machine fully automatic so that he can embroider letters and numbers.

Although the project is still a work in progress, [Andrew] has made his preliminary Arduino code available for folks who want to further his accomplishments. To continue reading about hacked sewing machines, check out this one converted to an embroidering machine.

Continue reading “Arduino Controlled Sewing Machine Increases Stitch Options”

A collection of boards that make up the LED Jacket

A Very Bright LED Jacket

Last year, [Ytai] went to Burning Man for the first time. He was a bit inexperienced, and lacked the lumens to make him visible on the Playa. This year, he made up for it by building an extra bright LED Jacket.

The jacket consists of 48 LEDs, at 150 lumens each. Each RGB LED module was placed on its own PCB, and controlled by the tiny PIC12F1571 microcontroller. This microcontroller was a great fit since it has three PWM channels (one for each color) and costs 50 cents. Firmware on the PIC allows the boards to be daisy-chained together to reduce wiring. This was done by using a protocol similar to the popular WS2811 LEDs.

Assembling 50 of the boards presented a challenge. This was addressed by using surface mount components, a solder stencil from OSH Stencils, an electric skillet, and a good amount of patience. The final cost of each module was about $3.

With 50 of the boards assembled, a two layer jacket was sewn up. The electronics were sandwiched between these two fabric layers, which gave the jacket a clean look. A wrist mounted controller allows the wearer to select different patterns.

For a full rundown of the jacket, check out the video after the break.

Continue reading “A Very Bright LED Jacket”

Sewing Conductive Thread In Parallel Lines

[Cynthia] has shared a great video of  machine sewing parallel lines of conductive thread onto ribbon using a cording foot which usually comes standard with most machines. This technique could be particularly useful when using addressable LEDs like a NeoPixel to get the ground, data, and positive lined up fairly accurately. Sewing the conductive thread onto ribbon also makes it a hell of a lot easier to attach to many garments or textiles,  and also makes it easier to replace or reuse.

The method is pretty easy, essentially using the grooves in the cording foot to guide the conductive treads and ensuring even spacing. Two of the lines are sewn down approximately 3 mm apart using a zigzag stitch. The third line is sewn separately making sure the stitching doesn’t break the first two lines. In the video, a striped ribbon is used which has slight troughs that additionally helps the threads stay in place and the sewer to stay on target.

[Cynthia] of Cynthia Designs Studio has been experimenting with embedding electronics in textiles and has quite a few great videos that you can check out on the Cynthia Designs Studio YouTube channel.

We have seen a machine embroidered LED matrix and a hand sewn LED quilt here on Hackaday, but those who have tried know that conductive thread can be very tricky to work with and keep conductivity.  Do you have any tips or tricks for hand or machine sewing conductive thread? If so, please share in the comments below.

Continue reading “Sewing Conductive Thread In Parallel Lines”