Shapeways Files For Bankruptcy

One of the earliest hobbyist-friendly on-demand 3D printing and fabrication shops, Shapeways, is filing for bankruptcy. As these financial arrangements always go, this may or may not mean the end of the service, but it’s a sure sign that their business wasn’t running as well as you’d hope.

One of the standout features of Shapeways was always that they made metal printing affordable to the home gamer. Whether it was something frivolous like a custom gear-shifter knob, or something all-too functional like a prototype rocket engine, it was neat to have the alternative workflow of iterative design at home and then shipping out for manufacturing.

We don’t want to speculate too much, but we’d be surprised if the rise of similar services in China wasn’t part of the reason for the bankruptcy. The market landscape just isn’t what it was way back in 2013. (Sadly, the video linked in this article isn’t around any more. If anyone can find a copy, post up in the comments?) So while Shapeways may or may not be gone, it’s not like we can’t get metal parts made anymore.

Still, we’re spilling a little for the OG.

Thanks [Aaron Eiche] for the breaking news tip!

Creating A Custom Engagement Ring With 3D-Printing

Even if you’re pretty sure what the answer will be, a marriage proposal is attended by a great deal of stress to make the event as memorable and romantic as possible. You’ve got a lot of details to look after, not least of which is the ring. So why not take some of the pressure off and just 3D-print the thing?

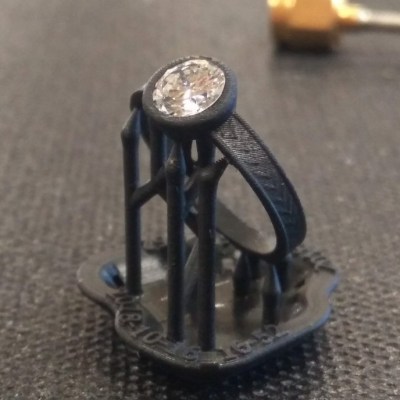
No, a cheesy PLA ring is probably not going to cut it with even the most understanding of fiancees, and that’s not at all what [Justin Lam] did with this DIY engagement ring. He took an engineer’s approach to the problem – gathering specs, making iterative design changes in Fusion 360, and having a prototype ring SLA printed by a friend. That allowed him to tweak the design before sending it off to Shapeways for production. We were surprised to learn that jewelry printing is a big deal, and Shapeways uses a lost-wax process for it. First a high-resolution wax SLA printer is used to make a detailed positive, which is then used to make a plaster mold. The mold is fired to melt the wax, and molten gold is poured in to make the rough casting, which is cleaned and polished before shipping.

Once he had the ring, [Justin] watched a few jewelry-making videos to learn how to set the family heirloom stone into the bezel setting; we admit we cringed a bit when he said he used the blade shaft of a screwdriver to crimp the edge of the bezel to the stone. But it came out great, even if it needed a bit of resizing. The details of the proposal are left to the romantically inclined, but TL;DR – she said yes.

Congratulations to the happy couple, and to [Justin] for pulling off a beautiful build. Most of our jewelry hacks are of the blinkenlight variety rather than fine jewelry, although we have featured a machinist’s take on the subject before.

3D Printed Alarm Clock Looks Just Like Store Bought

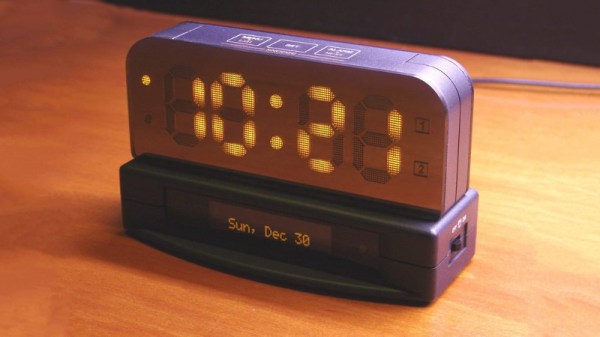
Clocks are a popular project on Hackaday. They’re a great way to showcase a whole range of creative build techniques, and can make an excellent showpiece as well. We’ve seen everything from the blinkiest binary build to the noisiest alarms, but [Benoit] has delivered something different — a stylish build that looks like it came right off the store shelf.

The clock features a large 7-segment display built with IN-PI554FCH LEDs, which are similiar to the popular WS2812Bs but with lower power consumption. There’s also an OLED display for reading the date and going through menus, capacitive touch buttons for control and an Arduino Mega to tie everything together.

The real party piece is the enclosure, however. [Benoit] spent significant time honing a process to get a nice surface finish on Shapeways SLS parts. The 3D printed components are first cleaned with a toothbrush to free any loose powder, before several stages of primer, sanding, and paint. The final product is then finished with decals that lend the device that perfect factory look. If you’re eager to replicate the build, the parts are available at Github.

[Benoit]’s clock is a great example of what can be achieved by the home builder who is willing to wait a couple weeks for high quality 3D printed parts and decals to ship. It’s not [Benoit]’s first build to grace these hallowed pages, either – his transparent clock runs Linux!

Hackaday Links: October 18, 2015

We have our featured speakers lined up for the Hackaday Supercon, one of which is [Fran Blanche]. We’ve seen a lot of her work, from playing with pocket watches to not having the funding to build an Apollo Guidance Computer DSKY. In her spare time, she builds guitar pedals, and there’s a biopic of her in She Shreds magazine.

Halloween is coming, and that means dressing children up as pirates, fairies, characters from the latest Marvel and Disney movies, and electrolytic capacitors.

There’s a new movie on [Steve Jobs]. It’s called the Jobs S. It’s a major upgrade of the previous release, featuring a faster processor and more retinas. One more thing. Someone is trying to cash in on [Woz]’s work. This time it’s an auction for a complete Apple I that’s expected to go for $770,000 USD.

Hackaday community member [John McLear] is giving away the factory seconds of his original NFC ring (think jewelry). These still work but failed QA for small reasons and will be fun to hack around on. You pay shipping which starts at £60 for 50 rings. We’ve grabbed enough of them to include in the goody bags for the Hackaday Superconference. If you have an event coming up, getting everyone hacking on NFC is an interesting activity. If you don’t want 50+, [John] is also in the middle of a Kickstarter for an improved version.

Your 3D printed parts will rarely come out perfectly. There will always be some strings or scars from removing them from the bed. There’s a solution to these problems: use a hot air gun.

Everyone has a plumbus in their home, but how do they do it? First, they take the dinglebop, and smooth it out with a bunch of schleem. The schleem is then repurposed for later batches.

Need Custom Parts? This Week We’re Giving Out $2k In 3D Printing

We’re having an excellent time watching your project builds take shape. All summer long we’re giving away prizes to make this easier and to help move great prototypes along. Last week we offered up 125 Teensy-LC boards; the winners are listed below. This week we want to see interesting parts come to life so we’re giving away two-thousand dollars in 3D Printing.

These 3D printed parts will be delivered to 40 different project builds in the form of $50 gift cards from Shapeways. Basically, you just design your parts, choose a printing medium like plastic or metal, and before you know it your digital creation appears as a real part shipped in the mail.

Time to write down your Hackaday Prize idea and get it entered! You’re best chance of winning will come when you publish a new project log describing how having custom-printed parts would move your build forward. Whether or not you score something this week, you’ll be eligible for all the stuff we’re giving away this summer. And of course, there’s always that Grand Prize of a Trip into Space!

Last Week’s 125 Winners of a Teensy-LC Board

50k-in-play-teensy-lc-featured

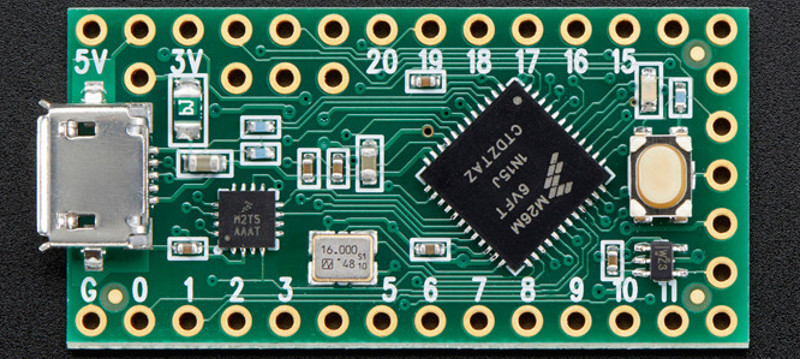
Congratulations to these 125 projects who were selected as winners from last week. You will receive a Teensy-LC board. The name makes them sound small, but the ARM Cortex-M0+ packs a punch. 62k of flash, 8k of RAM, and these run at up to 48 MHz. Program them bare-metal or use the ease of the Arduino IDE. Don’t forget to post pictures and information about what you build using your newly acquired powerhouse!

Each project creator will find info on redeeming their prize as a message on Hackaday.io.


The 2015 Hackaday Prize is sponsored by:

Open Source, 3D Printed Rocket Engines

A liquid-fuel rocket engine is just about the hardest thing anyone could ever build. There are considerations for thermodynamics, machining, electronics, material science, and software just to have something that won’t blow up on the test rig. The data to build a liquid engine isn’t easy to find, either: a lot of helpful info is classified or locked up in one of [Elon]’s file cabinets.

[Graham] over at Fubar Labs in New Jersey is working to change this. He’s developing an open source, 3D printed, liquid fuel rocket engine. Right now, it’s not going to fly, but that’s not the point: the first step towards developing a successful rocket is to develop a successful engine, and [Graham] is hard at work making this a reality.

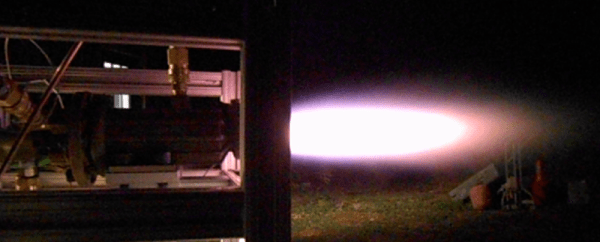
This engine, powered by gaseous oxygen and ethanol, is designed for 3D printing. It’s actually a great use of the technology; SpaceX and NASA have produced 3D printed engine parts using DMLS printers, but [Graham] is using the much cheaper (and available at Shapeways) metal SLS printers to produce his engine. Rocket engines are extremely hard to manufacture with traditional methods, making 3D printing the perfect process for building a rocket engine.

So far, [Graham] has printed the engine, injector, and igniter, all for the purpose of shoving oxygen and ethanol into the combustion chamber, lighting it, and marveling at the Mach cones. You can see a video of that below, but there’s also a few incredible resources on GitHub, the Fubar Labs wiki, and a bunch of pictures and test results here.

Continue reading “Open Source, 3D Printed Rocket Engines”

A Tiny Arcade Machine With Tinier Buttons

Building a MAME machine around a Raspberry Pi has been the standard build for years now, and tiny versions of full-sized arcade machines have gone from curiosity to commonplace. [diygizmo] just built one of these tiny arcades, but the fit and finish of this one puts it above all others. There’s a real, miniature joystick in there, along with 3D printed adapters for tact switches to make this one look like a lilliputian version of a full size standup MAME cabinet.

The entire enclosure is 3D printed, and most of the electronics are exactly what you would expect: A Raspberry Pi, 2.5″ LCD, and a battery-powered speaker takes up most of the BOM. Where this build gets interesting is the buttons and joystick: after what we’re sure was a crazy amount of googling, [diygizmo] found something that looks like a normal arcade joystick, only smaller. Unable to find a suitable replacement for arcade buttons, [diygizmo] just printed their own, tucked a tact switch behind the plastic, and wired everything up.

Add in some decals, paint, and the same techniques used to create plastic model miniatures, and you have a perfect representation of a miniature arcade machine.