Arduino WiFi Shield Available, Costs $85 USD

Over on the Arduino blog, the release of the official Arduino WiFi shield was just announced. On the spec page for this WiFi shield. we can see this new board isn’t a slouch; it’s powered by a 32-bit ATMega 32UC3 microcontroller, has provisions for WEP and WPA2 encryption, and supports both TCP and UDP with the Arduino WiFi library. It also costs €69/$85/£55 from the Arduino store.

Now that the announcement of the Arduino WiFi shield is over with, we’ll take this opportunity to go through a few other WiFi adapters for the Arduino that don’t cost an arm and a leg.

The WiFly shield – available from Sparkfun – is a WiFi adapter with the same form factor as the ever popular XBee modules. Of course, it’s possible to make your own breakout board; the WiFly only needs a TX, RX, power and ground connection to connect your Arduino project to the Internet.

We’ve seen a few projects use the WiShield from async labs. It’s a WiFi module packaged in the familiar Arduino shield form factor, and costs $55 USD.

For the hardcore hackers out there, you could always get a bare Microchip WiFi module and get it to work with an AVR as [Quinn Dunki] attempted to. In all fairness, [Quinn] was trying to de-Arduinofy the WiFi library; if you’re cool with Arduino code swimming around in your project, this method will probably work.

There’s also the very, very cool Electric Imp. Basically, it’s an SD card with a built-in WiFi module. After configuring the Imp by holding it up to patterns flashing on your smartphone screen, this device serves as a transparent bridge to the magical ‘cloud’ we’ve been hearing about. The Electric Imp was supposed to have been released in late July/early August, and we’ll put a post up when this cool device actually launches.

Of course we’re neglecting the simplest solution to getting WiFi running on an Arduino project: just use a wireless router. Really, all you need is a pair of TX and RX pins and a copy of OpenWRT. Easy, and you probably have the necessary hardware lying around.

We’re missing a few methods of Arduinofying a WiFi connection (or WiFying an Arduino…), but we’ll let our readers finish what we started in the comments.

The Proper Way To Put An Arduino In A Raspberry Pi

For all their hoopla, the GPIO pins on the Raspberry Pi aren’t terribly useful on their own. Sure, you can output digital data, but our world is analog and there just isn’t any ADCs or DACs on these magical Raspi pins.

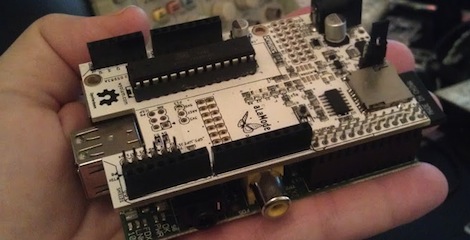
The AlaMode, a project designed by [Kevin], [Anool], and [Justin] over at the Wyolum OSHW collaborative aims to fix this. They developed a stackable Arduino-compatable board for the Raspberry Pi.

Right off the bat, the AlaMode plugs directly into the GPIO pins of the Raspberry Pi. From there, communication with the ATMega of the Arduino is enabled, allowing you to send and receive data just as you would with an Arduino. There’s a real-time clock, servo headers, plenty of ways to power the board, and even a breakout for this GPS module.

A lot of unnecessary cruft is done away with in the AlaMode; There’s no USB port, but it can be programmed directly over the GPIO pins of the Raspberry Pi. Pretty neat, and we can’t wait to grab one for our Raspi.

Cheap As Chips Arduino Ethernet Shield

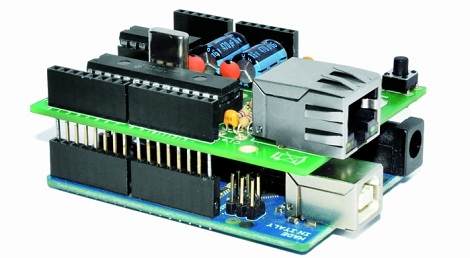
It’s no secret that Ethernet shields for the Arduino are a little expensive. With the official Ethernet shield selling for about $50 and other options not much cheaper, there’s a lot of room for improvement for Arduinofied Ethernet. [Boris] over at Open Electronics has a solution to this problem: his Ethercard powered by a $3 Ethernet controller.

The Ethercard uses the Microchip ENC28J60, a through-hole Ethernet controller. There isn’t much else on the board apart from an RJ45 jack, caps, resistors, and a cheap buffer chip. This board was designed to be easily produced, and we’re thinking it might be possible to etch this board at home.

There are a few drawbacks to this ENC28J60 Ethernet shield – the official Arduino Ethernet shield has a 10/100 Mbps connection where the Microchip-powered shield is limited to 10 Mbps. Given the reduced cost, ease of assembly, and the fact that it’s pretty hard to saturate a 100Mbps connection with an Arduino this flaw can be easily ignored.

Pretty neat, especially considering how much you can do with an Ethernet connection on your Arduino. Files and code available in the git.

Logic Analyzer Add-on For The MSP430 Launchpad

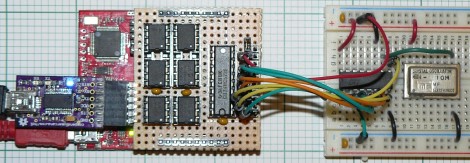
Here’s a 6-channel logic analyzer shield for the MSP430 Launchpad. It manages an eyebrow-raising 16 million samples per second. The prototype seen above is made on a hunk of protoboard with point-to-point soldering. [oPossum] did lay out a PCB — which is just 50mmx50mm — but has not had any produced quite yet.

He calls it the LogicBoost, and based it on the the LogicShrimp design. The sextuplet of 8-pin chips are all SPI RAM. These are responsible for storing the samples, with a 74HC573 latch routing the traffic. The MSP430 chip provides the SPI clock, and the Launchpad’s virtual com port can be used to push the data to a computer for graphing. That’s a bit slow so [oPossum] also included an optional header for an FTDI board that will do a faster job. The sample rate can be adjusted by tweaking the internal oscillator setting of the chip; there’s plenty to choose from so it will work for just about any purpose (as long as you don’t surpass the 16 Msps speed limit).

[via Dangerous Prototypes]

Traffic Signal Controller Pulls Data Over WiFi

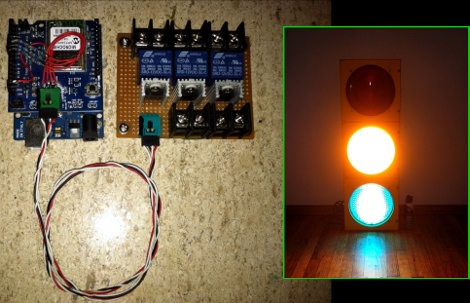
[Travis Brown] just published a post about the traffic light controller he built. His number one goal was to make the device wireless (except for AC power) and he achieved this by using a WiFi shield for his Arduino. But there is also a separate board that provides a way for the chip to switch the AC lights.

He works for a web hosting company, and the boss wanted a fun way to display the status of the servers among other things. He chose to use the WiServer library which controls the CoperHead WiFi Shield and gives him the ability to serve simple web pages from the Arduino. When power is applied the sketch automatically connects to the AP and starts polling the company’s API for status data. If you’re not within eyesight of the traffic lights you can log into the web server and check that way.

We think [Travis] did a great job of explaining his code, and we applaud him for making proper use of the watchdog timer (something we don’t see in very many projects). This joins the pile of traffic-light display devices we’ve seen around here. We still don’t know where people are getting their hands on the things.

Continue reading “Traffic Signal Controller Pulls Data Over WiFi”

Arduino Tells You How Rough Your Last Mountain Bike Ride Was

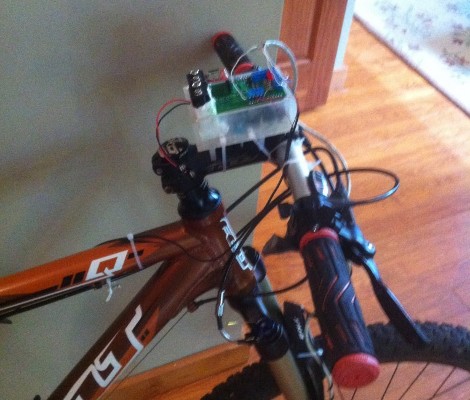
If you want to see what kind of abuse you’re causing your body when out on those single-track rides this system is just the thing. It’s an Arduino data logger that [Wdm006] takes along on the rides with him. When he gets back home, a Python scripts captures the data dump and graphs it. It may sound like a neat trick, but he’s got something planned for that information.

The enclosure mounts to the stem of his bike. It houses an Arduino board with a data logging shield of his own design. That shield holds an SD card for storage, and breaks the other pins out as screw terminals. Right now there’s an accelerometer on the front fork, and some method of recording wheel speed. This is the research phase of an anti-lock brake system (ABS) he plans to build for mountain biking. No word on what hardware he’ll use for that, but we can’t wait to see how it comes out.

LayerOne Badges Stop Bullets; Drive Away

We love badges. And we’ve really got to thank [Charliex] for taking the time to write a huge post about this year’s LayerOne badges, especially since they’ve got their backs up against the deadline for pulling everything together in time.

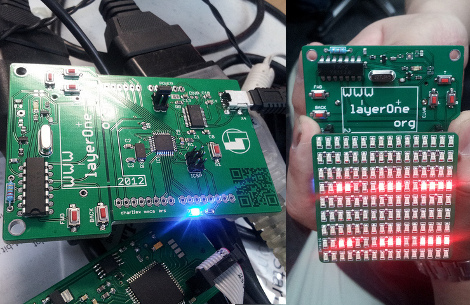
Here it is, the stock badge on the left, with an add-on shield on the right. Now the original intent was to make this badge the chassis of an RC car. [Charliex] chewed through his development time trying to source toy cars that could be gutted for parts that would mount easily on the badge. This looked promising at first, but turned out to be folly. Instead what we have here is an Arduino compatible board with an RF transmitter which can be cut off and used separately if you wish. Attendees will be able to use the badge to take control of the toy cars (cases of them have been shipped to the conference), with the option to use the USB functionality to facilitate automation.

So what about stopping bullets? There is a bug in the module [Charliex] used to export the board design from Eagle. They came back from the fab house as 0.125″ substrate. That’s pretty beefy!

The conference is this weekend… better get on that!