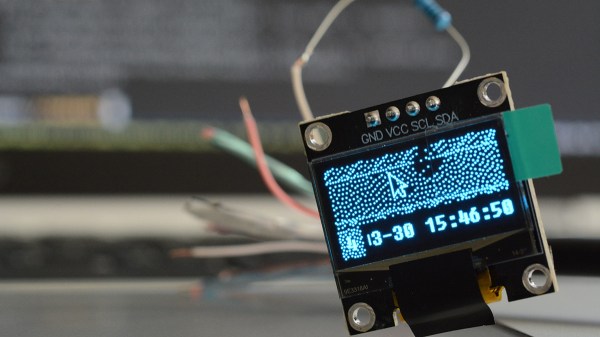
An 128x64 OLED display with a weird image on it, showing a mouse cursor, date and time in the bottom right corner, and a whole lot of presumably dithered dots

Making Your Own Technically-HDMI OLED Monitor

One day, [mitxela] got bored and decided to build his own HDMI monitor – the unconventional way. HDMI has a few high-speed differential pairs, but it also has an I2C interface used for detecting the monitor’s resolution and issuing commands like brightness control. In fact, I2C is the backbone for a lot of side channels like these – it’s also one of our preferred interfaces for connecting to cool sensors, and in this case, an OLED display!

[mitxela] describes his journey from start to end, with all the pitfalls and detours. Going through the pinout with a broken hence sacrificial HDMI cable in hand, he figured out how to probe the I2C lines with Linux command-line tools and used those to verify that the display was recognized on the HDMI-exposed I2C bus. Then, he turned to Python and wrote a short library for the display using the smbus bindings – and, after stumbling upon an FPS limitation caused by SMBus standard restrictions, rewrote his code to directly talk to the I2C device node, raising FPS from 2 to 5-10.

From there, question arose – what’s the best software route to take? He tried making a custom X modeline on the HDMI port the display was technically attached to, but that didn’t work out. In the end, he successfully employed the Linux capability called “virtual monitors”, and found out about an interesting peculiarity – there was no mouse cursor to be seen. Turns out, they’re typically hardware-accelerated and overlaid by our GPUs, but in [mitxela]’s case, the GPU was not involved, so he added cursor support to the picture forwarding code, too.

With partial refresh, the display could be redrawn even faster, but that’s where [mitxela] decided he’s reached a satisfactory conclusion to this journey. The write-up is a great read, and if videos are more your forte, he also made a video about it all – embedded below.

We first covered the ability to get I2C from display ports 14 years ago, and every now and then, this fun under-explored opportunity has been popping up in hackers’ projects. We’ve even seen ready-to-go breakouts for getting I2C out of VGA ports quickly. And if you go a bit further, with your I2C hacking skills, you can even strip HDCP!

We thank [sellicott] and [leo60228] for sharing this with us!

Continue reading “Making Your Own Technically-HDMI OLED Monitor”

Building An Open Source ThinkPad Battery

If you own a laptop that’s got a few years on the clock, you’ve probably contemplated getting a replacement battery for it. Which means you also know how much legitimate OEM packs cost compared to the shady eBay clones. You can often get two or three of the knock-offs for the same price as a single real battery, but they never last as long as the originals. If they even work properly at all.

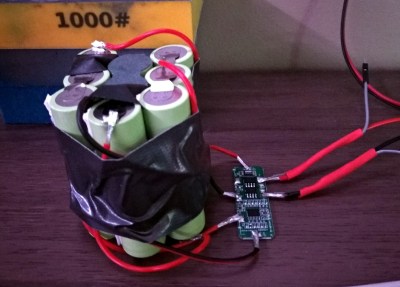
Which is why [Alexander Parent] decided to take the road less traveled and scratch built a custom battery for his ThinkPad T420. By reverse engineering how the battery pack communicated with the computer, he reasoned he would be able to come up with an open source firmware that worked at least as well as what the the third party ones are running. Which from the sounds of it, wasn’t a very high bar. From a more practical standpoint, it also meant he’d be able to create a higher capacity battery pack than what was commercially available should he chose to.

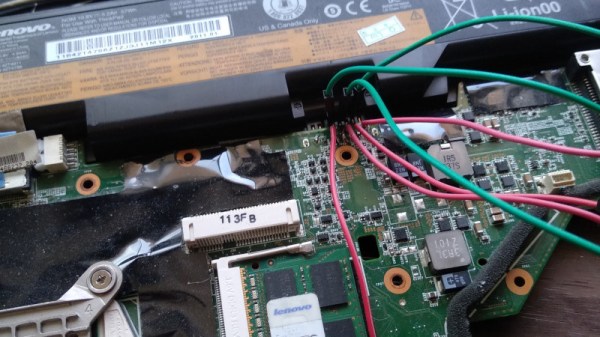
A logic analyzer wired in between one of the third party batteries and a spare T420 motherboard allowed [Alexander] to capture all the SMBus chatter between the two. From there he wrote some Arduino code that would mimic a battery as a proof of concept. He was slowed down a bit by an undocumented CRC check, but in the end he was able to come up with a fairly mature firmware that even allows you to provide a custom vendor name and model number for your pack.

The code was shifted over to an ATtiny85, with a voltage divider wired up to one of the pins so it can read the pack voltage. [Alexander] says his firmware still doesn’t do a great job of reporting the actual battery capacity remaining, but it’s close enough for his purposes. He came up with a simple PCB design to hold the MCU and support components, which eventually he plans on putting inside of a 3D printed case that actually plugs into the back of his T420.

This project is obviously still in a relatively early stage, but we’re very interested to see [Alexander] take it all the way. The ThinkPad has long been the hacker’s favorite laptop, and we can think of no machine more worthy of a fully open hardware and software battery pack.

PackProbe Reports Laptop Battery Health

The 18650 cell has become a ubiquitous standard in the lithium battery world. From power drills to early Tesla vehicles, these compact cells power all manner of portable devices. A particularly common use is in laptop batteries, where they’re often built into a pack using the Smart Battery System. This creates a smart battery that can communicate and report on its own status. PackProbe is a software tool built to communicate with these batteries, and you might just find it comes in handy.

The code runs on the WiFi-enabled Arduino Yún by default, but can be easily modified to suit other Arduino platforms. Communicating over SMBus using the Arduino’s I2C hardware, it’s capable of working with the vast majority of laptop batteries out there which comply with the Smart Battery System. With that standard being minted in 1994, it’s spread far and wide these days.

It’s a great way to harvest not only the specifications and manufacturing details of your laptop battery pack, but also to check on the health of the battery. This can give a clear idea over whether the battery is still usable, as well as whether the cells are worth harvesting for those in the recycling business.

You’re not limited to just the Arduino, though. There’s a similar tool available for the ESP8266, too.

Building A Proof Of Concept Hardware Implant

You’ve no doubt heard about the “hardware implants” which were supposedly found on some server motherboards, which has led to all sorts of hand-wringing online. There’s no end of debate about the capabilities of such devices, how large they would need to be, and quite frankly, if they even exist to begin with. We’re through the looking-glass now, and there’s understandably a mad rush to learn as much as possible about the threat these types of devices represent.

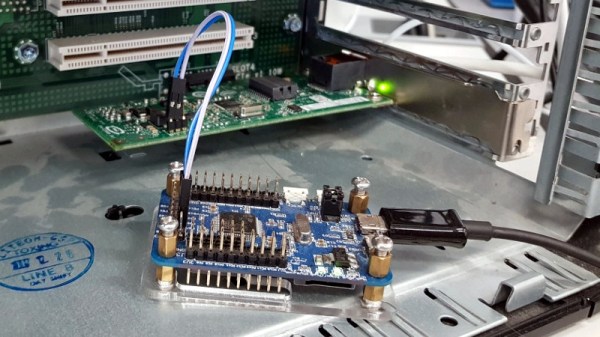
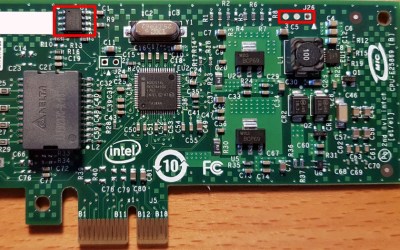
EEPROM (left) can be edited to enable SMBus access on this card (header to the right)

[Nicolas Oberli] of Kudelski Security wanted to do more than idly speculate, so he decided to come up with a model of how an implanted hardware espionage device could interact with the host system. He was able to do this with off the shelf hardware, meaning anyone who’s so inclined can recreate this “Hardware Implant Playset” in their own home lab for experimentation. Obviously this is not meant to portray a practical attack in terms of the hardware itself, but gives some valuable insight into how such a device might function.

One of the most obvious attack vectors for hardware implants is what’s known as the Baseboard Management Controller (BMC). This is a chip used on modern motherboards to allow for remote control and monitoring of the system’s hardware, and promises to be a ripe target for attackers. There are a few sideband channels which can be used by the BMC chip to talk to other chips. To keep things simple [Nicolas] focused on the older I2C-derived SMBus (rather than the newer and more complex NC-SI), demonstrating what can be done once you have control of that bus.

Only problem was, he didn’t have a motherboard with a BMC to experiment with. After a little research, the answer came in the form of the Intel EXPI9301CTBLK network card, which features the 82574L SMBus chip. This allows for experimenting with a subset of SMBus functionality on any machine with a PCI-E slot. Even better, the card has an SMBus header on the top to plug into. [Nicolas] describes in detail how he enabled the SMBus interface by modifying the card’s EEPROM, which then allowed him to detect it with his HydraBus.

With the hardware setup, the rest of the write-up focuses on what you can do with direct control of SMBus on the network card. [Nicolas] demonstrates not only creating and sending Ethernet packets, but also intercepting an incoming packet. In both cases, a running instance of tcpdump on the host computer fails to see the packets even exist.

He goes on to explain that since SMBus is very similar to I2C and only requires four wires, the techniques shown could easily be moved from the Hydrabus dev board used in the demo, to a small microcontroller like the ATtiny85. But you would still need to find a way to add that microcontroller directly onto the network card without it being obvious to the casual observer.

Our previous coverage of suspected hardware implants sparked considerable discussion, and it looks like no matter what side of the fence you’re on, the debate isn’t going away anytime soon.

Talking To Laptop Batteries With The ESP8266

It’s not something you often give a lot of thought to, but the modern consumer laptop battery is a pretty advanced piece of technology. Not only does it pack several dozen watt-hours of energy into a relatively small and lightweight package, but it features integrated diagnostic capability to make sure all those temperamental lithium cells are kept in check. Widely available and extremely cheap thanks to the economies of scale (unless you try to get them from the OEM, anyway), they’re a very compelling option for powering your projects.

Of course, it also helps if, like [teliot] you have a bunch of the things lying around. For reasons we won’t get into, he’s got a whole mess of Acer AL12x32 battery packs which he wanted to use for something other than collecting dust. He had the idea of hooking one up to a solar panel and using it as a power supply for some ESP8266 projects but wanted to be able to talk to the battery for status and diagnostic information. After studying the Smart Battery System (SBS) protocol the batteries use, he was able to come up with some code that lets him pull 37 separate fields of information from the pack’s onboard electronics using his ESP8266.

Battery consumption over time

It took some fiddling with a multimeter to figure out which pin did what on the eight pin interface of the battery. Two of the pins need to be shorted to enable the dual 12 VDC pins to kick in. Technically that’s all you really need to do if you want to utilize the battery in a low-tech sort of way. But to actually get some information from the battery, [teliot] had to identify the two pins which are for the System Management Bus (SMBus) interface where the SBS data lives.

Once he knew which pins to talk to the battery on, the rest was fairly easy. SBS is well documented, and the SMBus interface is very similar to I2C. Like all the cool kids are doing these days, his code publishes the battery info to MQTT where he can plot it and get finely grained info on the performance of his solar power system.

This isn’t the first time we’ve seen a hacker wrangle laptop batteries through SMBus, but it’s always nice to get multiple perspectives on a topic. If you plan on making this kind of thing part of your standard bag of tricks, you might even want to take the time to build a dedicated SMBus scanner.

[via /r/esp8266]

Unlocking Thinkpad Batteries

A few months ago, [Matt] realized he needed another battery for his Thinkpad X230T. The original battery would barely last 10 minutes, and he wanted a battery that would last an entire plane flight. When his new battery arrived, he installed it only to find a disturbing message displayed during startup: “The system does not support batteries that are not genuine Lenovo-made or authorized.” The battery was chipped, and now [Matt] had to figure out a way around this.

Most recent laptop batteries have an integrated controller that implements the Smart Battery Specification (SBS) over the SMBus, an I2C-like protocol with data and clock pins right on the battery connector. After connecting a USBee logic analyser to the relevant pins, [Matt] found the battery didn’t report itself correctly to the Thinkpad’s battery controller.

With the problem clearly defined, [Matt] had a few options open to him. The first was opening both batteries, and replacing the cells in the old (genuine) battery with the cells in the newer (not genuine) battery. If you’ve ever taken apart a laptop battery, you’ll know this is the worst choice. There are fiddly bits of plastic and glue, and if you’re lucky enough to get the battery apart in a reasonably clean matter, you’re not going to get it back together again. The second option was modifying the firmware on the non-genuine battery. [Charlie Miller] has done a bit of research on this, but none of the standard SBS commands would work on the non-genuine battery, meaning [Matt] would need to take the battery apart to see what’s inside. The third option is an embedded controller that taps into the SMBus on the charger connector, but according to [Matt], adding extra electronics to a laptop isn’t ideal. The last option is modifying the Thinkpad’s embedded controller firmware. This last option is the one he went with.

There’s an exceptionally large community dedicated to Thinkpad firmware hacks, reverse engineering, and generally turning Thinkpads into the best machines they can be. With the schematics for his laptop in hand, [Matt] found the embedded controller responsible for battery charging, and after taking a few educated guesses had some success. He ran into problems, though, when he discovered some strangely encrypted code in the software image. A few Russian developers had run into the same problem, and by wiring up a JTAG to the embedded controller chip, this dev had a fully decrypted Flash image of whatever was on this chip.

[Matt]’s next steps are taking the encrypted image and building new firmware for the embedded controller that will allow him to charge is off-brand, and probably every other battery on the planet. As far as interesting mods go, this is right at the top, soon to be overshadowed by a few dozen comments complaining about DRM in batteries.