3D Printing Steel Parts At Home Via Special Filaments

Rocket engines are great for producing thrust from fire and fury, but they’re also difficult to make. They require high-strength materials that can withstand the high temperatures involved. [Integza], however, has tried for a long time to 3D print himself a working rocket engine. His latest attempt involves printing an aerospike design out of metal.

Even steel couldn’t hold up to the fury of the rocket exhaust!

The project relies on special metal-impregnated 3D printer filaments. The part can be printed with a regular 3D printer and then fired to leave just the metal behind. The filament can be harsh, so [Integza] uses a ruby nozzle to handle the metal-impregnated material. Processing the material requires a medium-temperature “debinding” stage in a kiln which removes the plastic, before a high-temperature sintering process that bonds the remaining metal particles into a hopefully-contiguous whole. The process worked well for bronze, though was a little trickier for steel.

Armed with a steel aerospike rocket nozzle, [Integza] attempts using the parts with his 3D printed rocket fuel we’ve seen before. The configuration does generate some thrust, and lasts longer than most of [Integza]’s previous efforts, though still succumbs to the intense heat of the rocket exhaust.

Overall, though, it’s a great example of what it takes to print steel parts at home. You’ll need a quality 3D printer, ruby nozzles and a controllable kiln, but it can be done. If you manage to print something awesome, be sure to drop us a line. Video after the break.

Continue reading “3D Printing Steel Parts At Home Via Special Filaments”

Industrial-Grade Storage Built With Laser-Cut Steel

A tidy workshop is much more likely to be a happy workshop, and one that better supports the practice of making. Organisation is key to maintaining tidiness over time, and for that, you need storage. [Wesley Treat] needed some more space recently, and set about building a serious storage unit using laser-cut parts.

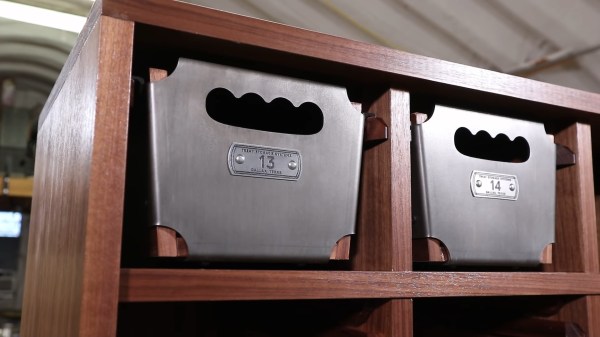
The key to the build lies in the elegant steel flanges used to make the drawers. These were designed in CAD, with a DXF cutting file exported and sent off to OSH Cut for laser cutting and bending, in much the same way one would send 3D printed parts off to Shapeways or PCB files to JLCPCB. The drawer flanges are then joined with steel angle and fitted with plywood bases and sides. The drawers are then given CNC-engraved nameplates for a nice aesthetic touch. Once finished, the heavy duty drawers slide on wooden rails built into the walnut frame.

It’s a great example of how farming out a single piece of a larger project can lead to a quicker build and better final results. Producing 12 flanges by hand in the home shop would take longer and likely have far more variability. For those that only have a 3D printer at home, farming out production for metal parts is a good way to do heavy-duty projects without having to invest in an entire machine shop.

[Wesley] has graced these pages before, too – with a great guide on reproducing knobs for vintage hardware. Video after the break.

Continue reading “Industrial-Grade Storage Built With Laser-Cut Steel”

DIY Furnace Smelts Magnetite Sand Into An Impressive Chef’s Knife

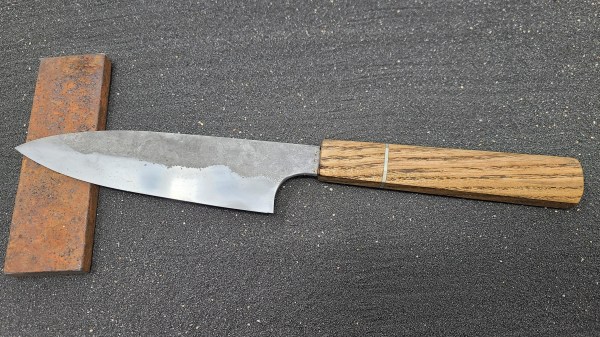
Some people order their raw materials from a factory, missing out on 99% of the fun… or suffering, we’re not sure which. To make that call, you need to look in on the process [IllyriaD] used to collect magnetite sand and turn it into a wicked-looking chef’s knife.

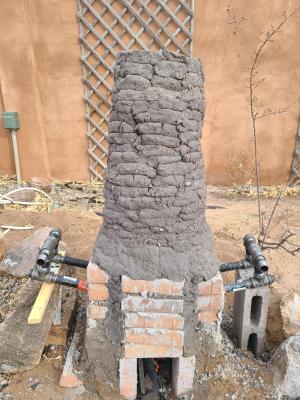
This began by collecting 150 pounds (!) of magnetic dirt from dry lake beds while hiking using a magnet pickup tool with release lever that he got from Harbor Freight. Several repeated magnetic refining passes separated the black ore from non-metallic sands ready for the furnace that he built. That is used to fire up the raw materials using 150 pounds of charcoal, changing the chemical composition by adding carbon and resulting in a gnarly lump of iron known as a bloom.
From there, it’s just a matter of beating the iron bloom into submission over at the anvil. [IllyriaD] details the process of flattening it out to a bar shape, then folding it over. Seven total folds are made for 128 layers, and in the gallery there’s a fantastic image that captures the striation when viewed on end. After being sharpened and polished, you can see where the bevel descends through those layers.

It’s delightful to see people working through the old ways and proving you don’t need a factory, as long as your true goal is to explore the process itself. Does this leave you wanting even more? [IllyriaD] left some insight about the process in the comments of the reddit thread. You probably also want to check out the tile-roofed hut built by [PrimitiveTechnology] without any modern tools.

For Your Holiday Relaxation: The Clickspring Sundial Build Megacut

The fortunate among us may very well have a bit of time off from work coming up, and while most of that time will likely be filled with family obligations and festivities, there’s probably going to be some downtime. And if you should happen to find yourself with a half hour free, you might want to check out the Clickspring Byzantine Calendar-Sundial mega edit. And we’ll gladly accept your gratitude in advance.

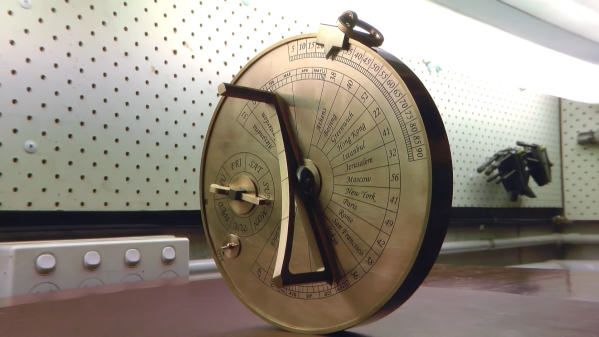
Fans of machining videos will no doubt already be familiar with Clickspring, aka [Chris], the amateur horologist who, through a combination of amazing craftsmanship and top-notch production values, managed to make clockmaking a spectator sport. We first caught the Clickspring bug with his open-frame clock build, which ended up as a legitimate work of art. [Chris] then undertook two builds at once: a reproduction of the famous Antikythera mechanism, and the calendar-sundial seen in the video below.

The cut condenses 1,000 hours of machining, turning, casting, heat-treating, and even hand-engraving of brass and steel into an incredibly relaxing video. There’s no narration, no exposition — nothing but the sounds of metal being shaped into dozens of parts that eventually fit perfectly together into an instrument worthy of a prince of Byzantium. This video really whets our appetite for more Antikythera build details, but we understand that [Chris] has been busy lately, so we’ll be patient.

Continue reading “For Your Holiday Relaxation: The Clickspring Sundial Build Megacut”

Railroad Rail Transformed Into Blacksmith’s Anvil With The Simplest Of Tools

One of the biggest challenges facing the aspiring blacksmith is procuring the tools of the trade. And that means tackling the unenviable task of finding a decent anvil. Sure, one can buy an ASO — anvil-shaped object — at Harbor Freight, but a real anvil is much harder to come by. So perhaps the beginner smith’s first build should be this railroad rail to anvil conversion.

Repurposing sections of rail into anvils is hardly a new game, but [The Other Finnish Guy]’s build shows us just how little is needed in terms of specialized tooling to pull this off. Other than a file, the bulk of the work is done by angle grinders, which are used to cut off the curved crown of the rail section, cut the shape of the heel, and rough out the horn. Removing that much metal will not be a walk in the park, so patience — and a steady supply of cutting wheels and sanding discs — is surely required. But with time and skill, the anvil hidden inside the rail can be revealed and put to use.

We have questions about the final result, like its lack of a hardy hole and the fact that the face isn’t hardened. We wonder if some kind of induction heating could be used to solve the latter problem, or if perhaps a hardened plate could be welded into the top to make a composite anvil. Still, any anvil is better than no anvil. More on the anatomy and physiology of these tools can be had in [Jenny List]’s article on anvils, and her whole excellent series on blacksmithing is highly recommended. [Jenny]’s not the only smith we have on staff, though — [Bil Herd] has been known to smite a bit too.

Continue reading “Railroad Rail Transformed Into Blacksmith’s Anvil With The Simplest Of Tools”

A Good, Hard Look At Pre-Stressed Concrete

From the looks of the average driveway or sidewalk, it may seem as though concrete is just destined to crack. But if concrete is so prone to cracking, how are we able to use it in so many high-stress applications like bridges and skyscrapers? This question came about while I was researching 3D-printed thermite for an article. Thermite is often used in welding railroad tracks, and I linked a video of fresh tracks being welded that had concrete ties. I knew I had to find out how concrete could be made to withstand the pressure of freight trains.

On its own, concrete is brittle and has no give to it at all. But that doesn’t mean it isn’t strong. Although concrete has good compression strength, the tensile strength is quite poor. Around the late 1800s, someone thought to fortify spans of concrete with steel reinforcing bars, better known as rebar. Steel can stretch, adding steel bars gives the concrete some tensile strength to go along with its compressive strength. Rebar also allows for thinner slabs and other members.

Rebar Only Goes So Far

Parking blocks are meant to be replaced occasionally. Image via Checkers Safety

Rebar or mesh-enforced concrete is good for things like parking lot blocks and roads, but it still fails before it ought to. In fact, it usually has to crack before the rebar can chip in any of its tensile strength.

In high-stress concrete applications like bridges and skyscrapers, it’s terrifically important to avoid deflection — that’s when a concrete member flexes and bends under load. Deflection can cause the modern glass skins to pop off of skyscrapers, among other problems.

A solid, rigid bridge is much nicer to walk, drive, and bicycle on than a bridge that sways in the breeze. But how do you do make a rigid bridge? One solution is to apply stresses to the concrete before it ever bears the load of cars and trucks or a steady schedule of freight trains.

Pre-stressed concrete is like rebar-enforced concrete, but with the added power of tension baked in. By adding stress to the concrete before it goes into service, deflection will be reduced or perhaps eliminated altogether. With the addition of tensile strength, more of the concrete’s own strength is able to come into play.

Continue reading “A Good, Hard Look At Pre-Stressed Concrete”

3D Printing Damascus-like Steel

Recreating Damascus steel remains a holy grail of materials science. The exact process and alloys used are long ago lost to time. At best, modern steelworking methods are able to produce a rough visual simulacra of sorts that many still consider to be pretty cool looking. Taking a more serious bent at materials science than your average knifemaker, a group of scientists at the Max Planck institute have been working to create a material with similar properties through 3D printing.

The technology used is based on the laser sintering of metal powders. In this case, the powder consists of a mixture of iron, nickel and titanium. The team found that by varying the exact settings of the laser sintering process on a layer-by-layer basis, they could create different microstructures throughout a single part. This allows the creation of parts that are ductile, while remaining hard enough to be sharpened – a property which is useful in edged weapons like swords.

While the process is nothing like that used by smiths in Damascus working with Wootz steel, the general idea of a metal material with varying properties throughout remains the same. For those eager to get into old-school metalwork, consider our articles on blacksmithing. For those interested in materials research, head to a good university. Or, better yet – do both!

[Thanks to Itay for the tip, via New Atlas]