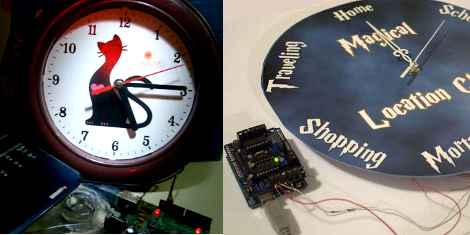
Arduino Boards Control Cheap Clockworks Via Coil Injection

Here’s a couple of clocks that use Arduino boards to control inexpensive clockworks. The concept is quite simple, and perhaps best outlined by [Matt Mets’] article on the subject. As it turns out, these clockworks are driven by a coil, forming a device that is quite similar to a stepper motor. If you solder a wire onto each end of the electromagnetic coil and hook those to a microcontroller, you can alter the speed at which the clock ticks. Just drive one pin high and the other low, then reverse the polarity for the next tick.

The clock you see on the right (translated) is a store-bought cheapy. The Arduino barely visible at the bottom of the image is sending pulses once every second. But as you can see in the video after the break, holding down a button will fast-forward through time. [Sodanam] posted his code as well as pictures of the hardware hack itself.

To the left is a horse of a different color. It’s a clock modeled after the Weasley household clock from the Harry Potter books. The clockwork trick is the same, but the Arduino uses GPS data and NOAA weather information to set the status.

Continue reading “Arduino Boards Control Cheap Clockworks Via Coil Injection”

Sustainability Hack: Wind Turbine Battery Charger

Hit your parts bin and set aside an afternoon to build a wind turbine that recharges batteries. You can see two AA batteries hanging off the side of this small generator. You only need a few parts to make this happen, and chances are you have them sitting in your junk bin already.

The generator itself is a small stepper motor which can be pulled from a floppy disk drive or a scanner. The blade is cut from a single piece of 3.5″ (90mm) PVC pipe, with another piece of smaller-diameter pipe serving as the body of the turbine. The tail-fin makes sure it’s always pointing into the wind and was made from some plywood. As the blade spins, a current is induced on the control pins of the stepper motor. By building a pair of bridge rectifiers and using an RC filter you’ll get the most out of the generated current.

This turbine can charge a pair of NiCad batteries in about 10 hours, but it might be worth developing some smart circuitry to manage charging. If it were able to choose between a dedicated storage battery and the on-board battery holder you could put all of the wind energy to good use.

[Thanks Michael]

Building A Stepper Driver

[TBJ] is building what he calls a junkbox 3D printer. You can probably guess that he’s trying to salvage most of the parts for the device, and after pulling a stepper motor from an old printer he was in need of a way to control it. What he came up with is a stepper driver that uses discrete components that are easy to acquire and inexpensive. The design calls for two inputs, one that toggles the direction in which the motor will spin, and the other that triggers one step of the motor. A CD4013 dual flip-flop takes care of both of these inputs in one chip package.

The motor is driven by a pair of H-bridges that he built using six transistors each. The trick with a stepper motor is that you need to drive the four poles of the motor to a specific logic level at a specific time. For this [TBJ] uses a CD4017 decade counter. A network of diodes grounds half of the output lines based on the flip-flop that controls direction. Our friend the 555 timer provides a clock for the circuit, keeping everything moving at a predefined rate. Check out the video after the break for an explanation and demonstration.

Continue reading “Building A Stepper Driver”

Why Build A CNC Mill When You Can Have A Chess Robot Instead?

[Patrick McCabe] enjoys the challenge of playing chess against the computer but he wasn’t satisfied with the flat experience of on-screen gaming. No problem, he just built his own gantry-style chess robot that he can play against. Don’t be confused, he still doesn’t have to touch the pieces, but instead uses the dedicated control board seen on the left of the image above. The robotic arm that is mounted on a gantry takes care of moves for both players.

It’s a pretty normal CNC build, using four stepper motors to slide the moving bits along precision rod. An Arduino Mega drives the system, with a PC doing the heavy lifting using a program called My Robot Lab.

We certainly like it that [Patrick] spent a little bit of time making the cabinet and visible parts look nice. Chess is a civilized game and unfinished parts would be out-of-place. We didn’t see it in his writeup, but the one feature we’re really hoping he has implemented is the ability to have the robot automatically reset the board at the beginning of a game.

As you might have guess, you’ll find embedded video after the break.

Continue reading “Why Build A CNC Mill When You Can Have A Chess Robot Instead?”

Classical’s Greatest Hits On Hardware’s Greatest Flops

We get a lot of tips about old hardware playing recognizable tunes. But once in a while one of these projects goes above and beyond the others and this is a shining example of great hardware music. [FunToTheHead] put together a music video (embedded after the break) that shows his custom MIDI device playing Bach’s Toccata in d minor. He left some comments that clue us into the way he did it. Most obviously, he’s using the stepper motors from four floppy drives to create precisely pitched sounds. Internally, a PIC 18F14K50 acts as a MIDI-over-USB device, taking commands for all 128 MIDI notes as well as the pitch bends associated with them. The first four channels are played directly on each drive and the other twelve are triaged among the hardware by the microprocessor. But for the results heard in the video you’ll need to code your MIDI files by hand.

Bonus points to the video editor for the Phantom’s floppy-laden appearance in the video… it’s good to laugh!

Continue reading “Classical’s Greatest Hits On Hardware’s Greatest Flops”

Spy On Your Office

[Garagedeveloper] sent us his custom surveillance system, part 1, part 2, and part 3 after needing a way to find out why some cables at work were becoming unplugged (spoiler, the cleaners were messing up the wiring). At the base of the system is a web cam glued to a stepper motor. However, it gets much more in depth with a web front-end that allows the user to stream the feed and control the position of the stepper. We’re not particularly fond of how many different parts the project takes, while it all could be accomplished under C# with ASP.NET and parallel port library instead of including Arduino and excess code, but to each their own and the project turned out a success anyway.

Giving An Old Arm New Life

[Jarek] found a non-functional robotic arm sitting around and wanted to get it working again. By adding a few custom boards to an Arduino he managed to do just that.

The arm is driven by six stepper motors, each having four control wires. To handle all of these [Jarek] used TIP120 transistors to protect the controller. This still leaves the problem of 24 control wires to connect. By using a couple of 74HC4514 demultiplex chips he cut that number down to just 8 Arduino control pins. He completed the project by interfacing an original Playstation controller as the input device.

Source code for the project is available for download but we didn’t see a schematic for his setup. This shouldn’t be a problem as the low parts count should mean the datasheets for the transistors and demultiplexers are all you really need.