Custom Storage Boxes, From Cardboard And 3D Printed Bits

It’s not that storage boxes and organizers are hard to find. No, the problem this project set out to solve was more nuanced than that. The real trouble [theguymasamato] had was that his storage options — wide shelves and deep drawers — weren’t well suited to storing a lot of small and light objects. The result was a lot of wasted space and poor organization. To make matters worse, his big drawers had oddball dimensions, meaning that store bought organizers weren’t a good fit either.

To solve these problems, [theguymasamato] decided to design his own stackable boxes to store small and light objects far more efficiently than before. The design also allows the boxes to be made in a variety of sizes without changing any of the 3D printed parts. Carefully measured and cut cardboard is critical, but that’s nothing a utility knife and ruler can’t solve. The only other requirements are a few simple plastic parts, and some glue. He can fit six of these inside a single one of his drawers with enough room to access and handle them, but without wasting space.

Cardboard is really versatile stuff. Not only has it been behind some amazingly complex devices such as this tiny working plotter, but we’ve seen it form major components in the remarkably ambitious cardboard CNC.

FindyBot3000 Is Listening And Ready To Help

It’s a problem every maker faces at one time or other – how to organise the ever-growing mass of components in the workshop. Some give up and just live with box upon box of disordered parts. That wasn’t good enough for [Inventor22], though – who created FindyBot3000 to tackle the job. 

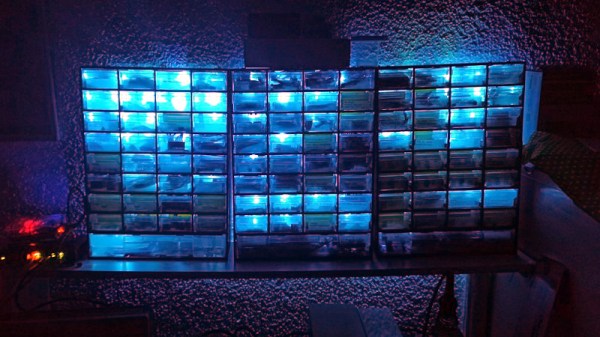
The first step is to source a set of those tiny component drawers we all know and love. These are then combined with WS2812B LED strips, which act as indicators for each individual drawer. A Particle Photon is used as the brains of the operation, and drives the strips. So far, so good.

Of course, blinking LEDs are great and all, but it’s the voice control where things get really interesting. Through Google Home and IFTTT, it’s possible to give commands to the Particle Photon. This can be used to manage the parts in the drawers, as well as to quickly highlight the location of various components. It’s backed up with an Azure backend, which manages the component database and keeps track of everything.

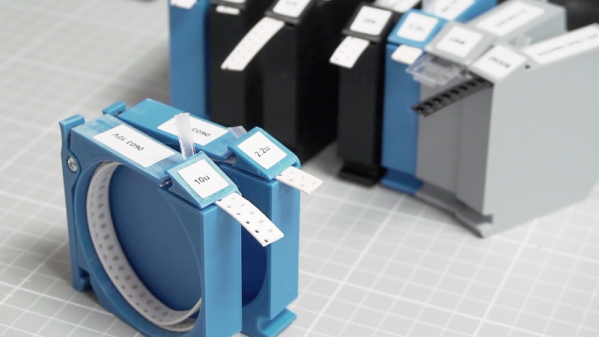
It’s a tidy build that does away with tiny sticky labels, and is reconfigurable on the fly as parts come and go. Of course, if you’re mostly storing SMD parts, you might prefer a reel based solution. Video after the break.

Continue reading “FindyBot3000 Is Listening And Ready To Help”

Pack Your SD Cards Swiss Army Style

SD cards have largely supplanted most other card-based storage devices, in all but a few niches. Available in standard, micro, and the rather obscure mini sizes, they’re used in everything from digital cameras to car stereos and console ROM carts. For most users, storing them consists of tossing them in a bag, occasionally in a plastic case that’s barely any bigger than the card itself for a little extra protection. This can get frustrating when carrying multiple cards, but [Dranoweb] has a solution.

[Dranoweb]’s design is similar to a Swiss Army knife, repurposed with many fingers, each with slots for holding everyone’s favourite storage devices. All the parts barring the screw are 3D printed. There are various designs of the storage fingers, allowing the build to be customized to suit varying quantities of SD and microSD cards. There’s even a deep-pocketed piece for USB drives and small adapters, and an oversized design for Nintendo DS carts.

It’s a tidy design that makes it that much less likely you’ll lose your microSD in the bottom of your backpack. Now, if you need to interface with an SD card, we can help you there too.

Printed It: Parametric Hex Key Holder

Desktop 3D printing is an incredible technology to be sure, but it’s not a cure-all. If you’re interested in making something in large numbers, or if production speed is a concern, 3D printing probably isn’t what you’re looking for. But on the flip side, if you want to make a few highly specialized or customized objects, desktop 3D printing represents an absolute revolution in capability for the individual hacker and maker.

In our ongoing mission to prove that desktop 3D printing isn’t just a novelty, we keep a close eye out for printable objects which play to the strengths of the technology. You won’t find any benchmarks or dust collectors here; everything featured in Printed It is a bona fide practical object. An ideal entry into this series is something that you wouldn’t need to print more than a few times, isn’t easily sourced or made via traditional means, and if possible, offers some form of customization which makes it more suitable to the individual’s needs than what’s commercially available.

Not every object we feature hits all of these marks, but this parametric hex key holder designed by [Daniel Leitner] absolutely does. This object was created to address a problem that we imagine most Hackaday readers share: taming an ever-growing collection of hex keys. What’s more, this design is something of an open source success story. It’s an idea that passed through the hands of multiple community members, becoming more refined and functional as it went. Even if you don’t personally need to wrangle some unruly hex keys, this object is a fascinating look at how 3D printing and the community that has sprouted up around it is truly evolving the process of going from concept to execution.

Continue reading “Printed It: Parametric Hex Key Holder”

The Ultimate IPhone Upgrade

While Apple products have their upsides, the major downside with them is their closed environment. Most of the products are difficult to upgrade, to say the least, and this is especially true with the iPhone. While some Android devices still have removable storage and replaceable batteries, this has never been an option for any of Apple’s phones. But that doesn’t mean that upgrading the memory inside the phone is completely impossible.

[Scotty] from [Strange Parts] is no stranger to the iPhone, and had heard that there are some shops that can remove the storage chip in the iPhone and replace it with a larger one so he set out on a journey to try this himself. The first step was to program the new chip, since they must have software on them before they’re put in the phone. The chip programmer ironically doesn’t have support for Mac, so [Scotty] had to go to the store to buy a Windows computer first before he could get the chip programmer working right.

After that hurdle, [Scotty] found a bunch of old logic boards from iPhones to perfect his desoldering and resoldering skills. Since this isn’t through-hole technology a lot of practice was needed to desolder the chip from the logic board without damaging any of the other components, then re-ball the solder on the logic board, and then re-soldering the new larger storage chip to the logic board. After some hiccups and a lot of time practicing, [Scotty] finally had an iPhone that he upgraded from 16 GB to 128 GB.

[Scotty] knows his way around the iPhone and has some other videos about other modifications he’s made to his personal phone. His videos are very informative, in-depth, and professionally done so they’re worth a watch even if you don’t plan on trying this upgrade yourself. Not all upgrades to Apple products are difficult and expensive, though. There is one that costs only a dollar.

We sat down with him after his talk at the Hackaday Superconference last November, and we have to say that he made us think more than twice about tackling the tiny computer that lies hidden inside a cell phone. Check out his talk if you haven’t yet.

Continue reading “The Ultimate IPhone Upgrade”

Comic Boxes Reflect Owner’s Skills

We are the culmination of our experiences. We build with the tools we’re familiar. We design with the decorations we like. Sometimes this thinking leads to a project that looks like a kindergartener who has dressed in a pink tutu and a camo shirt. Sometimes our experience leads us to make something functional and elegant. [jordanlund] combined his work experience in a library, 3D modeling skills, and love of comic books to turn a hodgepodge pile of scribbled-upon boxes into an orderly collection of comic books in boxes adorned with brass drawer pulls.

3D printing bridged the gap between the brass card catalog drawer pulls he knew well from the library and the crates of comics he kept at home. Custom brackets allowed the drawer pulls, which were meant to be screwed into wooden drawer faces, to work with cardboard boxes. The drawer pulls have a slot for labels so there will be no need to rip off sticky labels later or scrawl with a permanent marker. Perhaps [jordanlund] is merely a bibliophile with a 3D printer but if we didn’t know better, we might think those boxes were meant to have the drawer pulls installed.

Engage your own love of literature with this wordplay riddled appeal for libraries. or make your home library a little more fantasical with a secret door.

Electronics Workbench Goes Vertical With Pegboard Mounting

[JesusGomez] has certainly put work into his Vertical Laboratory concept. There’s a bit more to the idea than simply using 3D printed parts to move electronics from the desktop onto a metal pegboard, although that part is certainly nicely done. There are 3D models for securely mounting various hardware such as Raspberry Pi, Beaglebone, ESP32, cable management, breadboards, and other common parts to a metal pegboard. Instead of having parts and wires splayed across a workbench, it can be mounted and organized vertically. Having a project or prototype mounted on pegboard is easier to store, saves room, and frees up desk space in small work areas. It also makes for an organized and visually pleasing layout.

A clever piece of design is in the plastic mounts that he created. He wanted parts to remain securely mounted unless intentionally removed, allow different mounting orientations, and to never require access to the back side of the pegboard. To accomplish this, the parts use a combination of pegs that slide-lock with bendable sections that act as lock tabs. Once mounted, the parts stay put until the lock tabs are released by gently prying them out of position. Since mounting and removal can be done entirely from the front, wall mounted pegboards with inaccessible backs can be used.

Metal pegboard has its uses, even if the more common dead-tree version shows up more often in projects from DIY vacuforming to making a modular work surface for when space is at an absolute premium.