When A CRT Isn’t Retro Enough: LEDs

When we think of an old-style computer terminal, it has a CRT screen: either one of the big 1970s VDUs with integrated keyboard, or maybe one from a later decade with more svelte styling. You would have found other displays in use in previous decades though, and one of them came our way that we think it worthy of sharing.

16 segments in action. (PD) Wikimedia Commons.

[Dan Julio] was given several tubes of Siemens DL1416B 4-digit 17-segment LED displays by a friend, and decided to use them as an unusual retro display for his terminal project. These devices are an alphanumeric display with a parallel interface that can show a subset of the ASCII character set as well as a cursor. He had 213 of them, so made plans for a 64 character by 16 line display, however on discovering a quantity of the parts were non-functional he had to scale back to 12 lines of 48 characters.

The terminal in action.

The displays are mounted on PCBs in groups of four, controlled by a PIC16F1459 and some shift registers. These boards are then daisy-chained via a TTL serial line. The whole display shares one of the three serial ports on a Teensy 3.1 with his retro keyboard that has its own PIC controller, the others serving a serial printer port and the terminal serial port. The Teensy software has two modes: serial terminal or a Tiny Basic interpreter, and the relevant repositories are linked from the project page.

Since each set of DL1416Bs takes 250 mA, the whole display consumes about 9 A at 5 volts. On top of that the keyboard uses another 500 mA, so a sufficiently powerful supply had to be incorporated. This is mounted along with the Teensy in a very well-made enclosure, and the whole is mounted on what looks like a surplus monitor stand for a very professional finish.

To take us through the terminal’s features he’s posted a YouTube video that we’ve placed below the break. It comes across as a surprisingly usable machine, as he logs into a Raspberry Pi and edits a file, and takes us through some features of the BASIC interpreter.

Continue reading “When A CRT Isn’t Retro Enough: LEDs”

Hacklet 126 – Teensy Projects

The Arduino has proved to be a great platform for electronics projects. The same goes for the Raspberry Pi. However, there are some projects that fall in the gap between these two options. Projects that need more memory or processing power than the ATmega microcontrollers have to offer, but not so much as to require a full Linux/ARM powerhouse. For those projects, there is the Teensy series. [Paul Stoffregen] created these lilliputian boards, and he’s been adding features ever since. The thousands of Teensy projects out there stand as proof that these little boards have been well received by the hacker community. This week’s Hacklet is about some of the best Teensy projects on Hackaday.io!

beats
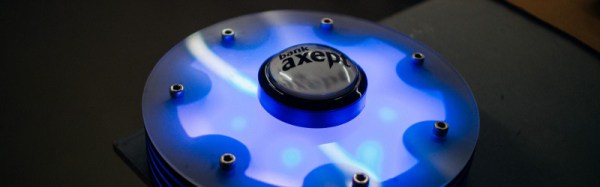
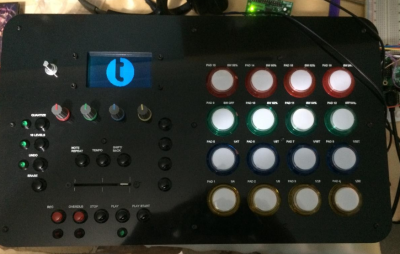
We start with [Jonathan Payne] and Beats by Teensy. Beats is an all in one music machine. A sampler, sequencer, and MIDI control surface; all powered by the Teensy 3.1 and the Teensy Audio Board. The audio board gives Beats the ability to record and playback 16 bit audio at a sampling rate of  up to 44.1 kHz. [Jonathan’s] inspiration came from devices such as the Akai MPC, and the MIDI Fighter. He utilized the incredible Teensy audio library on the software side. A project like this needs a serious case. [Jonathan] designed and built the perfect panel and case utilizing arcade buttons and a 128×64 LCD from Adafruit.

sab
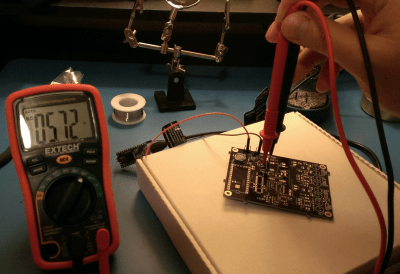
Next we have [RF William Hollender] and Teensy Super Audio Board. Not satisfied with CD quality 44.1 kHz audio, [William] decided to add a high quality audio codec to Teensy’s bag of tricks. He picked the CS4272 codec from Cirrus Logic. Capable of sampling rates up to 192 kHz, with a THD+N of -100 db, this codec should please all but the most discerning audiophiles. The high noise immune design doesn’t stop there though. [William’s] design isolated the Teensy and the rest of the interfaces from the codec to prevent ground loops. Connectivity is via standard I2S for the audio stream and I2C for control. This means the super audio board can be used with Raspberry Pi’s and the like.

spino
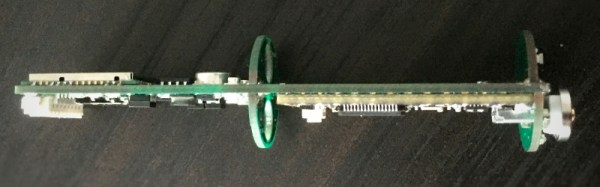
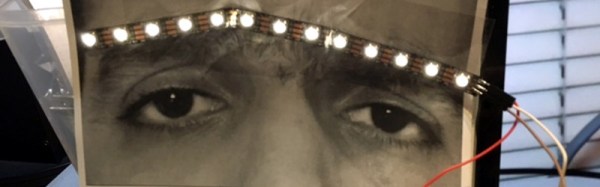
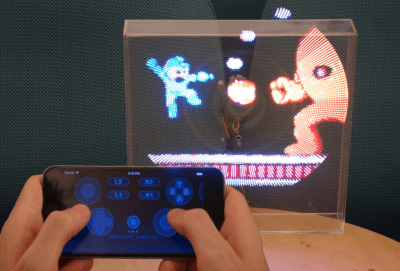
Next up is [Spino] with Spino. Teensy boards can do a lot more than just audio. Spino is a POV display with 32 spinning RGB LEDs. Spino can do more than just show pretty pictures though. With a Teensy 3.2 and bluetooth radio on board, the spino team is able to play games on their display. LEDs don’t work exactly like CRTs and LCDs though, so some color changes were necessary. The team utilized cell shading with a sobel filter to make Doom look even better than ever. The Teensy is even powerful enough to handle live webcam video sent over USB. The video is rendered and displayed on the spinning LEDs.

megsy
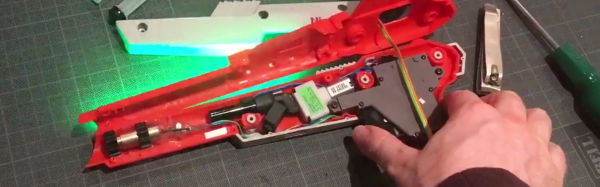
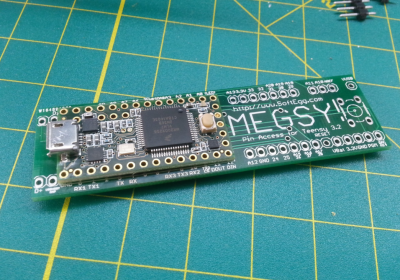
Finally we have [Tim Trzepacz] with Megsy? A homebrew Teensy 3++. [Tim] is working on Megsy as part of his  residency at the Supplyframe Design Lab. Teensy’s have lots of edge mounted IO pins. There isn’t enough real estate for all the pins though, so some are routed to pads on the bottom. Megsy is a Teensy carrier board that breaks these pads out to pins. The idea is to solder the Teensy directly do the Megsy. As [Tim] calls it, “a poor man’s BGA”. The problem is getting the solder hot enough to melt while sandwiched between two insulating PCBs. [Tim’s] first attempt netted him a rather scorched Megsy board. Blacked as it may have been, the board did work!

If you want to see more Teensy projects, check out our new Teensy projects list. Notice a project I might have missed? Don’t be shy, just drop me a message on Hackaday.io. That’s it for this week’s Hacklet, As always, see you next week. Same hack time, same hack channel, bringing you the best of Hackaday.io!

Arcade Button Pressing Game

When every month brings out a fresh console blockbuster game that breaks new boundaries of cinematic immersion in its gameplay, it’s easy to forget that sometimes the simplest of game interfaces can be rewarding.

Hele Norges Knapp” (“All of Norway’s Button”), is a good example. As you might expect, it’s a button, a large arcade-style one, and the gameplay is simple. Press the button as many times as you can in 30 seconds. It’s a project from Norwegian Creations, and it was produced as a promotion that toured the country for one of Norway’s debit card payment systems.

The blog post and video is frustratingly light on hardware or software details, and their is nothing about it in their GitHub presence. But they tell us that at its heart is a Teensy 3.2 with an audio board, driving the big 7-segment displays for the scoreboard and the WS2801 LED lighting.

The button itself is Adafruit’s 100mm Massive Arcade Button, and given that it was pressed over a million times by eager Norwegians it would seem this project has proved its robustness.

The video below the break has details of construction and of the game in action, and there is another far more corporate promotional video on Facebook featuring a host of Bright Young People honing their button action in a sun-kissed Norway that looks almost tropical. The game itself does look as though it could be an amusing diversion in the same vein as those fairground strength tests.

Continue reading “Arcade Button Pressing Game”

NES Light Gun Fires Awesome Laser Effect

[Seb Lee-Delisle]’s NES lightgun gave us pause as the effect is so cool we couldn’t quite figure out how he was doing it at first. When he pulls the trigger there erupts the beam of light Sci Fi has trained us to expect, then it explodes in a precision sunburst of laserlight at the other end as smoke gently trails from the end of the barrel. This is a masterpiece of hardware and trickery.

seb-lee-delisle-nes-zapper-trick-thumb
Demo video posted by @seb_ly

The gun itself is a gutted Nintendo accessory. It looks like gun’s added bits consist of two LED strips, a laser module (cleverly centered with two round heatsinks), a vape module from an e-cigarette, a tiny blower, and a Teensy.  When he pulls the trigger a cascade happens: green light runs down the side using the LEDs and the vape module forms a cloud of smoke in a burst pushed by the motor. Finally the laser fires as the LEDs finish their travel, creating the illusion.

More impressively, a camera, computer, and 4W Laser are waiting and watching. When they see the gun fire they estimate its position and angle. Then they draw a laser sunburst on the wall where the laser hits. Very cool! [Seb] is well known for doing incredible things with high-powered lasers. He gave a fantastic talk on his work during the Hackaday Belgrade conference in April. Check that out after the break.

So what does he have planned for this laser zapper? Laser Duck Hunt anyone? He has a show in a month called Hacked On Classics where this build will be featured as part of the Brighton Digital Festival.

Continue reading “NES Light Gun Fires Awesome Laser Effect”

Hackaday Links: August 28, 2016

E-paper looks awesome, but it’s a pain to work with. You need only look at the homebrew implementations of e-paper drivers and the mess of SMD components for proof of that. [jarek] wanted to play around with e-paper and developed this tiny little driver for a Teensy. It’s a fun toy, and the simplest possible circuit necessary to drive this particular e-paper module.

I am once again asking if anyone knows where to buy this computer case. No, not a complete system – I just want the case, folding keyboard, and monitor integrated into an mATX enclosure.

Back in 1985, a young [Matthias Wandel] built a remote control forklift out of a few windshield wiper motors, wood, and not much else. He’s rebuilt this toy recently, just to prove you can build anything with a stack of plywood and a wood gear template generator.

More Adafruit muppets they probably can’t call muppets. Yaaay. This time it’s J is for Joule. Watts that? A second.

The Raspberry Pi Project, one of our favorite projects in the Hackaday Prize that uses a Raspberry Pi, one of the most liked, viewed, and followed projects on Hackaday.io, and a technological tour de force the likes of which have not been seen since the invention of the steam engine got an update this week. [Arsenijs] and the rest of the Raspberry Pi Project team have released a version of their Raspberry Pi pinout helper. Previously, this tool was only used internally to the project, but since this pinout helper has such far-reaching utility they’ve decided to release a public version. Truly, they are kings among men.

This is possibly the coolest use of stacked plywood I’ve ever seen. It’s a spiral staircase, with each step made of 12 layers of plywood. The ‘spine’ of this staircase is a 3″ sch 40 steel pipe, with a proper foundation. The layer of ply are adhered to the pipe with construction adhesive, and each layer of ply is glued together with wood glue. No, it’s not up to code yet, but it was cheaper to build than just buying a spiral staircase.

[Brek] wrote a graphics library for the ubiquitous 128×64 monochromatic LCDs. It’s written for PICs, but damned if we can’t find a link to the library itself. Hopefully [Brek] will jump in the comments below.

Those really, really cheap ESP8266 modules only have 512kB of Flash in them. Here’s how you upgrade those modules to 4MB. You can do it without a hot air gun, and all you need is a few cheap Flash chips.

Here’s a sound card for a Raspberry Pi. No, that’s not a completely dumb idea. This sound card uses quality op-amps, 24-bit ADCs and DACs, and has MIDI. If you’re experimenting with Pure Data or any other Linux audio toy, this could be a useful addition to your Pi stack.

Open Source SNES To USB Converter Lets You Emulate Legally

[Andrew Milkovich] was inspired build his own Super Nintendo cartridge reader based on a device we covered an eternity (in internet years) ago. The device mounts a real cartridge as a USB mass storage device, allowing you to play your games using an emulator directly from the cart.

This uses a Teensy++ 2.0  at its core. [Andrew] had to desolder the EEPROM pins from the SNES cartridge and reverse engineer the pinouts himself, but the end result was a device that could successfully read the cartridge without erasing it, no small accomplishment. The finished cartridge reader is build on some protoboard and we’d like to complement [Andrew] on his jumper routing on the underside of that board.

Of course, the experience of any console is just not the same without the original controller. So [Andrew] went a step further and made his own SNES controller to USB converter. This had the venerable Atmel ATmega328 at its core, and can be used separate from the cartridge reader if desired.

Introducing The Teensy 3.5 And 3.6

Paul Stoffregen has built a new Teensy. The latest in the line of very powerful, USB-capable microcontrollers is the Teensy 3.5 and 3.6 development boards. It’s faster, more capable, and bigger putting even more pins on a solderless breadboard.

The first Teensy was one of the first Arduino compatible boards with native USB. The Teensy 2.0 was even better with support for USB keyboards, mice, and MIDI. Even today, the Teensy 2.0 is the de facto board to use if you want to build anything like a USB keyboard. The Teensy 2.0 was followed by the exceptionally powerful Teensy 3.0, the first 32-bit Arduino compatible board, and thanks to Paul’s contributions of a pile of Arduino libraries, doing cool stuff faster has never been easier. Since the launch of the Teensy 3.0, its successors, the 3.1 and 3.2 have launched. If you want the power of an ARM microcontroller with the deepest Arduino library support, there’s only one board you should consider.

Like the launch of the Teensy 3.0, Paul is Kickstarting the launch of the latest Teensys with a crowdfunding campaign. Let’s dig into everything these new boards have to offer.

Continue reading “Introducing The Teensy 3.5 And 3.6”