Vintage Microammeter Now Tells Temperature

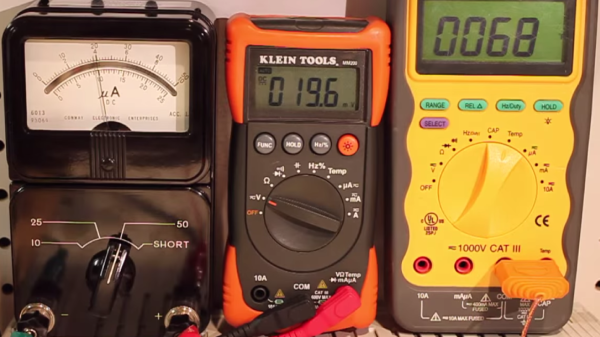
[Craig] sent in this tip about a simple hack he built to convert an old analog micro-ammeter into a thermometer using a few parts. There’s a certain charm to retro analog meters, and there was enough space inside the old meter to accommodate the tiny breadboarded circuit and the three AA batteries to convert it into a cool looking centerpiece which is useful too!

He used the 3-pin MCP9700 analog temperature sensor connected to a LTC1541 – a combined comparator, op-amp and band gap reference voltage all rolled into one package. The thermometer displays 1uA per degree Celsius, has an output of 1mV per degree Celsius for external temperature monitoring / data logging, and draws just about 20uA. While the build itself is pretty simple, [Craig] took the time to walk through every design decision he made in the video after the break. This starts with the design for his circuit, and  moves on to the selection of parts and their values. The video is a must-watch for anyone wanting to learn more about precision op-amp based designs.

The three batteries will drain over time, and a circuit like this one requires a stable reference voltage. That is taken care by the bandgap reference voltage from the LTC1541. This eliminates the use of additional voltage regulators, and allows the circuit to work from 4.5V down to about 3.3V. Check the video after the break to listen to [Craig] describe how it works. We’re not sure how quickly it responds to changes in ambient temperature since the sensor is enclosed inside the meter, so maybe some vents at the back, or bringing out the sensor might be a good idea.

Continue reading “Vintage Microammeter Now Tells Temperature”

Measuring Temperature On An AVR Without A Sensor

There are a few AVR microcontrollers with onboard temperature sensors. These temperature sensors are neither accurate nor precise, but they do work for a few use cases. [Thomas] came up with a little bit of code that runs on all AVR microcontrollers, and is at least as accurate as the sensors in the rare AVRs that have them.

Although not all AVRs have a temperature sensor, they do all have RC oscillators, and these RC oscillators are temperature sensitive. By combining the RC oscillator and watchdog timer, [Thomas]’ code can get a vague idea if it’s getting hotter or colder.

To prove his code works, [Thomas] took an ATtiny13A chip loaded up with a few bits of code and placed a heated coin on it. The chip was programmed to turn on an LED when it detected a rise in temperature, and predictably, the LED lit up. With a coin chilled in a bowl of ice water, another bit of code ran, flashing the LED.

While we’re sure it’s neither accurate nor precise, it does have its uses – overheating protection or a simple thermostat. You can check out a video of the code in action below.

Continue reading “Measuring Temperature On An AVR Without A Sensor”

Temperature, Altitude, Pressure Display

During a recent trip to Bhutan, [electronut] wished for a device that would show the temperature and altitude at the various places he visited in the Kingdom. Back home after his trip, he built this simple Temperature, Altitude and Pressure Display Device using a few off the shelf parts.

Following a brief search, he zeroed in on the BMP 180 sensor which can measure temperature and pressure, and which is available in a break-out board format from many sources. He calculates altitude based on pressure. The main parts are an Arduino Pro Mini clone, a BMP180 sensor and a Nokia 5110 LCD module. A standard 9V battery supplies juice to the device. A push button interface allows him to read the current parameters when pressed, thus conserving battery life.

Standard libraries allow him to interface the LCD and sensor easily to the Arduino. He wrapped it all up by enclosing the hardware in a custom laser cut acrylic box. The result is bigger than he would like it to be, so maybe the next iteration would use a custom PCB and a LiPo battery to shrink it in size. While at it, we think it would be nice to add a RTC and some sort of logging capability to the device so it can store data for future analysis. The schematic, code and enclosure drawing are available via his Github repository.

Penny And Paper Clip Heat Sinks

A bunch of audio heads over at the Head-Fi forum were discussing handy and quick heat sinking methods, leading to much speculation and conjecture. This finally prompted [tangentsoft] to take matters in his own hands and run some tests on DIY Heat Sinks.

The question that sparked this debate was if a paper clip is a good enough heat sink to be used for a TO220 package. Some folks suggested copper pennies (old ones minted 1981 and earlier – the new ones are zinc with copper plating and won’t help much). [tangentsoft] built a jig to test six LM317 regulators in constant current mode set to 0.125A and 2w dissipation. The six configurations were a paper clip, a single penny bolted to the regulator, a regular Aavid TO220 heat sink, a set of 4 pennies bolted, a single penny epoxy glued and finally a single penny soldered directly to the regulator.

The results were pretty interesting. The paper clip scored better than any of the single pennies! The quad-penny and the Aavid heat sink fared above all the other configurations, and almost at par with each other. [tangentsoft] posts his review of each configurations performance and also provides details of his test method, in case someone else wants to replicate his tests to corroborate the results. He tested each configuration independently for one hour, gathering just over 10000 readings for each setup. Other nearby heat sources were turned off, and he placed strategic barriers around the test circuit to isolate it from the effects of other cooling / heating sources. He even removed himself from the test area and monitored his data logging remotely from another room. When he noticed a couple of suspect deviations, he restarted the test.

[tangentsoft] put all the data through Mathematica and plotted his results for analysis, available at this link [pdf, 2.8MB]. So the next time you want to heat sink a regulator for cheap, just hunt for Clippy in your box of office supplies. Do remember that these methods will work for only a couple of watts dissipation. If you would like to cast and build your own heat sinks out of aluminum, check out this post about DIY Aluminum heat sink casting. And if you need help calculating heat sink parameters, jump to 12:00 minutes in this video from [Dave]’s EEVBlog episode on Dummy loads and heat sinks.

Thanks to [Greg] for sending in this tip.

Reverse Engineering Wireless Temperature Probes

[bhunting] lives right up against the Rockies, and for a while he’s wanted to measure the temperature variations against the inside of his house against the temperature swings outside. The sensible way to do this would be to put a few wireless temperature-logging probes around the house, and log all that data with a computer. A temperature sensor, microcontroller, wireless module, battery, case, and miscellaneous parts meant each node in the sensor grid would cost about $10. The other day, [bhunting] came across the exact same thing in the clearance bin of Walmart – $10 for a wireless temperature sensor, and the only thing he would have to do is reverse engineer the protocol.

These wireless temperature sensors are exactly what you would expect for a cheap piece of Chinese electronics found in the clearance bin at Walmart. There’s a small radio operating at 433MHz, a temperature sensor, and a microcontroller under a blob of epoxy. The microcontroller and transmitter board in the temperature sensor were only attached by a ribbon cable, and each of the lines were labeled. After finding power and ground, [bhunting] took a scope to the wires that provided the data to the radio and took a look at it with a logic analyzer.

After a bit of work, [bhunting] was able to figure out how the temperature sensor sent data back to the base station, and with a bit of surgery to one of these base stations, he had a way to read the temperature data with an Arduino. From there, it’s just a data logging problem that’s easily solved with Excel, and [bhunting] has exactly what he originally wanted, thanks to a find in the Walmart clearance bin.

Know Your Speed On Rollerblades

[Anurag] is a computer engineering student with a knack for rollerblading. Rollerblades are not a transportation device that are often fitted with speedometers, so [Anurag] took that more as a challenge and designed this Arduino-powered computer to give him more information on his rollerblade rides.

The device uses an Arduino as the brain, and counts wheel revolutions (along with doing a little bit of math) in order to calculate the speed of the rider. The only problem with using this method is that the wheels aren’t on the ground at all times, and slow down slightly when the rider’s foot is off the ground. To make sure he gets accurate data, the Arduino uses an ultrasonic rangefinder to determine the distance to the ground and deduce when it should be taking speed measurements.

In addition to speed, the device can also calculate humidity and temperature, and could be configured to measure any number of things. It outputs its results to a small screen, but it could easily be upgraded with Bluetooth for easy data logging. If speed is truly your goal, you might want to have a look at these motorized rollerblades too.

PuzzleBox

Captain Hermano’s Mystery Box Is Full Of Puzzles

[Raffi] needed a birthday present idea but he wanted to do something extra special. He realized that a big part of gift giving is the anticipation and excitement of opening the present. In order to prolong this experience, [Raffi] built an electronic puzzle box. The box contains the final gift, but first a series of puzzles must be solved in order to open the box.

The project runs on an Arduino Mega. This is hooked up to several sensors, including a temperature sensor, GPS unit, and CO sensor. There is also an LCD screen and numeric keypad for user input and output. The project page contains a flow chart that shows all of the puzzles and their solutions. One of the more interesting puzzles requires the user to blow tobacco smoke into a tube. The CO sensor detects the smoke and unlocks the next puzzle.

Some of the puzzles require interacting with outside systems. For example, one puzzle requires the user to send an email to the fictional Captain Hermano’s email address. If the correct keyword is included in the email, the user will receive a reply with the code to enter into the box. Another puzzle requires the user to call a particular phone number and listen for another riddle. We’ve included the video demonstration below.

This isn’t the first puzzle box we’ve seen, but each one has its own special flair. This one is very well made and looks like a lot of care was put into it. We’ve seen another that uses only discrete components. We’ve seen yet another that uses Morse code. Continue reading “Captain Hermano’s Mystery Box Is Full Of Puzzles”