Hackaday Prize Entry: The MultiSpork

If you’re working on a mobile project – a robot, something outside, or even your car – you don’t want to bring an oscilloscope, logic analyzer, signal generator, or any other piece of equipment that should stay on the bench. For his Hackaday Prize Entry, [Pierce Nichols] is working on the electronic equivalent of a Leatherman: something small and portable that also does just enough to get by in a pinch.

The MultiSpork, as [Pierce] calls his device, is a single WiFi enabled board that’s completely portable. With the addition of a $50 Android tablet, it’s very close to a complete electronics lab in a box.

The heart of the MultiSpork is a new chip from Maxim, the MAX 11300. This chip has 20 pins that can be used as a 12-bit ADC, a 12-bit DAC, or as GPIOs. it’s a logic analyzer, signal generator, oscilloscope, and a Bus Pirate in a single chip. As far as the rest of the board goes, [Pierce] is forgoing any notion of a hardware freeze and changing the Atmel microcontroller over to a TI CC3200 chip that will be coming out soon.

[Pierce] put together a short video describing the MultiSpork; you can check that out below.


The 2015 Hackaday Prize is sponsored by:

Continue reading “Hackaday Prize Entry: The MultiSpork”

ps3 eyetoy

PS3 Eye Lives Again Thanks To Low Prices

[Henry Tonoyan] has started getting into OpenCV and digital control system projects. He needed a decent webcam that could do higher than standard frame rates. As it turns out, the PS3 Eye is actually a pretty capable little camera. Now that it’s kind of obsolete, you can have it for as little as $7 from places like Amazon!

The PS3 Eye has a standard USB interface, and after messing around with it a bit in Linux, [Henry] was able to adjust the frame rate settings for his application. He’s using a library called video for Linux with an application called qv4L2. It’s capable of 60fps at VGA, which we admit isn’t amazing, but at $7, we can’t complain — if you drop down to QVGA (320×240) you can go up to 120fps.

From there you can play around in OpenCV to your heart’s content.

Seeing as the Eye has been out for over 7 years now, it has been used in quite a few hacks since then. From an actual eyeball tracker (seriously), to an interactive projection globe with touch tracking to even a physical tower defense game.

How To Tell If You’re Installing Foil Capacitors Backwards

It only takes one mistake to realize electrolytic capacitors have a polarity, but if you’re working with old tube gear, tube amps, or any old equipment with those old orange dip, brown dip, or green dip foil capacitors you also have to watch your polarity. These old caps were constructed with a foil shielding, and there’s always one side of these caps that should always be connected to the chassis ground. If you don’t, you’re going to get interference – not something you want in an amplifier circuit.

Old caps that have long since given up the ghost usually have a black band designating whatever side of the cap the ‘foil ground’ is. This is the side that should be connected to ground. If you look at modern foil caps, you might also see a black band on one side of the cap, which should – if we lived in a just world – also designate the foil ground. This is not always the case.

To properly test foil caps and determine which side should be closer to ground, you can construct a small tester box that’s more or less an h-bridge with a single switch and a pair of alligator clips in the middle. Connect the cap to the clips, put the output of the circuit in your scope, and flick the switch: the direction that has the least amount of interference is the denotes the foil ground of the cap. Replace those old caps in your vintage equipment with a new, correctly oriented cap, and you’re well on your way to having a great sounding amplifier.

Video below.

Continue reading “How To Tell If You’re Installing Foil Capacitors Backwards”

A Very, Very Small IMU

The reason we’re playing with quadcopters, flight controllers, motion controlled toys, and hundreds of other doodads is the MEMS revolution. A lot is possible with tiny accelerometers and gyroscopes, and this is looking like the smallest IMU yet. It’s an 18mm diameter IMU, with RF networking, C/C++ libraries, and a 48MHz ARM microcontroller – perfect for the smallest, most capable quadcopter we’ve ever seen.

The build started off as an extension of the IMUduino, an extremely small rectangular board that’s based on the ATMega32u4. While the IMUduino would be great for tracking position and orientation over Bluetooth, it’s still 4cm small. The Femtoduino cuts this down to an 18mm circle, just about the right size to stuff in a model rocket or plane.

Right now, femtoIO is running a very reasonable Kickstarter for the beta editions of these boards with a $500 goal. The boards themselves are a little pricey, but that’s what you get with 9-DOF IMUs and altimeter/temperature sensors.

Hackaday BAMF Meetup Reaches Critical Mass And Overflows Awesome

I love the Hackaday crowd. Despite a long day standing at a booth or crawling the fairgrounds as a spectator, everyone still made it on Saturday night to the 2nd Annual Hackaday BAMF meetup and made it one for the annals of hacker history. Just look at that crowd… I see a couple of Hackaday Prize Judges, a friend I met in Germany (who I actually found out I first met at this same event last year), and many many more great people. I don’t want to spoil the fun so check out the full size over on [Rich Hogben’s] photo log and see how many you can identify.

We started this gathering last year as a come-as-you-are and bring-what-you’re-proud-of after party to Bay Area Maker Fair. We don’t rent out the bar — O’Neil’s Irish Pub in San Mateo — but we had a handshake agreement for drink tickets (thank you to Supplyframe for buying the first round for everyone) with the bartenders. The place feels like the perfect size, and before long we were packed into every available space. The ramp to the restroom area in the back was a gauntlet of conversation — enough room to walk by but you felt like you were interrupting people talking to those across from them.

The amount of hardware on hand was spectacular. Taking pictures of it was tough in the tight quarters. I got a look at the first prototype of the Pebble smart strap. I really enjoyed seeing OSHChip (pictured above) which is an ARM Cortex-M0 chip and BLE rolled into a DIP-16 form factor. [Sophi’s] HeartBeat Boombox was a big hit; it uses the heartrate and blood oxygen sensors seen above to drive a drumbeat. Those blinky glasses should look familiar. [Garrett Mace] and his colleague [Jason] were on hand. These Macetech glasses are from a couple of years back but don’t worry, they were sporting the newest RGB flavor which I’m told will have black solder mask and integrated controller among other tasty goodies.

Perhaps the best way to tell the success of the night is that there were a lot of friends in the room that I never realized were even there. The next day I met up with [Sarah Petkus] and [Mark Koch] and was surprised to find they had been at the Hackaday meetup and I missed them. The same thing happened when I looked at [Rich’s] album from the night and saw [Trey German] was there too. I wasn’t hiding and I wasn’t stuck in one conversation, it was just that kind of a party that makes the room feel like a TARDIS but somehow the night doesn’t last forever.

It’s hard to imagine BAMF without this Saturday gathering. If you missed it this year, add it to your calendar for next.

Tearing Down The Apple Watch

The Apple Watch has been out for nearly a month now, but so far we haven’t seen a good look at the guts of this little metal bauble of electronic jewelry. Lucky for us that a company in China is hard at work poking around inside the Apple Watch and putting up a few incredible SEM images along the way (Google Translatrix).

This isn’t the first Apple Watch teardown that’s hit the intertubes – iFixit tore one apart with spudgers and tiny screwdrivers and found someone skilled in the ways of tiny parts could probably replace the battery in this watch. Shocking for an Apple product, really. iFixit also took a look at the watch with an x-ray, revealing a little bit of the high-level design of the Apple Watch, the Apple S1 computer on a chip, and how all the sensors inside this wearable work.

A side view of a 6-DOF IMU

This teardown uses an incredible amount of very high-tech equipment to peer inside the Apple Watch. Because of this, it’s probably one of the best examples of showing how these tiny sensors actually work. With some very cool images, a 6-DOF IMU is revealed and the Knowles MEMS microphone is shown to be a relatively simple, if very small part.

Now the Apple S1, the tiny 26.15mm x 28.50mm computer on a chip, serves as the brains of the Apple Watch. It’s breathtakingly thin, only 1.16mm, but still handles all the processing in the device.

Even if you won’t be buying this electronic accessory, you’ve got to respect the amazing amount of engineering that went into this tiny metal bauble of semiconductors and sensors.

Colorizer For ZX81 Clone

[danjovic] is a vintage computer enthusiast and has several old computers in his collection. Among them are a couple of TK-85 units – a ZX81 clone manufactured by Microdigital Eletronica in Brazil. The TK-85 outputs a monochrome video output. And when [danjovic] acquired a SyncMaster 510 computer monitor, he went about building a circuit to “colorise” the output from the ZX81 clone (Portuguese translation).

The SyncMaster 510 supports 15kHz RGB video refresh rate, so he thought it ought to be easy to hook it up to the TK-85, which internally has the video and composite sync signals available. So, if he could lower the amplitude of the video signal to 0.7Vpp, using resistors, and connect this signal to one of the primary colors on the monitor, for example green, then the screen should have black characters with a green background.

DSCN5584-thumb
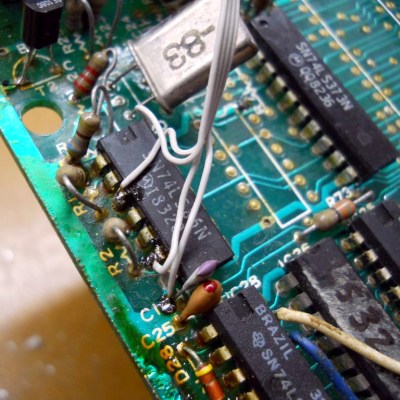
Before he could do any of this, he first had to debug and fix the TK-85 which seemed to be having several age related issues. After swapping out several deteriorating IC sockets, he was able to get it running. He soldered wires directly to one of the logic chips that had the video and sync signals present on them, along with the +5V and GND connections and hooked them up to a breadboard. He then tested his circuit consisting of the TTL multiplexer, DIP switches and resistors. This worked, but not as expected, and after some digging around, he deduced that it was due to the lack of the back porch in the video signal. From Wikipedia, “The back porch is the portion of each scan line between the end (rising edge) of the horizontal sync pulse and the start of active video. It is used to restore the black level (300 mV.) reference in analog video. In signal processing terms, it compensates for the fall time and settling time following the sync pulse.”

To implement the back porch, he referred to an older hack he had come across that involved solving a similar problem in the ZX81. Eventually, it was easily implemented by an RC filter and a diode. With this done, he was now able to select any RGB value for foreground and background colors. Finally, he built a little PCB to house the multiplexer, DIP switches and level shifting resistors. For those interested, he’s also documented his restoration of the TK-85 over a four-part blog post.