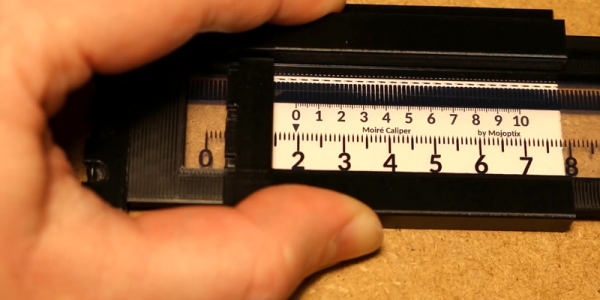
Laser-Cut Modular Toolbox

[ystoelen] created this modular wooden toolbox out of laser-cut 5mm plywood secured with leather hinges bolted into place. The leather strips secure the various tool boards with grommets connecting to plastic plugs. The toolboards use cross-shaped holes with laser-cut plugs and strips of elastic securing the tools, allowing each board to be uniquely configured depending on what tool is being stored there. There is a larger, “main” board, onto which smaller boards can be placed depending on what tools you’ll need.

While this is a clever approach to tool transport, we have some concerns about this project. Usually the problem with a box full of tools is that you’ve overloaded it and can’t readily lift it up. Often this involves a steel toolbox that won’t break, no matter what happens. But a plywood construct isn’t nearly that strong, and if overloaded or dropped it’s gonna take some damage.

For more toolbox inspirations, read our posts on a machine shop in a toolbox as well as this Transformers-themed portable workbench.


Modding A Powdercoating Gun For Performance

In life, tools come in two varieties – good tools, and cheap tools. This is where the hacker steps in, to transform a cheap tool into more than the sum of its parts. [Josh] had problems with his Eastwood powdercoating gun. [Josh] decided to fix things with a couple of tasteful mods.

The problem with the gun was related to the delivery of powder to the workpiece. The stream was either too weak to coat properly, or too heavy, delivering a thick stream of powder. [Josh] surmised that with better airflow into the powder reservoir, the gun would deliver a properly mixed cloud of powder as required. By drilling a couple of small holes into the air feed into the reservoir, the powder stream was much less heavy and the gun’s performance was greatly improved.

[Josh] then decided to take things a step further, by fitting a tip from a more expensive gun to his Eastwood model. There were some challenges in getting it connected electrically, but nothing a little electrical tape couldn’t fix. While this did further improve results, it was a minor improvement compared to the air feed modifications.

Overall, [Josh] was able to take a poorly performing tool and transform it into something much more useful, just by drilling a couple of holes. Check out our Hacklet on quick tool hacks, or share your best work in the comments.

Where A Wood Shop Goes, A Hackerspace Follows

The 2×4 Contest at my local hackerspace captured my interest. The challenge was to build something cool out of a single eight-foot 2×4 with the winner getting free wood storage in the space. I had half an idea for a project, but I ran out of time and never even started it. My idea was to cut the board into half-thickness strips and glue them edge-to-edge with some biscuits holding them together — to basically make wider, thinner boards to do… something cool with it.

One of the entries is pictured above. [Jon Alt] designed this clock and phone charger that includes a capacitive charger for his smart watch. He makes use of the 2×4’s grain to make a gorgeous enclosure, carving away the rear of the front panel so only a credit-card’s thickness of wood remained, allowing the 7-segments to shine through. The other entries were great as well and I especially liked the 2×4 guitar.

Mostly what interested me about the contest was what it showed about the wood shop: thanks to the volunteers and board, that is a wood shop doing well. Stuff is going on! A sad wood shop doesn’t hold contests. By extension, when the shop is doing well, that means the hackerspace is also doing well.

A wood shop is one of those areas of a hackerspace that is tool-driven. It’s not just a gathering place for like-minded folks; people go to use a specific tool or tools they can’t afford, and let’s face it, there’s always tools to buy that costs a bunch of money.

I’ve seen this particular shop begin as an empty concrete room with a cheap drill press and someone’s old bandsaw. Pretty soon worktables, shelving, and storage were built. More tools arrived, some donated, some loaned, some purchased with dues. So how can other spaces replicate this wood shop success story?

Continue reading “Where A Wood Shop Goes, A Hackerspace Follows”

Solar Bulldozer Gets Dirty

As the threat of climate change looms, more and more industries are starting to electrify rather than using traditional fuel sources like gasoline and diesel. It almost all cases, the efficiency gains turn out to be environmentally and economically beneficial. Obviously we have seen more electric cars on the roads, but this trend extends far beyond automobiles to things like lawn equipment, bicycles, boats, and even airplanes. The latest in this trend of electrified machines comes to us from YouTube user [J Mantzel] who has built his own solar-powered bulldozer.

The fact that this bulldozer is completely solar-powered is only the tip of the iceberg, however. The even more impressive part is that this bulldozer was built completely from scratch. The solar panel on the roof charges a set of batteries that drive the motors, and even though the bulldozer is slow it’s incredibly strong for its small size. It’s also possible for it to operate on solar alone if it’s sunny enough, which almost eliminates the need for the batteries entirely. It’s also built out of stainless steel and aluminum, which makes it mostly rust-proof.

This is an impressive build that goes along well with [J Mantzel]’s other projects, most of which center around an off-grid lifestyle. If that’s up your alley, there is a lot of inspiration to be had from his various projects. Be sure to check out the video of his bulldozer below as well. You don’t have to build an off-grid bulldozer to get started in the world of living off-the-grid, though, and it’s easy to start small with just one solar panel and a truck.

Thanks to [Darko] for the tip!

Continue reading “Solar Bulldozer Gets Dirty”

The Textile Bench

What’s on your bench? Mine’s mostly filled with electronic test equipment, soldering kit, and computers. I’m an electronic engineer by trade when I’m not writing for Hackaday, so that’s hardly surprising. Perhaps yours is like mine, or maybe you’ve added a 3D printer to the mix, a bunch of woodworking tools, or maybe power tools.

So that’s my bench. But is it my only bench? On the other side of the room from the electronics bench is a sturdy folding dining table that houses the tools and supplies of my other bench. I’m probably not alone in having more than one bench for different activities, indeed like many of you I also have a messy bench elsewhere for dismantling parts of 1960s cars, or making clay ovens.

My textile bench, with a selection of the equipment used on it.

The other bench in question though is not for messy work, in fact the diametric opposite. This is my textile bench, and it houses the various sewing machines and other equipment that allow me to tackle all sorts of projects involving fabric. On it I’ve made, modified, and repaired all sorts of clothing, I’ve made not-very-successful kites, passable sandals, and adventurous tent designs among countless other projects.

Some of you might wonder why my textile bench is Hackaday fodder, after all it’s probably safe to assume that few readers have ever considered fabricating their own taffeta ball gown. But to concentrate only on one aspect of textile work misses the point, because the potential is there for so much cross-over between these different threads of the maker world. So I’m going to take you through my textile bench and introduce you to its main tools. With luck this will demystify some of them, and maybe encourage you to have a go.

Continue reading “The Textile Bench”

Tweezing Diodes

Surface mount diodes are simple enough — all you need to do is make sure you have the anode and cathode in the right order when you place them on the pad when you solder them. These SMD diodes come in industry-standard packages, but do you think there’s an industry-standard way of marking the cathode? Nope, not by a long shot. To solve the problem of figuring out which way the electrons go through his LEDs, [Jesus] built a simple pair of LED tweezers.

The purpose of these tweezers is to figure out which way is up on a LED. To do this, [Jesus] picked up a pair of multimeter and power supply compatible SMD test clips that are sufficiently tweezy. These tweezers come with red and black wires coming out the back, but cutting those leads off, peeling back the insulation and adding a CR2032 battery holder and 220Ω resistor turns these tweezers from a probe into an electrified poker.

To figure out what the arcane symbols on the bottom of an SMD diode mean, all [Jesus] has to do is touch each side of the pair of tweezers to one of the contacts on a LED. If it lights up, it’s that way around. If it doesn’t light up, the battery is dead, or the diode is backwards. It’s a great project, especially since these SMD test clip tweezer things can be had from the usual online retailers for just a few bucks. We would recommend a switch and marking which tweeze is ground, though.

Review: Antex TCS 50W Digital Temperature Controlled Soldering Iron.

Sometime last summer, I suffered a very sad loss indeed. My soldering iron failed, and it was not just any soldering iron, but the Weller Magnastat temperature-controlled iron that had been my iron of choice since my student days. It was time to buy a replacement, and a whole world of soldering equipment lay before me. In the end I settled on a choice that might seem unexpected, I bought an Antex TCS 50W temperature controlled iron with a digital temperature controller and LCD display in its handle.

No room for a poor iron

When looking at a new iron it’s worth considering for a moment what requirements you might have.  After all, while we’d all love to own a top-of-the range soldering station it’s sometimes necessary to target your purchase carefully for an acceptable blend of affordability, reliability, and performance. It’s possible to find temperature controlled irons for astoundingly low prices these days, thanks to the wonders of globalised manufacturing. But the irons themselves will not be of good quality, their bits will be difficult to replace, and sometimes they are better described as variable temperature rather than temperature controlled. If I was to escape a poor choice I’d have to set my sights a little higher.

Antex are a perennial in the world of British electronics, their signature yellow-handled irons have been around for decades. They aren’t priced at the top end of the market yet they have a pretty good reputation, but could their all-in-one temperature controlled iron be a good alternative to a unknown-name iron that came with a soldering-station-style controller? I parted with my £55 (about $68) before taxes, and waited for the delivery.

All-in-one, win or bin?

The iron I chose is the latest in a long line of their all-in-one temperature controlled irons, and so the blurb tells me, the first with digital control. Previous models had an analogue adjustment which if I recall correctly was achieved by means of a screw, while this one has an LCD display with up and down buttons on its handle.

I haven't bothered with the supplied stand, as you can see.
I haven’t bothered with the supplied stand, as you can see.

In the box are the iron, a rather useless stand made from metal sheet, and an instruction leaflet. Fortunately my requirements included a decent stand, so I’d already ordered the more substantial companion product with a sponge. Out went the sponge and in went a bundle of brass turnings, but the stand itself is fine.

The iron has the usual Antex bit that fits as a sleeve over the cylindrical element. I bought a range of bits of different sizes, it’s never a bad thing to have choice. The handle is bigger than their standard irons as you might expect, but has a flattened and curved profile that’s easy on the hand. It’s noticeably lighter than the Magnastat, which along with its extra-flexible silicone cable makes it easier to use than its predecessor.

In use, the extra length of the handle doesn’t compromise soldering ability. In the time since purchase it has been used to construct multiple projects, and everything from the smaller surface-mount components upwards are taken in its stride. The 50 W element has plenty of power for soldering to PCB planes that suck away the heat, though you probably wouldn’t use it to solder heavy-gauge copper.

The temperature range of 200 to 450 Celcius is ample for my requirements, in fact once I’d set it to my normal 360 degrees I’ve never changed it. Time from power-on to full working temperature is about 45 seconds, which isn’t the fastest on the block, but then again since I turn it on when I sit down it’s not ever been an issue.

A match made in heaven

So, based on quite a few months of regular use, I’m happy with my iron. The question is though, was it the best choice? I think so, given that the competition at the price would almost certainly not come with such readily available support. There’s almost an instinctive distrust of all-in-one temperature-controlled irons that I haven’t found to be justified by the reality. An alternative might have been to build one of the clever designs that adds a temperature controller to a Weller tip, but given that this is an iron I sometimes use to earn a living I’d rather be working for cash than working on my iron. There are certainly cheaper irons and there are probably better irons, but for me this one hits the sweet spot between the two sets of being a good enough iron without being too expensive.