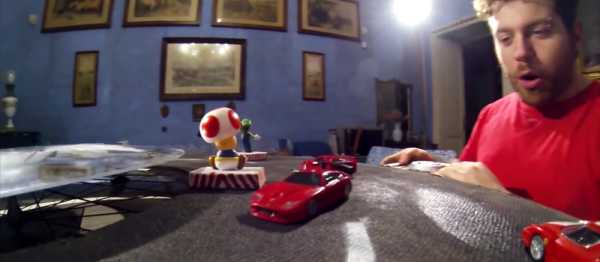
HotWheels

DIY Hot Wheels Drag Race Timer

[Apachexmd] wanted to do something fun for his three-year-old son’s birthday party. Knowing how cool race cars are, he opted to build his own Hot Wheels drag race timer. He didn’t take the easy way out either. He put both his electronics and 3D printing skills to the test with this project.

The system has two main components. First, there’s the starting gate. The cars all have to leave the gate at the same time for a fair race, so [Apachexmd] needed a way to make this electronically controlled. His solution was to use a servo connected to a hinge. The hinge has four machine screws, one for each car. When the servo is rotated in one direction, the hinge pushes the screws out through holes in the track. This keeps the cars from moving on the downward slope. When the start button is pressed, the screws are pulled back and the cars are free to let gravity take over.

The second component is the finish line. Underneath the track are four laser diodes. These shine upwards through holes drilled into the track. Four phototransistors are mounted up above. These act as sensors to detect when the laser beam is broken by a car. It works similarly to a laser trip wire alarm system. The sensors are aimed downwards and covered in black tape to block out extra light noise.

Also above the track are eight 7-segment displays; two for each car. The system is able to keep track of the order in which the cars cross the finish line. When the race ends, it displays which place each car came in above the corresponding track. The system also keeps track of the winning car’s time in seconds and displays this on the display as well.

The system runs on an Arduino and is built almost exclusively out of custom designed 3D printed components. Since all of the components are designed to fit perfectly, the end result is a very slick race timer. Maybe next [Apachexmd] can add in a radar gun to clock top speed. Check out the video below to see it in action. Continue reading “DIY Hot Wheels Drag Race Timer”

Bending And Printing A Curved Camera Dolly Track

How lucky is [Transistor Man] that he found the materials for the tracks of this curved camera dolly just lying around the shop? The three rails making up the system are quarter-inch diameter and he was able to bend them by hand with the help of a 55 gallon drum. But to hold them in place so that the camera dolly would run smoothly he had to find a way to precisely space the tracks.

The robot arm you see in the picture above is a 3D printer which ended up being the easiest solution to the problem. With a bit of trial and error he found a design that holds the tracks in place without interfering with the camera sled’s progress. From there he devised a mounting system which uses three camera tripods to hold the track. You can see a test video shot from the dolly track embedded after the jump. It’s the opposite of the bullet time rigs [Caleb’s] been working on lately.

We figure the spacers would work for any track shape, but if you’re going for a complicated route you need some type of pipe bender to help out.

Continue reading “Bending And Printing A Curved Camera Dolly Track”

Flying Microscope Build Seems Way Too Nice For A Home Lab

This flying microscope is a tool which [Darrell Taylor] can be very proud of. He wanted to have an inspection microscope for working with surface mount projects. He got his hands on a binocular version for a song and dance because it came without a stand. Initially he built a simple rig but if it wasn’t in the right place it was hard on the body, and the upright section was getting in the way of larger projects.

This time around he used a hanging track system instead of a stand. He had some aluminum track on hand which was originally meant for use with a sliding glass door. He fabricated a trolley to interface with the track, and added a vertical rod to support the microscope. This makes it easy to slide the unit to the side when not in use, and provides for some height adjustment as well. To add to the functionality he included a light on the opposite side of the scope. This keeps the project illuminated without shadows being cast by his hands or the scope itself.

Out Engineering A Sneaky Cat

Cats do what they want, which rarely coincides with what their owner wants them to do. In [Dumitru]’s case, his girlfriend’s cat [Pufu] tended to make it outside into the cold more often than desired. Rather than settle with the normal bell which gets obnoxious even when the cat isn’t misbehaving, he decided to put together a custom Cat Finding collar. He used a PIC microcontroller as the brains, and temperature and light sensors to decide whether the cat had snuck into the cold, dark night. Once the cat has been marked as being outside, a buzzer and LED are set to go off at regular intervals until returned into the safety of the indoors.

[Dumitru]’s website along with his YouTube videos are in Romanian, though the schematics and source code provided speak for themselves. He does a wonderful job walking through the entire design process, including time spend in the IDE as well as EAGLE designing the board. YouTube has managed to subtitle the majority of the details, but we imagine this post will be a real treat to any Romanian speaking hobbyists out there. Be sure to catch both videos after the break.

Continue reading “Out Engineering A Sneaky Cat”

Time-lapse Camera Dolly

[Brian Grabski] was asked by a friend to design and build a dolly that would move a camera during a time-lapse sequence. Above you can see the product of his toils, and the videos after the break show off the parts that went into the design and showcase effectiveness of the build.

The dolly is designed to ride on a pair of tubular rails. These can be bent to match any desired path and the dolly will have no problem following it thanks to two features. First, the triad of skateboard wheels on each of the three corners are mounted on a swivel bearing that allows them to rotate without binding. The other piece of the puzzle is a set of drawer slides that let the third support move perpendicular to the other two sets of rollers. A motor drives a geared wheel to move the dolly along the track with speed adjustments courtesy of the motor controller. There’s also a failsafe that will shut the system down when it runs out of track, protecting that fancy piece of hardware taking the pictures.

We’ve seen timelapse equipment that moves the camera in the past, but those hacks usually involve rotating the camera along and axis. This track-based setup is a well executed tool useful at all levels of photography. We can’t wait to see the arch-based dolly that is teased at the end of the demo video.

Continue reading “Time-lapse Camera Dolly”

Track The Sun For Home Lighting.

sun_track

Have a room in your house that really could benefit from some sunlight? Build a Suntrack to reflect light in as long as possible. The two axis motor set up is built from a couple of  satellite dish positioning motors with the control electronics removed. The whole thing is controlled with a PIC 18f2520.  Once calibrated, it will reflect the sun into your room, updating every twenty seconds. While this may not be the most efficient way of lighting a room, it is a cool way to do it if you absolutely must have sunlight. We can’t help but wonder if there would be a way of using a solar powered system to do this to save energy. Could this possibly be done using BEAMhead” circuit?

[via Hacked Gadgets]