UVA Aims To Be More Than Just One Tool

Sometimes, a project is more than it seems on just the surface. The UVA project from [Said Alvarado Marin] is one such example. What started as an attempt to build a single useful tool became the beginning of a broader utility ecosystem.

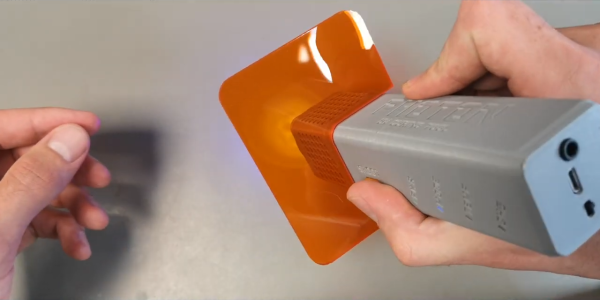
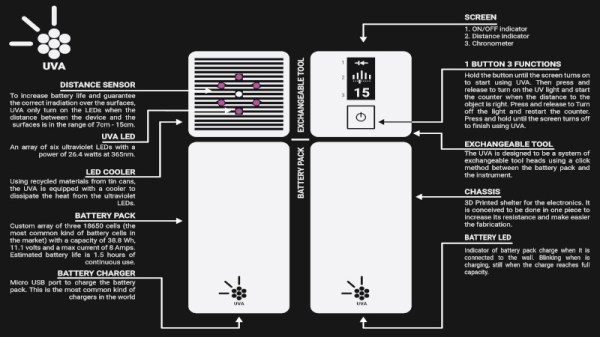
In and of itself, UVA is a project to build a powerful UV flashlight for curing UV-reactive glues. After some serious research, [Said] was able to find the right LEDs, outputting the right wavelengths, and begin the design of this simple tool. However, UVA quickly became a base upon which other tools could be developed. The design of UVA is such that the flashlight head fits onto an interchangable power base, consisting of three 18650 lithium polymer cells and a charging subsystem.

The aim of UVA is to encourage others to produce their own tools to work with this ecosystem. Designed around commonly available parts and DIY build methods like 3D printing, it’s intended to allow the average person to create the tools they need when and as they need them, on location. We look forward to seeing how the project progresses further as we head closer to the finale of the 2020 Hackaday Prize!


A PIN Pad Blasting UV Sanitizer

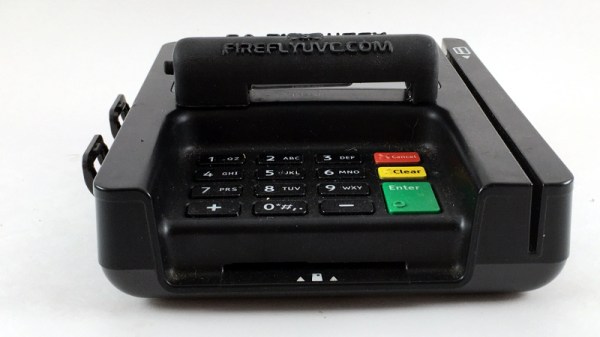
Retailers have instituted enhanced cleaning procedures in response to the COVID-19 pandemic, with an aim to keep frequently touched surfaces as clean as possible. Certainly one of the most commonly handled objects in the entire store is the payment terminal by the register, and the PIN pad specifically. Which is why [Josh Starnes] is working on a UV sterilizer that mounts onto a standard credit card terminal.

It’s a simple enough idea, but as is often the case, figuring out how to properly execute it is where things get tricky. [Josh] has already moved through several design iterations for his 3D printed enclosure in an attempt to make something that’s unobtrusive enough to be practical. The goal is to make something that the user won’t mistake for some kind of skimming device, which can certainly be tricky.

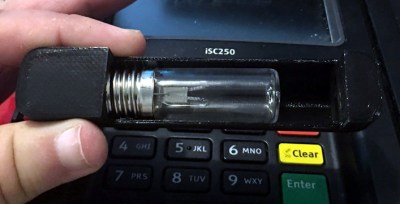
The skeptics in the audience will be happy to hear that [Josh] isn’t bothering with an LED UV source, either. We’ve all seen the pitfalls of trying to sanitize using UV LEDs, so this design goes old school with a small 12 volt UV bulb. That does mean it will need a dedicated power source however, which it seems like he’ll be addressing in the next phase of the project.


Printing, Plating, And Baking Makes DIY Microlattices Possible

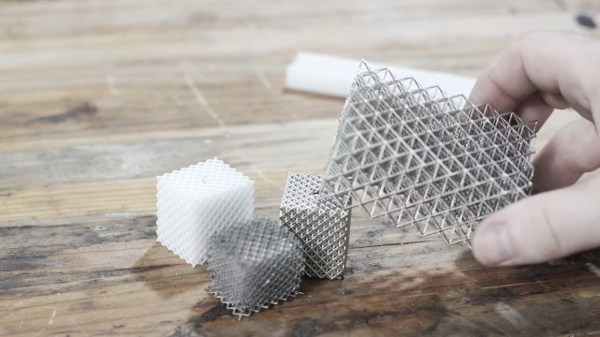
To be honest, we originally considered throwing [Zachary Tong]’s experiments with ultralight metallic microlattices into the “Fail of the Week” bucket. But after watching the video below for a second time, it’s just not fair to call this a fail, so maybe we’ll come up with a new category — “Qualified Success of the Week”, perhaps?

[Zachary]’s foray into the strange world of microlattices began when he happened upon a 2011 paper on the subject in Science. By using a special photocurable resin, the researchers were able to use light shining through a mask with fine holes to create a plastic lattice, which was then plated with nickel using the electroless process, similar to the first half of the electroless nickel immersion gold (ENIG) process used for PCBs. After removing the resin with a concentrated base solution, the resulting microlattice is strong, stiff, and incredibly light.

Lacking access to the advanced materials and methods originally used, [Zachary] did the best he could with what he had. An SLA printer with off-the-shelf resin was used to print the skeleton using the same algorithms used in the original paper. Those actually turned out pretty decent, but rather than electroless plating, he had to go with standard electroplating after a coat of graphite paint. The plated skeletons looked great — until he tried to dissolve the resin. When chemical approaches failed, into the oven went the plated prints. Sadly, it turns out that the polymers in the resin expand when heated, which blew the plating apart. A skeleton in PLA printed on an FDM printer fared little better; when heated to drive out the plastic, it became clear that the tortuous interior of the lattice didn’t plate very well.

From aerogels to graphene, we love these DIY explorations of new and exotic materials, so hats off to [Zachary] for giving it a try in the first place.

Continue reading “Printing, Plating, And Baking Makes DIY Microlattices Possible”

Cheap And Effective Mosquito Trap Looks Like A Disco

Words cannot quite articulate the collective loathing humankind has for mosquitoes, and rightfully so! These parasite peddling, blood sucking little critters are responsible for a great deal of human suffering. Mosquito-borne diseases such as malaria still account for a significant proportion of human mortality, especially in under-developed parts of the world . So it’s no wonder that people try to reduce their numbers; see this latest $40 mosquito trap by [jacobsk]. (Video, embedded below.)

The idea is critically simple, opening up the potential for widespread deployment. The base and body of the trap are made out of three five-gallon buckets with a mini desk fan sandwiched in between, providing suction into the main trap bin. An opening is cut in the top bucket as a point of entry, and an old school incandescent blacklight is mounted in the centre, with just enough IR and UV output to entice these little vermin, who will definitely regret mistaking it for a black-light rave.

[jacobsk] also does a very good job of showing every step of its construction in his videos. Whilst this solution is purposefully low tech, check out this admittedly overcooked way of killing mosquitoes, with a laser turret.

Continue reading “Cheap And Effective Mosquito Trap Looks Like A Disco”

Digi-Key Hacks UV Into Conveyor Line To Protect Warehouse Staff

No doubt that every hacker has already heard of Digi-Key, the electronic component distributor that makes it just as possible to order one of something as it is to order a thousand of it. As an essential business, Digi-Key has been open during the duration of the lockdown since they support critical manufacturing services for virtually every industry on the planet including the medical industry.

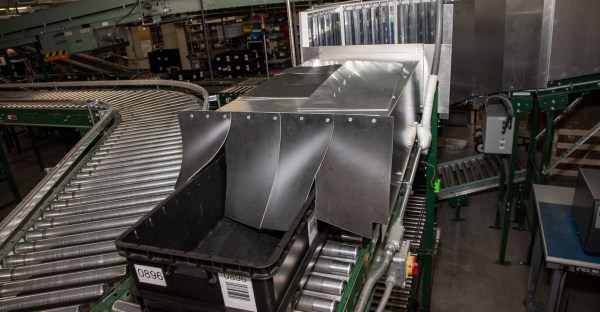
Ensuring their workforce stays healthy is key to remaining open and as part of their efforts they hacked together a nice addition to their sanitation regime. They use around 8,000 plastic totes to transport components around the distribution center and devised a way to sanitize tote coming in from the receiving area using a UV light tunnel. From their sanitation plan we can see this is in addition to the fogging system (likely a vaporized hydrogen peroxide system) used to regularly sanitize the totes passing throughout the warehouse.

They developed a UV light tunnel that wraps around the conveyor rollers. The design includes a sensor and a timer to control when and how long the UV lights are on. The totes are a frequent touch point for employees, and running incoming shipments through the UV light tunnel helps decrease the chance of exposure.

Thinking of using UV as a sanitation tool? Make sure you do your research on the wavelengths you need and vet the source of critical components. [Voja] ran into UV lamps that were anything but germicidal.

Art of 3D printer in the middle of printing a Hackaday Jolly Wrencher logo

3D Printering: Sticky Resin Prints And How To Fix Them

After going through all the trouble of printing a part in resin, discovering it feels sticky or tacky to the touch is pretty unwelcome. Giving the model some extra ultraviolet (UV) curing seems like it should fix the problem, but it probably does not. So, what can be done?

The best thing to do with a sticky print is to immediately re-wash it in clean isopropyl alcohol (IPA) before the UV present in ambient light cures stray resin. If the part remains sticky after it is dry, more aggressive steps can be taken.

We’ll get into those more extreme procedures shortly, but first let’s understand a bit more about how resin works, then look at how that applies to preventing and removing tacky surfaces on finished prints. Continue reading “3D Printering: Sticky Resin Prints And How To Fix Them”

Can You Print With Highlighter Ink?

With huge swathes of people either out of work or working from home, many are now attempting all manner of exciting or silly projects in their downtime. [Emily Velasco] is no exception. She decided to explore the feasability of printing with highlighter ink.

It’s a messy business. Wear gloves.

The hack starts with a rather ancient inkjet printer, so old that it works with tractor feed paper. [Emily] set about gutting several highlighter pens and squeezed out the ink reservoirs into a ladle. The printer’s ink cartridge was then filled with the fluid, and a test print was fired off. Upon initial extraction, it appears blank. However, with the aid of a UV light, the printed pattern is revealed. It appears that the inkjet is printing a very faint image, such that the system almost works as an “invisible ink”.

It’s a fun little hack with an old printer, made easier as it lacks the DRM of newer models. It’d probably be quite achievable with a dot-matrix, too. If you’re similarly tinkering in the innards of your peripherals, be sure to let us know. Video after the break.

Continue reading “Can You Print With Highlighter Ink?”