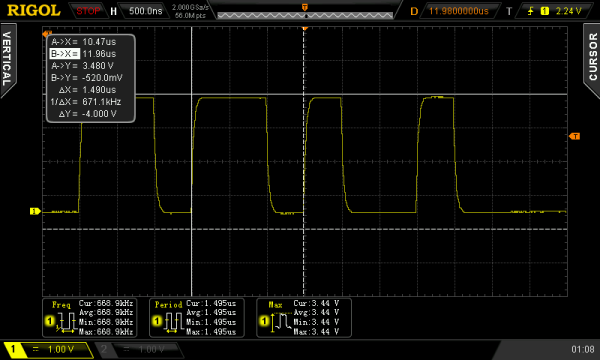
WS2812 at 670 kHz

Driving WS2812B Pixels, With DMA Based SPI

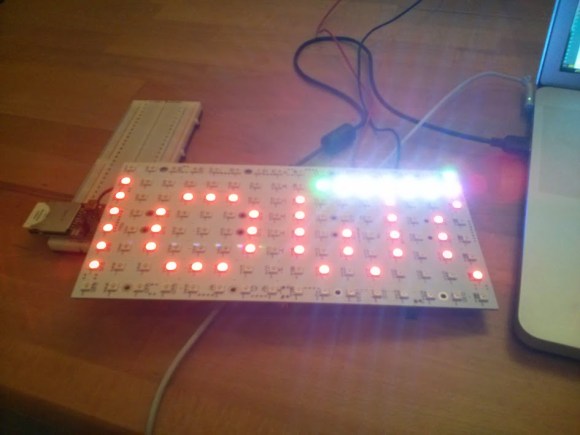
Typically bit-banging an I/O line is the common method of driving the WS2812B (WS2811) RGB LEDs. However, this ties up precious microcontroller cycles while it waits around to flip a bit. A less processor intensive method is to use one of the built-in Serial Peripheral Interface (SPI) modules. This is done using specially crafted data and baud rate settings, that when shifted out over the Serial Data Out (SDO) pin, recreate the needed WS2812B signal timing. Even when running in SPI mode, your hardware TX buffer size will limit how many pixels you can update without CPU intervention.

[Henrik] gets around this limitation by using peripheral DMA (Direct Memory Access) to the SPI module in the Microchip PIC32MX250F128B microcontroller. Once properly configured, the DMA controller will auto increment through the defined section of DMA RAM, sending the pixel data over to the SPI module. Since the DMA controller takes care of the transfer, the micro is free to do other things. This makes all of DMA memory your display buffer. And leaves plenty of precious microcontroller cycles available to calculate what patterns you want the RGB LEDs to display.

Source code is available at the above link for those who would like to peruse, or try it out. This is part of [Henrik’s] Pixel Art Project. Video of DMA based SPI pixels after the break:

Continue reading “Driving WS2812B Pixels, With DMA Based SPI”

Driving 1000 NeoPixels With 1k Of Arduino RAM

timing

NeoPixels, or WS2812 RGB LEDs, are the display device du jour for impressive and blinding lighting projects. Commonly known for very tight timing requirements, [Josh] discovered this is, in fact, usually unnecessary. The timing requirements for NeoPixels aren’t as bad as they seem, once you get to know them.

The official WS2812 timing specs give values that are fairly constraining for anyone writing a library to drive these RGB LED pixels, but simplifying the timing diagram by assuming a 50% duty cycle on the data lines and ignoring the longer maximum times results in a surprising conclusion: the only tight timing parameter for NeoPixel signaling is the maximum width of the 0-bit pulse.

Realizing this, [Josh] wrote a simple demo program to drive over 1000 NeoPixels – an 11 meter long strip – using 1K of RAM on an Arduino. The trick comes by simply delaying the bitbanging a set number of cycles. No obtuse assembly required.

There is only one problem with [Josh]’s method of driving a nearly unlimited amount of NeoPixels – building a display where every NeoPixel is an element in a larger image, such as in a video display, is impossible on systems with limited amounts of RAM. The code writes values to the NeoPixel strip algorithmically, so if you can’t build your animation with for loops, you’re out of luck. Still, Driving this many NeoPixels is a migraine trigger, and we have to give [Josh] credit for doing this with 1K of RAM.

Check out the video of [Josh]’s extreme NeoPixel strip below.

Continue reading “Driving 1000 NeoPixels With 1k Of Arduino RAM”

Wearable Flames With Fur And LED Strips

wearable-flames-with-fur-and-LED-strips

[Finchronicity] over on Hackaday Projects has made a pretty awesome furry LED Vest to keep him warm and well lit at this year’s Burning Man. He is using a Teensy 3.0 that drives strips of 470 WS2811 LEDs.

The vertically aligned strips run on a continuous sequence which reaches up to 31 frames per second using precompiled animations. The effects rendered in Processing or video mapped, are captured frame by frame and stored as raw color data to an SD card. Playback uses the NeoPixel library to control the strips. The high resolution LEDs, with the video mapped fire and the long pile fur, create one of the nicest flame effects we have seen on clothing.

We’ve also seen the Teensy 3.0 and WS2811 LEDs used as a popular combination for building huge displays, a 23ft tall pyramid, and more recently in the RFID jacket at Make Fashion 2014. Have you made or seen a great Teensy/WS2811 project you would like to share with us? If so, let us know the details in the comments below.

Continue reading “Wearable Flames With Fur And LED Strips”

Blinkenschild, The RGB LED Display For Every Occasion

turd

One morning [overflo] decided to protest the European Parliament’s stance on equine rights of defecation, a cherished liberty dating back to the time of Charlemagne. The best way to do this is, of course, blinking lights. He calls his project Blinkenschild, and it’s one of the best portable LED displays we’ve seen.

The display is based around fifteen RGB-123 LED panels, each containing an 8×8 matrix of WS2811 LEDs. That’s 960 pixels, all controlled with a Teensy 3.1. Power is supplied by fifteen LiPo cells wired together in parallel giving him 6 Ah of battery life. Clunky, yes, but it’s small enough to fit in a backpack and that’s what [overflo] had sitting around anyway.

The animations for the display are generated by Glediator, an unfortunately not open source control app for LED matrices. Glediator sends data out over a serial port but not over IP or directly into a file. Not wanting to carry a laptop around with him, [overflo] created a virtual serial port and dumped the output of Glediator into a file so it could be played back stored on an SD card and controlled with an Android app. Very clever, and just the thing to raise awareness of horse and Internet concerns.

Video below.

UPDATE: Check out [overflo’s] clarification in the comments below.

Continue reading “Blinkenschild, The RGB LED Display For Every Occasion”

Fail Of The Week: WS2811 Pixel Failure On FLED

This Fail of the Week project comes from one of Hackaday’s own. [Ben] took on the FLED data visualization project as a way to make the SupplyFrame decor a lot more fun. He had quite a bit of help soldering the 96 WS2811 pixels into their custom made 6’x4′ enclosure and the results are really awesome. In addition to showing server load and playing games, FLED has become something of a job interview. Sit the prospective employee down at a terminal and give them an hour to code the most interesting visualization they are capable of.

But two weeks ago [Ben] staggered into the office and found the display was dead. Did he try turning it off and back on again? Yes, but to no avail. The power supply wasn’t the issue and there was no option but to pull the display off the wall and crack it open for a look at all those pixels. Since every one of them had 4 solder joints on either side he figured the problem was with a broken connection. But not so. He resorted to a binary search for the offending pixel by  cutting the strand in half, and testing each portion. He tracked it down to the pixel whose underside was blackened as you can see above.

[Ben] thinks one of the capacitors inside the sealed enclosure blew, but isn’t certain. Feel free to tell us what you think failed in this component. But the thing we’d really like to know is if there is a more clever way to sniff out the offensive pixel without cutting the connections? Four hours on the floor with this thing (and no knee-pads) and [Ben] has sworn off sourcing pixels from random Chinese suppliers. He might go with pre-assembled strings next time. We chuckle; this is the high-tech equivalent of trying to get old strands of Christmas lights to work.

If you haven’t seen FLED in action, check it out after the break. It amazing how LED intensity and quality diffuser material can make a perfect grid of LEDs seem to dance in waves and color curves.

Continue reading “Fail Of The Week: WS2811 Pixel Failure On FLED”

WS2811 SPI Driver Using One Transistor And Passives

ws2811-spi-driver

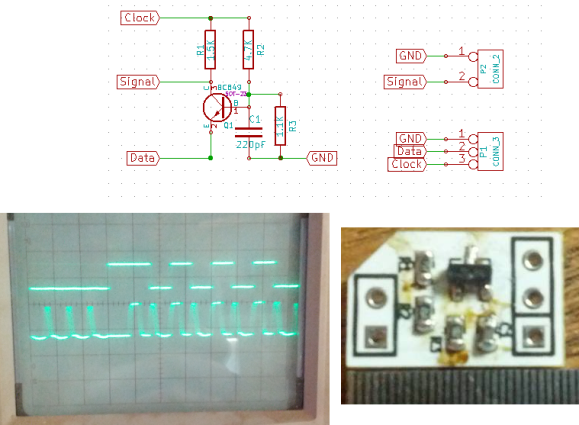
We love the WS28xx projects because even if we never plan to use them, the signal timing is like the most addictive puzzle game ever. For instance, check out this WS2811A driver which uses hardware SPI to generate the signals.

The WS28xx offerings place a microcontroller inside an RGB LED, allowing them to be individually addressed in very long chains or large matrices (still a chain but different layout). But the timing scheme used to address them doesn’t play well with traditionally available microcontroller peripherals. [Brett] had been intrigued by some of the attempts to bend hardware SPI to the will of the WS2811 — notably [Cunning_Fellow’s] work featured in this post. He took it a great step forward by simplifying the driver to just one transistor, three resistors, and a capacitor.

Click through the link above for his step-by-step description of how the circuit works (it’s not worth re-explaining here as he does a very concise job himself). The oscilloscope above shows the SPI signal on top and the resulting timing signal below. You will notice the edges aren’t very clean, which requires the first pixel to be very close to the driver or risk further degradation. But, since the WS28xx drivers feature a repeater which cleans up signals like this, it’s smooth sailing after the first pixel.


Monitor GitHub Activity With An RGB LED Matrix

tim-display

Ever wonder who is forking your code? [Jack] did, so he built a real time GitHub activity display for his company’s repositories. The display is based a Wyolum The Intelligent Matrix (TiM) board. The TiM is an 8 x 16 matrix of the ubiquitous WS2811/Smart Pixel/NeoPixel RGB LEDs with built-in controller. We’re seeing more and more of these serial LEDs as they drop in price. Solder jumpers allow the TiM to be used as 8 parallel rows of LEDs (for higher refresh rates), or connected into one long serial chain.

[Jack] wasn’t worried about speed, so he configured his board into a single serial string of LEDs. An Arduino drives the entire matrix with a single pin. Rather than reinvent the wheel, [Jack] used Adafruit’s NeoMatrix library to drive his display. Since the TiM uses the same LEDs as the Adafruit NeoPixel Matrix, the library will work. Chalk up another victory for open source hardware and software!

An Electric Imp retrieves Github data via WiFi and passes it on to the Arduino. This is a good use of a microcontroller such as the AVR on the Arduino. [Jack’s] display has a scrolling username. Every step in the scroll animation requires all the pixel data be clocked out to the TiM board. The Arduino can handle this while the IMP takes care of higher level duties.

Continue reading “Monitor GitHub Activity With An RGB LED Matrix”