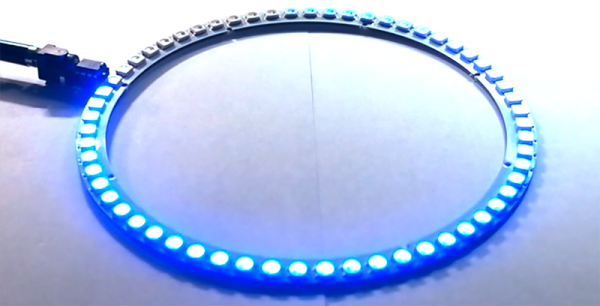
WS2812 at 670 kHz

Driving WS2812B Pixels, With DMA Based SPI

Typically bit-banging an I/O line is the common method of driving the WS2812B (WS2811) RGB LEDs. However, this ties up precious microcontroller cycles while it waits around to flip a bit. A less processor intensive method is to use one of the built-in Serial Peripheral Interface (SPI) modules. This is done using specially crafted data and baud rate settings, that when shifted out over the Serial Data Out (SDO) pin, recreate the needed WS2812B signal timing. Even when running in SPI mode, your hardware TX buffer size will limit how many pixels you can update without CPU intervention.

[Henrik] gets around this limitation by using peripheral DMA (Direct Memory Access) to the SPI module in the Microchip PIC32MX250F128B microcontroller. Once properly configured, the DMA controller will auto increment through the defined section of DMA RAM, sending the pixel data over to the SPI module. Since the DMA controller takes care of the transfer, the micro is free to do other things. This makes all of DMA memory your display buffer. And leaves plenty of precious microcontroller cycles available to calculate what patterns you want the RGB LEDs to display.

Source code is available at the above link for those who would like to peruse, or try it out. This is part of [Henrik’s] Pixel Art Project. Video of DMA based SPI pixels after the break:

Continue reading “Driving WS2812B Pixels, With DMA Based SPI”

Mood Lighting With LEDs And An Arduino

Regular candles can be awfully boring at times. They can only produce one color and the flicker is so… predictable. They can’t even be controlled by an infrared remote control, not to mention the obvious fire hazard. Now, however, [Jose] has come up with an LED candle that solves all of these problems. (Original link to the project in Spanish.)

The heart of the project is an Arduino Pro Mini, which is especially suited for this project because of its size. [Jose] put the small form-factor microcontroller in the base of a homemade wax enclosure and wired it to a Neopixel WS2812b LED strip. The strip can produce any color, and has some programmed patterns including flicker, fade, rainbow, and fire.

The artificial candle is controlled with an infrared remote control, and all of the code for the project is available on the project site if you want to build your own. [Jose] has been featured here before for his innovative Arduino-driven RGB lighting projects, and this is another great project which builds on that theme!


PIC Up A NeoPixel Ring And C What You Can Do Using This Tutorial

lit ringAs [Shahriar] points out in the introductory matter to his latest video at The Signal Path, Arduinos are a great way for a beginner to dig into all kinds of electronic excitement, but they do so at the cost of isolating that beginner from the nitty gritty of microcontrollers. Here, [Shahriar] gives a very thorough walkthrough of a 60-neopixel ring starting with the guts and glory of a single RGB LED. He then shows how that ring can easily be programmed using a PIC and some C.

[Shahriar]’s eval board is a simple setup that he’s used for other projects. It’s based on the PIC18F4550 which he’s programming with an ICD-U64. The PIC is powered through USB, but he’s using a separate switching supply to power the ring itself since he would need ~60mA per RGB to make them burn white at full brightness.

He’s written a simple header file that pulls in the 18F4550 library, sets the fuses, and defines some constants specific to the ring size. As he explains in the video, the PIC can create a 48MHz internal clock from a 20Mhz crystal and he sets up this delay in the header as well. The main code deals with waveform generation, and [Shahriar] does a great job explaining how this is handled with a single pin. Before he lights up the ring, he puts his scope on the assigned GPIO pin to show that although the datasheet is wrong about the un-delayed width of the low period for a zero bit, it still works to program the LEDs.

[Shahriar] has the code available on his site. He is also holding a giveaway open to US residents: simply comment on his blog post or on the video at YouTube and you could win either a TPI Scope Plus 440 with probes and a manual or a Tektronix TDS2232 with GPIB. He’ll even pay the shipping.

Continue reading “PIC Up A NeoPixel Ring And C What You Can Do Using This Tutorial”

800+ LED Wall With Diffuser Panel Is A Work Of Art

LED Wall

What happens when you take over 800 individually addressable super bright RGB LEDs and house them in a giant diffused panel? You get awesome. That’s what you get.

[Epoch Rises] is a small electronic music and interactive technology duo who create cool interactive projects (like this wall) for their live shows and performances. They love their WS2812B LEDs.

The cool thing about this wall is that it can take any video input, it can be controlled by sound or music, an iPad, or even generate random imagery by itself. The 800 LEDs are controlled by a Teensy 3.0 using the OctoWS2811 library from Paul Stoffregen which is capable of driving over 1000 LEDs at a whopping 30FPS using just one Teensy microcontroller. It works by using Direct Memory Access to send data over serial into the Teensy’s memory and directly out to the LEDs with very little overhead — it is a Teensy after all!

Continue reading “800+ LED Wall With Diffuser Panel Is A Work Of Art”

THP Hacker Bio: Infinityis

thp-contestant-bio-infinityis

That profile picture is full of pure joy! Meet [infinityis], aka [David Hoelscher] — don’t worry, we’re not revealing his secret identity; he posted his real name on his profile page.

His entry for The Hackaday Prize is a functional show piece to greet guests when they step into his home. His Waterfall Wall will serve as a way to separate the living space from the entryway. The top portion of it is a water feature which will be edge-lit with LEDs whose color will be controlled wirelessly. The bottom part of the wall will provide some storage space.

Join us after the break to find out more about [David], and check out his THP video for a brief introduction to his Waterfall Wall.

Continue reading “THP Hacker Bio: Infinityis”

Blinding Shades Hide Wearer’s Four Eyes

We ran into [Garrett Mace] at Maker Faire. He wasn’t exhibiting, but in keeping with the fun he made something to show off. This pair of RGB LED Shades was assembled the night before. They may have been hacked together, but they were in no way a hack. Especially of interest to us is the hinge design which is made of PCB substrate and a few machine screws.

Our video above does a pretty good job of showing off the blinky patterns he coded. What’s surprising to us is that the wearer is almost no view of the light the specs are emitting. The slots aren’t that hard to see out of either, and they hide [Garrett’s] prescription glasses quite nicely. This pair steps up from the single color version we saw a couple of years back. That set was also on display, but you really do need to get a closer look at the newer design. Luckily it took us so long to get this video edited that the Macetech blog now has complete details.

Roman Headgear Looks Less Silly With Lots Of Blinky

centurion-project

Look, it’s not Steam-Punk because the period is way out of whack. And we’ve never seen ourselves as “that guy” at the party. But it would be pretty hard to develop The Centurion Project and not take the thing to every festive gathering you could possibly attend. This sound-reactive helm compels party-going in a toga-nouveau sort of way.

[Roman] tells us that it started as a movie prop. The first build step was to remove the plume from the top of it. The replacement — seven meters worth of addressable RGB LEDS — looks just enough like an epic mohawk to elicit visions of the punk rock show, with the reactive patterns to make it Daft. The unexpected comes with the FFT generated audio visualizations. They’re grounded on the top side of each of the LED strips. Most would call that upside-down but it ends up being the defining factor in this build. Seriously, watch the demo after the break and just try to make your case that this would have been better the other way around.

As a final note, this project was written using Cinder. It’s an Open Source C++ library that we don’t remember hearing about before.

Continue reading “Roman Headgear Looks Less Silly With Lots Of Blinky”