Custom Parts Put IKEA Window Shades On IoT

No matter what the project is about, we’re always suckers for nicely integrated builds with good fit and finish. There’s a certain appeal to rat’s nest wiring on a breadboard, and such projects are valuable because they push the limits. But eventually you need to go from prototype to product, and that’s where this IKEA window shade automation project shines.

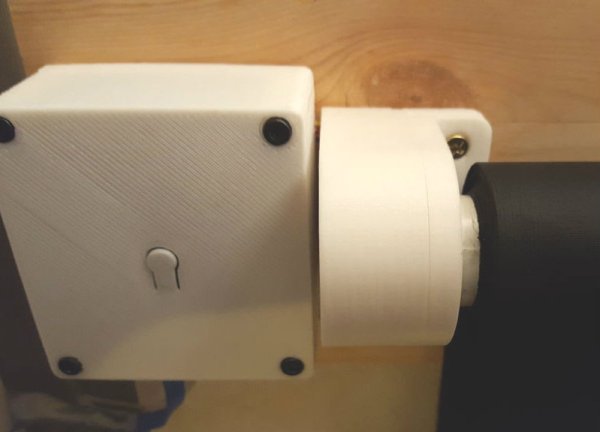
Integration is more than just putting everything in a nice box, especially for home automation gear – it really needs to blend. [ehsmaes] roller blind motorization project accomplishes that nicely with a 3D-printed case for the electronics, as well as a custom case for the geared stepper motor to drive the shade. The drive replaces the standard spring-loaded cap on the end of the IKEA Tupplur shade, and the neutral color of both cases blends nicely with the shade and surroundings. The control electronics include a NodeMCU and a motor shield; [eshmaes] warns that narrow shades work just fine off of USB power, but that wider windows will need a power boost. The IoT end of things is taken care of by MQTT and OpenHab, allowing the shades to be raised and lowered to any position. The short video below shows the calibration procedure for the shade.

Need a primer on MQTT? We’ve got you covered. Or perhaps you need to control the windows rather than the treatments.

Continue reading “Custom Parts Put IKEA Window Shades On IoT”

An Electronic 90V Anode Battery

One of the miracle technological gadgets of the 1950s and 1960s was the transistor radio. Something that can be had for a few dollars today, but which in its day represented the last word in futuristic sophistication. Of course, it’s worth remembering that portable radios were nothing new when the transistor appeared. There had been tube radios in small attaché cases, but they had never really caught the imagination in the same way. They were bulky, like all tube radios they had to warm up, and they required a pair of hefty batteries to work.

If you have a portable tube radio today, the chances are you won’t be able to use it. The low voltage heater battery can easily be substituted with a modern equivalent, but the 90V anode batteries are long out of production. Your best bet is to build an inverter, and if you’re at a loss for where to start then [Ronald Dekker] has gone through a significant design exercise to produce a variety of routes to achieve that goal. It’s a page that’s a few years old, but still a fascinating read.

A problem with these radios lies with their sensitivity to noise. They are AM receivers from an era with a low electrical noise floor, so they don’t react well to high-frequency switch-mode power supplies. Thus, the inverters usually tasked for projects like this are low-frequency, at 50Hz as this is a European project, to mimic one source of electrical noise that would have been an issue for the designers in the 1950s.

We are taken through transformer selection and a variety of discrete inverter designs using multivibrators, investigating how to maximize efficiency through careful manipulation of switch-on and switch-off times. Then a PIC microcontroller design is presented, and finally a CMOS ring counter.

The final converter is mounted in a diecast box and covered with a printed card shell to mimic a period battery. If you weren’t intimately familiar with battery tube radios, you might mistake it for the real thing.

We’ve featured one of [Ronald]’s designs before, though only in passing. His Nixie PSU was used in this rather frightening clock with no PCB.

Hackaday Links: February 19, 2017

The ESP-32 is the Next Big Chip. This tiny microcontroller with WiFi and Bluetooth is the brains of the GameBoy on your keychain, emulates an NES, and does Arduino. There are ESP32 modules that are somewhat easy to acquire, but so far the bare chips have been unobtanium. Now you can buy them. One supplier has them for $3.60 USD/piece. That’s a lot of computational power, WiFi, and Bluetooth for not much money. What are you going to build?

What is the power of artisanal product videos? The argument for this trend cites [Claude C. Hopkins] and how he told consumers what no one else would tell them. In other words, if you and your competitors have product designers working on the enclosure, tell the consumer you have product designers working on the enclosure before your competitors do coughapplecough. In other words, marketing your product as ‘artisanal’ is simply telling consumers what all products in your market do, and this type of advertising is the easiest to create. See also: music with whistling, clapping, a ukulele, and a Fisher Price xylophone – it’s popular because it’s very easy to make.

Over on hackaday.io, [Michael Welling] is stuffing a BeagleBone in one of those mini Altoids tins. This build is based on the Octavo Systems OSD3358, otherwise known as the BeagleBone on a Chip. This is an absurdly small build, but surprisingly something we’ve seen before. Before the Octavo chip was released, [Jason Kridner] built a mini BeagleBone breakout for this chip in the mini Altoids form factor. [Jason] did it in Eagle, [Michael] is doing it in KiCad. Awesome work, and just what you need if you want Linux in your pocket.

Every month or so, Hackaday (or at least the Hackaday Overlords) hold events in LA, NYC, and San Francisco. These events are free, there’s usually pizza, and there’s always a speaker or two giving a talk on a very interesting topic. Waaaaaay back in July, we had the monthly Hardware Developers Didactic Galactic meetup in SF, with two great talks. [Jason Cerundulo], a CastAR engineer gave a talk about various ways of driving a LED. [Werner Johansson], a former Sony designer, talked about software-defined power supplies. There’s mention of a ‘transverter design’ which sounds like excellent Berman-era Trek technobabble but is really a power converter without a transformer. Both of these talks can be seen below.

Continue reading “Hackaday Links: February 19, 2017”

Nespresso Capsule Detector

Nespresso fans rejoice! If you like coffee (of course you do) and are a Nespresso fan, chances are you are one of two types of persons: the ones that chosen one type of capsule and stick to it or the ones that have a jar full of mixed capsules and lost track which coffee is which. Of course, there is a third, rarer, OCDish, kind. The ones that have every capsule organized neatly by color in a proper holder, full of style. In any case, if you forgot which color is which coffee because you threw the case away and forgot about it here’s an interesting weekend project for you: the Nespresso Capsule Detector.

[circuit.io team] made a neat Arduino-based project that can detect which capsule is which using an RGB color detector and display information about it on an LCD display. It’s a pretty simple project to make. If you have a 3D printer you can print the case, if not it’s fairly easy to come up with a working casing for the electronics and capsule.

The operation is simple, just drop the capsule in the hole and the Nespresso Capsule Detector will tell you which type it is, its intensity, its flavor tones and the optimal cup size for the coffee in question. We are just not sure if it can detect the Nespresso weddingbots correctly, but who knows?

Have a look:

Continue reading “Nespresso Capsule Detector”

The USB Killer: Now Faster, Better, More Anonymous

A few years ago, [Dark Purple] built the USB equivalent of an RJ45 connector wired into mains power. The USB Killer is a simple device with just a FET, a few high voltage caps, a DC/DC converter, and a USB connector. Plug this device into your computer and -220V is dumped directly into the USB signal wires. This kills your laptop dead.

Over the years we’ve seen the USB Killer evolve from a hand-etched PCB to something less discrete but more discreet. It was a crowdfunding campaign run by a company in Hong Kong, and a few months ago this new commercial version was released.

Now, the USB Killer V3 is out. It provides 1.5 times the power to your poor USB ports, with power surges twice as fast. There’s also an anonymous version that looks like every other USB thumb drive sourced from Hong Kong. This is your warning: never, ever plug an unknown USB thumb drive into your computer.

While a product announcement really isn’t news, it is extremely interesting to take a look at how something that should not exist is being marketed. As with all electronic destructive devices, it’s on your Amazon recommended products list alongside tactical kilts, fingerless gloves, beard oil, and black hoodies. This is pentesting gear, with an anonymous edition for your friend, the hacker called four chan. Don’t think too much about how you’re going to get data off a laptop you just killed, or how you would go undetected by destroying equipment; this is cool hacker stuff.

In addition, the USB Kill 2.0 is FCC and CE approved. This allows you to, “test in complete safety” (their emphasis, not ours).   We have no idea what this actually means.

Making Use Of Stellaris/Tiva Real-Time Clock

If you’re at all like us, or like [Vadim], you’ve got a stash of development boards in a shoebox on a shelf in your closet. If you’re better organized that we are, it might even be labeled “dev boards”. (Ah well, that’s a project for another day.) Anyway, reach into your box and pull one out, and put it to use. Do something trivial if you need to, but a dev board that’s driving a silly blinker is better than a dev board sitting in the dark.

[Vadim]’s good example to us all is going to serve as the brains for an automated plant watering system. That’s a low-demand application where the microcontroller can spend most of the time sleeping. [Vadim]’s first step, then was to get a real-time clock working with the hibernation mode. There’s working code inline in his blog.

royale-with-cheese-pulp-fiction-2_12-movie-clip-1994-hd-6pkq_ebhxj4mkv-shot0001
“I don’t know, I didn’t go into Burger King.”

If you use Arduino, you’ll feel at home in the Energia ecosystem. But it’s like ordering a Quarter Pounder with Cheese in Paris: Energia is a Royale with Cheese (YouTube) — it’s the little differences. And maybe that’s the point of the exercise; it’s always a good thing to try out something new, even if it’s only minimally different.

So grab that unused dev board off the shelf, struggle through the unfamiliar development environment and/or toolchain, but remember to keep an eye out for the sweet little differences. The more tools that you’re familiar with, the more solutions will spring to mind when you’re hacking on your next project.

SPI On Embedded Linux

Are you already comfortable working with Serial Peripheral Interface (SPI) parts and looking for a challenge? We suspect many of you have cut your teeth on 8-bit through 32-bit microcontrollers but how much time have you spent playing with hardware interfaces on embedded Linux? Here a new quest, should you choose to accept it. [Matt Porter] spoke in detail about the Linux SPI Subsystem during his presentation at FOSDEM 2017. Why not grab an embedded Linux board and try your hand at connecting some extra hardware to one of the SPI buses?

The hardware side of this is exactly what you’d expect from any embedded SPI you’ve worked on: MOSI, MISO, a clock, and a slave select. [Matt] gives a succinct overview of SPI and reading datasheets. Our own [Elliot Williams] has done an excellent job of digging through the basics and most common gotchas if you need to get up to speed on all the SPI basics.

The fun details in the talk start at about 18:30 into the video when [Matt] jumps into the Linux side of SPI. You need a controller driver and a protocol driver. The controller driver is responsible for dealing with the pins (actual hardware) and the protocol driver handles the job of making sense of the SPI packets (messages containing any number of transfers) going in or out. In other words, the controller drive just want bits and pushes them in or out on hardware, the protocol driver makes those bits meaningful to the Linux system.

Adding SPI devices (think devices like LCDs and sensors) to your own embedded systems means telling the OS the particulars about that hardware, like max speed and SPI mode. There are three ways to handle this but the Device Tree is the preferred method for modern systems. This paves the way for the controller driver which implements an API set that the Linux SPI subsystem will use to work with your new hardware.

Protocol drivers follow the standard Linux driver model and are pretty straight forward. With these two drivers in place the new device is hooked into the OS and opens up common SPI API calls: spi_async(), spi_sync(), spi_write(), and spi_read(), and a few others.

Continue reading “SPI On Embedded Linux”