Modern DIY FM Radio

Back in the day, building a DIY radio was fun! We only had to get our hands at a germanium diode, make some coils, and with a resistor and long wire as an antenna maybe we could get some sound out of those old white earplugs. That was back then. Now we have things like the Si4703 FM tuner chip that can tune in FM radio in the 76–108 MHz range, comes with integrated AGC and AFC, controlled by I2C, as well as a bunch of other acronyms which seem to make the whole DIY radio-building process outdated. The challenges of the past resulted in the proven solutions of the present in which we build upon.

This little project by [Patrick Müller] is a modern radio DIY tutorial. With an Arduino Nano as the brains and controller for an Si4703 breakout board, he builds a completely functional and portable FM radio. A small OLED display lets the user see audio volume, frequency, selected station and still has space left to show the current available battery voltage. It has volume control, radio station seek, and four buttons that allows quick access to memorized stations. The source code shows how it is possible to control the Si4703 FM tuner chip to suit your needs.

As for ICs, not everything is new, [Patrick] still used the good old LM386 amp to drive the speaker, which is almost 35 years old by now. As we can listen in the demo video, it can still output some seriously loud music sounds!

Continue reading “Modern DIY FM Radio”

Well Engineered Radio Clock Aces Form And Function

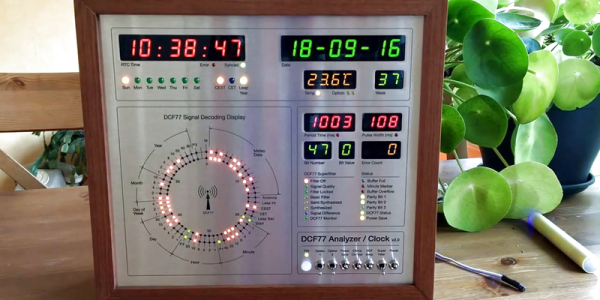
Clocks that read time via received radio signals have several advantages over their Internet-connected, NTP-synchronised brethren. The radio signal is ubiquitous and available over a fairly large footprint extending to thousands of kilometres from the transmitting antennae. This allows such clocks to work reliably in areas where there is no Internet service. And compared to GPS clocks, their front-end electronics and antenna requirements are much simpler. [Erik de Ruiter]’s DCF77 Analyzer/Clock is synchronised to the German DCF77 radio signal, which is derived from the atomic clocks at PTB headquarters. It features a ton of bells and whistles, while still being simple to build. It’s a slick piece of German hacker engineering that leaves us amazed.

Among the clock functions, it shows time, day of the week, date, CET/CEST modes, leap year indications and week numbers. The last is not part of the DCF77 protocol but is calculated via software. The DCF77 analyzer part has all of the useful information gleaned from the radio signals. There are displays for time period, pulse width, a bit counter, bit value indicator (0/1) and an error counter. There are two rings of 59 LEDs each that provide additional information about the DCF77 signal. A PIR sensor on the front panel helps put the clock in power save mode. Finally, there is a whole bunch of indicator LEDs and a bank of switches to control the various functions. On the rear panel, there are RJ45 sockets for the DCF77 receiver antenna board, temperature sensor and FTDI serial, a bunch of audio sound board controls, reset switches and a mode control switch.

His build starts with the design and layout of the enclosure. The front panel layout had to go through a couple of iterations before he was satisfied with the result. The final version was made from aluminium-coated sandwich-panel. He used an online service to photo-etch the markings, and then a milling machine to carve out the various windows and mounting holes. The rear panel is a tinted acrylic with laser engraving, which makes the neatly laid out innards visible for viewers to appreciate. The wooden frame is made from 40-year-old Mahogany, sourced from an old family heirloom desk. All of this hard work results in a really professional looking product.

The electronics are mostly off the shelf modules, except for the custom built LED driver boards. The heart of the device is an Arduino Mega because of the large number of outputs it provides. There are seven LED driver boards based around the Maxim 7221 (PDF) serial interface LED drivers – two to drive the inner and outer ring LEDs, and the others for the various seven-segment displays. The numerous annunciator LEDs are driven directly from the Arduino Mega. His build really comes together by incorporating a noise resilient DCF77 decoder library by [Udo Klein] which is running on a separate Arduino Uno. All of his design source files are posted on his GitHub repository and he hopes to publish an Instructable soon for those who would like to build one of their own.

In the first video below, he walks through the various functions of the clock, and in the second one, gives us a peek in to its inside. Watch, and be amazed.

Thanks for the tip, [Nick]

Continue reading “Well Engineered Radio Clock Aces Form And Function”

Bees In TVs

Bees are a crucial part of the ecosystem – without bees to act as pollinators, many plant species wouldn’t be able to reproduce at all! It’s unfortunate then that bees are struggling to survive in many parts of the world. However, [Louise Cosgrove] is doing her part – building homes for bees in old television sets.

The project started when Louise’s son-in-law left 100 (!) analog TVs at her home, having already recycled the picture tubes. That sounds kind of impolite to us, but we’ll give them the benefit of the doubt and assume they had some sort of agreement. [Louise] realised the empty television cases had plenty of ventilation and would make ideal homes for bees. By filling the empty boxes with natural materials like wood, bamboo and bark, it creates nesting places that the bees can use to lay their eggs.

We’ve seen bees on Hackaday beefore (tee-hee) – like this beehive wired for remote monitoring.

[Thanks to Stuart Longland for the tip!]

From XP To 10, DoubleAgent Pwns All Your Windows?

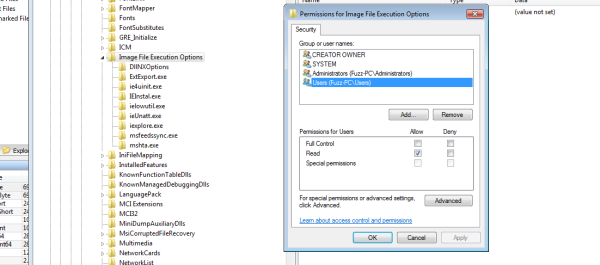
The Cybellum team published a new 0-day technique for injecting code and maintaining persistency on a target computer, baptized DoubleAgent. This technique uses a feature that all Windows versions since XP provide, that allows for an Application Verifier Provider DLL to be installed for any executable. The verifier-provider DLL is just a DLL that is loaded into the process and is supposedly responsible for performing run-time verifications for the application. However, its internal behaviour can be whatever an attacker wants, since he can provide the DLL himself.

Microsoft describes it as:

Application Verifier is a runtime verification tool for unmanaged code. Application Verifier assists developers in quickly finding subtle programming errors that can be extremely difficult to identify with normal application testing. Using Application Verifier in Visual Studio makes it easier to create reliable applications by identifying errors caused by heap corruption, incorrect handle and critical section usage. (…)

The code injection occurs extremely early during the victim’s process initialization, giving the attacker full control over the process and no way for the process to actually detect what’s going on. Once a DLL has been registered as a verifier provider DLL for a process, it would permanently be injected by the Windows Loader into the process every time the process starts, even after reboots, updates, reinstalls, or patches.

So it’s all over for Windows right? Well… no. The thing is, to register this DLL, the registered process has to have administrator rights so it can write the proper key to the Windows Registry. Without these permissions, there is no way for this attack to work. You know, the kind of permissions that allow you to install software for all users or format your own hard-drive. So, although this technique has its merit and can present challenges to processes that absolutely must maintain their integrity (such as the Cybellum team points out in the Anti-Virus software case), some other security flaw had to occur first so you can register this sort of ‘debugging DLL’.

If you already have administrator permissions you can do pretty much what you want, including DLL injection to fool anti-virus software. (Though it might be easy just to disable or remove it.)  This new tool has the advantage of being stealthy, but is a 0-day that requires root a 0-day?

[via The Hacker News]

An Android Phone Makes A Better Server Than You’d Think

There was a time a few years ago when the first Android phones made it to market, that they seemed full of promise as general purpose computers. Android is sort of Linux, right, or so the story went, so of course you must be able to run Linux on an Android phone and do all sorts of cool stuff with it.

As anyone who tried to root an Android phone from 2010 will tell you, it was a painful and unrewarding process. There was normally a convoluted rooting process followed by somehow squeezing your own Linux filesystem tree onto the device, then chroot-ing into it. You’d then have to set up a VNC server and VNC into it, and eventually you’d feel immensely proud of your very slow tiny-screen Linux desktop that you’d slaved over creating. It was one of those things that’s simple in theory, but extremely convoluted in practice.

But six years have passed since those days, phones have gotten much faster and so has the software for tasks such as rooting, so maybe it’s time to return to the topic of Linux on an Android device. [Pete Scargill] gave it a try when a friend gave him a Chinese quad-core Android phone with a broken screen. He proceeded to put a Debian installation on it, upon which he runs his collection of server processes.

Rooting the phone was straightforward process using the KingRoot app, a sideloaded version as it seems there’s a bogus copy on the Play Store. Then bringing a Linux system to it could be achieved with the LinuxDeploy app. The result is surprisingly useful, after some installation steps upon which he goes into detail.

You might ask what would be the point of this exercise, given that you can do the same thing much more easily with a single board computer such as a Raspberry Pi. But to buy a Pi, SD card, screen, and UPS, as he points out you’d have to spend a lot more than you would for a second-hand phone from eBay — or a free, slightly broken, one from friends or family.

If getting more from your Android phone is your thing, perhaps you’d like to know about installing Busybox on it. We’ve also advocated for using old Android phones for ARM dev.

How Does A Voltage Multiplier Work?

If you need a high voltage, a voltage multiplier is one of the easiest ways to obtain it. A voltage multiplier is a specialized type of rectifier circuit that converts an AC voltage to a higher DC voltage. Invented by Heinrich Greinacher in 1919, they were used in the design of a particle accelerator that performed the first artificial nuclear disintegration, so you know they mean business.

Theoretically the output of the multiplier is an integer times the AC peak input voltage, and while they can work with any input voltage, the principal use for voltage multipliers is when very high voltages, in the order of tens of thousands or even millions of volts, are needed. They have the advantage of being relatively easy to build, and are cheaper than an equivalent high voltage transformer of the same output rating. If you need sparks for your mad science, perhaps a voltage multiplier can provide them for you.

Continue reading “How Does A Voltage Multiplier Work?”

Dartboard Watches Your Throw; Catches Perfect Bullseyes

Some people really put a lot of effort into rigging the system. Why spend years practicing a skill and honing your technique to hit a perfect bullseye in darts when you can spend the time building an incredibly complicated auto-bullseye dartboard that’ll do it for you?

In fairness, what [Mark Rober] started three years ago seemed like a pretty simple task. He wanted to build a rig to move the dartboard’s bullseye to meet the predicted impact of any throw. Seems simple, but it turns out to be rather difficult, especially when you choose to roll your own motion capture system.

That system, built around the Nvidia Jetson TX1, never quite gelled, a fact which unfortunately burned through the first two years of the project. [Mark] eventually turned to the not inexpensive Vicon Vantage motion capture system with six IR cameras. A retroreflector on the non-regulation dart is tracked by the system and the resulting XY data is fed into MATLAB to calculate the parabolic path of the dart. An XY-gantry using six steppers quickly shifts the board so the bullseye is in the right place to catch the incoming dart.

It’s a huge amount of work and a lot of money to spend, but the group down at the local bar seemed to enjoy it. We wonder if it can be simplified, though. Perhaps tracking just the thrower’s motions with an IMU-based motion capture system and extrapolating the impact point would work.

Continue reading “Dartboard Watches Your Throw; Catches Perfect Bullseyes”