ColibriNANO USB SDR Receiver Reviewed

At first glance, the ColibriNANO SDR looks like another cheap SDR dongle. But after watching [Mile Kokotov’s] review (see video below), you can see that it was built specifically for software defined radio service. When [Mile] takes the case off, you notice the heavy metal body which you don’t see on the typical cheap dongle. Of course, a low-end RTL-SDR is around $20. The ColibriNANO costs about $300–so you’d hope you get what you pay for.

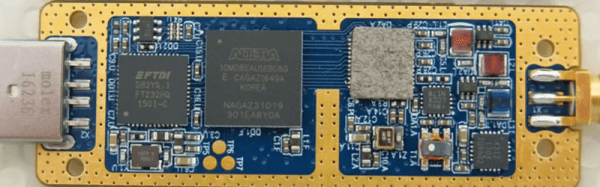
The frequency range is nominally 10 kHz to 55 MHz, although if you use external filters and preamps you can get to 500 MHz. In addition to a 14-bit 122.88 megasample per second A/D converter, the device sports an Altera MAX10 FPGA.

Continue reading “ColibriNANO USB SDR Receiver Reviewed”

DIY VT220 Keyboard

There’s always been interest in the computers of old, and people love collecting and restoring them. When [peterbjornx] got his hands on a DEC VT220 video terminal, it was in good shape – it needed a bit of cleaning, but it also needed a keyboard. [Peter] couldn’t afford to buy the keyboard, but the service manual for it was available, so he decided to convert a modern keyboard to work with his new terminal. (Editor’s note: Link rot. Try the Internet Archive’s Wayback Machine link instead.)

The original keyboard for the VT220 is the LK201. This keyboard communicates with the terminal using 8-N-1 (eight data bits, no parity, one stop bit) over RS232 at 4800 baud. This meant that it would be pretty simple to implement this on microcontroller in order to communicate with the terminal. [Peter] chose the Arduino Nano. However, the LK200 was more than just a keyboard for communicating with the terminal, it also housed a speaker and LEDs which the terminal used to communicate with the user. Rather than put these into the adapter unit, [Peter] decided to put these into the keyboard – a few holes and a bit of wiring, and they were in.

[Peter]’s write-up includes a description of some of the issues he encountered as well as a picture of the keyboard. He’s put the schematic online and the code up on GitHub. In case you were wondering, he used Vim on the VT220 to write his article. You could also use a Raspberry Pi to help out your dumb terminal, or just hook the terminal directly to your Linux box and go from there.

Starter Guide To Linux Forensics

The old saying is if your data isn’t backed up at least twice, it’s not backed up at all. For those not wise enough to heed this adage, there are a number of options available to you if you wish your data to be recovered. Assuming the drive itself is just corrupted somehow (maybe a malicious attack, maybe a user error) and not damaged beyond physical repair, the first step is to connect the drive to another computer. If that fails, it might be time to break out the computer forensics skills.

[Luis]’s guide is focused on Linux-specific drives and recovery tools, so this isn’t necessarily a general-purpose how-to. That being said, there is a lot of information in this guide such as how to mount the target drive’s partitions, how to set up various timelines, and which of the Linux system’s logs are important for the forensic analysis. This specific example in the guide also goes into detail about noticing which of the recent files had been accessed, what they might have done, and different approaches to piecing the mystery of this corrupted drive together.

[Luis] points out that the world of Linux forensics is much different from that of Windows, but for anyone looking to get started he suggests starting with a clean Linux install and going from there. There are many other avenues of digital forensics, as well; the field has as many avenues of exploration as there are different types of computers.

ATMega328 3D!

Small OLED displays are inexpensive these days–cheap enough that pairing them with an 8-bit micro is economically feasible. But what can you do with a tiny display and not-entirely-powerful processor? If you are [ttsiodras] you can do a real time 3D rendering. You can see the results in the video below. Not bad for an 8-bit, 8 MHz processor.

The code is a “points-only” renderer. The design drives the OLED over the SPI pins and also outputs frame per second information via the serial port.

Continue reading “ATMega328 3D!”

Hackaday Prize Entry: A BSTRD Preamp

For this year’s Hackaday Prize, [skrodahl] is building a beautiful tube preamp. It’s a masterpiece of glass and free electrons, it already works, and it sounds great.

This circuit is a modified version of the Bastard, an amp published in the Danish magazine Ny Elektronik nearly 20 years ago. The original amp was a true bastard, with a transistor phono stage, a valve line stage, and an input selector that used relays. [skrodahl]’s version only uses the line stage, but part of the name remains as a nod to the original design.

The design of this amp uses octal 6J5 tubes, a 80 VDC, 0.1 A and 6 VDC, 1.5 A power supply. This is actually two projects in one, with the power supply comprising an another entire project.

[skrodahl]’s BSTRD is built, and it works, but the question remains: how does it sound? Unlike so, so many tube amp projects on the Interwebs, [skrodahl] actually has test and measurement gear to figure out what the frequency response and THD measurements actually are. For the frequency response, this amp is dead flat from 10 Hz to 30 kHz. THD is somewhere between 0.35-0.4%, or more than acceptable.

This is a great little project, and an awesome extension to an already popular Open Source project. It’s also a great entry for the Hackaday Prize, and we’re pleased to see it entered in this year’s contest.

Eclipse Megamovie: Thousands Of Cameras For Citizen Science

On August 21, 2017, the Moon will cast its shadow across the entire breadth of the United States for the first time in almost a century. It is estimated that 12 million people live within the path in which the sun will be blotted out, and many millions more are expected to pour into the area to experience the wonders of totality.

We’d really love it if you would tell us where you’ll be during the eclipse by creating your own event page, but that’s not what this article’s about. With millions gathered in a narrow swath from Oregon to South Carolina, and with the eclipse falling on a Monday so that the prior two weekend days will be filled with campouts at prime viewing locations, I expect that Eclipse 2017 will be one big coast-to-coast party. This is an event that will attract people of all stripes, from those with no interest in astronomy that have only the faintest idea of what’s actually happening celestially, to those so steeped in the science that they’ll be calling out the exact beginning of totality and when to expect Baily’s Beads to appear.

I suspect our readership leans closer to the latter than the former, and some may want to add to the eclipse experience by participating in a little citizen science. Here’s how you can get involved.

Continue reading “Eclipse Megamovie: Thousands Of Cameras For Citizen Science”

Touchscreen Oscilloscope

[Marco Reps] didn’t want to lug a full-sized oscilloscope around to measure his ECG while running. He decided to check out the DSO112A which is a tiny touchscreen scope from the usual China sources. The tiny one channel scope can go to 2mV/division at 2MHz and can save and recall up to 24 configurations. It also has access to the data via a serial port so you can use it as a fancy data logger. [Marco’s] video appears below.

Apparently, there is was an older model without the A on the end that was not as sensitive and had some other missing features. The price is about $70–fairly inexpensive, although not throw-away cheap.

[Marco] noted that one of the two small connectors can act as an external trigger input or a function generator. There’s the typical LiPo battery inside and a shielded input section. [Marco] tears the board down and looks at the chips on the board. Inside are two Atmel CPUs and a 20 megasample per second analog to digital converter.

The color screen looks surprisingly good in the video although, as [Marco] points out, with one channel, the colors aren’t super useful. The device also has cursors and a nice selection of measurements that work both live and on stored data.

At the end of the video, [Marco] shows a simple ECG amplifier he built from an open source schematic. We’ve covered simple ECG circuits before if you want to read more.

Last year we looked at two small inexpensive scopes. Like everything else, each year the bar gets higher. Although, in fairness, those scopes had a (reported) 25 MHz bandwidth. We’d love to see that kind of front end with the user interface of the DSO112A.

Continue reading “Touchscreen Oscilloscope”