Control The Air Conditioning With Slack

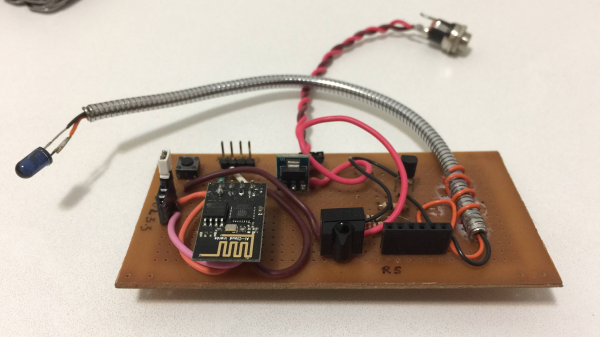
[Raphael Baron] needed a better way to control his office’s air conditioning units. Sure, they have remotes, but that’s too easy. [Raphael] came up with a solution that uses an ESP8266, a computer, IR LEDs, and a bot that runs on Slack.

[Raphael] built a prototype of the ESP8266 hardware on protoboard and used it to read and record the IR signals from the remote. Once he’d figured out the issues he was having with the IR library he was using, he could use it to send the IR commands to the AC unit. Since their office has two AC units, [Raphael] built a second prototype which had two IR LEDs but didn’t have the IR receiver. Using this he could turn both AC units on and off and set their temperatures.

For the server, [Raphael] turned to Clojure, a dialect of Lisp, which provides easy access to the Java Framework, mainly to get practice working with the language. The server’s main responsibility is to use Slack’s real-time API to listen for messages from a Slack bot and forward them to the ESP. In this way, a user talking to the Slack bot can send it messages which the server forwards to the microcontroller which, in turn, parses the messages and send IR commands to the AC units.

[Raphael] admits that this isn’t the most advanced, professional stuff, but it doesn’t matter. The schematics for the ESP8266 board and the code for both the ESP board and the server are available on GitHub. There seems to be a lot of hacks using Slack, such as this NERF Turret controlled by a Slack bot.  Or this jukebox that users can interact with by talking to a Slack bot.

DIY Electric Beach Luge Is A Thrill

[John Dingley] describes his Electric Beach Luge Project as an exciting mashup between “a downhill luge board, a kite surf buggy, a go-kart, and a Star Wars Land Speeder” and it’s fresh from a successful test run. What’s not to like? The DIY experimental vehicle was made to run on long, flat, firm stretches of sand while keeping the rider as close to the ground as possible. The Beach Luge is mainly intended to be ridden while lying on one’s back, luge-style, but it’s also possible to lay prone in the “Superman” position.

The whole unit was built from the ground up, but [John] points out that the design isn’t particularly complicated. There is no fancy self-balancing or suspension involved and steering is simple. A tube bender and a welder took care of making the frame. The rest is mainly used go-kart parts obtained cheaply from eBay, driven by a 500W 24V electric motor from an old Golf Kart. Like a luge sled, the goal is for the vehicle itself to interfere as little as possible between the user and the earth to make the experience as visceral as it can be.

You can see it in action in the two videos embedded below, but even more videos and some great pictures are available on the project’s page. [John] says it’s great fun to ride, but feels it could use twice as much power!

Continue reading “DIY Electric Beach Luge Is A Thrill”

So, You’ve Never Made A Spaceframe Before

It is sometimes a surprise in our community of tinkerers, builders, hackers, and makers, to find that there are other communities doing very similar things to us within their own confines, but in isolation to ours. A good example are the modified vehicle crowd. In their world there are some epic build stories and the skills and tools they take for granted would not in any way be unfamiliar to most Hackaday readers.

As part of a discussion about electric vehicles near where this is being written, someone tossed an interesting link from that quarter into the mix; a two-part treatise on building ultra-light-weight tubular frame vehicles. Or space frames, as you might know them.

You might think that making a tubular framed for a vehicle would be a straightforward enough process, but as the article explains, it contains within it a huge well of geometry and metallurgy to avoid a creation that is neither too heavy nor contains excessive weakness. Part one deals mainly with prototyping a frame, the selection of materials and joining tubes, while part two goes into more detail on fabrication. The author likes brazing which may offend the sensibilities of welding enthusiasts, but you can substitute your jointing tech of choice.

A particularly neat suggestion, one of those simple ideas that make you wish you’d thought of it yourself, is to prototype a frame in miniature with copper wire and solder to evaluate the effect of different forces upon it before you commit your final design to steel.

The articles are a few years old, but no less pertinent in the information they contain. Meanwhile if you are a spaceframe veteran, then you may have your own suggestions for the comments below. And if you’d like some tips on how not to build a spaceframe, have a look at this motorcycle.

Thank you [JHR] and [Jarkman] for the tips.

Mini Delta Gets A Hot End Upgrade

3D printers are now cheaper than ever and Monoprice is at the absolute forefront of that trend. However, some of their printers struggle with flexible filaments, which is no fun if you’ve discovered you have a taste for the material properties of Ninjaflex and its ilk. Fear not, however — the community once again has a solution, in the form of a hot end adapter for the Monoprice Mini Delta.

The Mini Delta is a fantastic low-cost entry into 3D printing but its hot end has a break in the Bowden between the extruder and nozzle. This can lead to flexible filaments not being properly guided through the hot end and a general failure to print. This adapter allows the fitting of the popular E3D V6 hot end, and is similar to modifications out there for other Monoprice printers.

Overall, 3D printing has long benefited from the efforts of the community to bring both incremental improvements and major leaps forward to the technology. We look forward to seeing more hacks on the Monoprice range!

Hackaday Prize Entry: E.R.N.I.E. Teaches Robotics And Programming

[Sebastian Goscik]’s entry in the 2017 Hackaday Prize is a line following robot. Well, not really; the end result is a line following robot, but the actual project is about a simple, cheap robot chassis to be used in schools, clubs, and other educational, STEAM education events. Along with the chassis design comes a lesson plan allowing teachers to have a head start when presenting the kit to their students.

The lesson plan is for a line-following robot, but in design is a second lesson – traffic lights which connect to a main base through a bus and work in sync. The idea of these lessons is to be fairly simple and straightforward for both the teachers and the students in order to get them more interested in STEM subjects.

What [Sebastian] noticed about other robot kits was that they were expensive or complicated or lacked tutorials. Some either came pre-assembled or took a long time to assemble. [Sebastian] simplified things – The only things required after the initial assembly of the chassis are: Zip-ties, electrical tape and a few screws. The PCB can’t be disassembled, but the assembled PCB can be reused.

The hardware [Sebastian] came up with consists of some 3mm material that can be laser cut (acrylic or wood) and a sensor board that has 5 IR LEDs and corresponding IR sensors. The chassis can be put together using nothing more than a Phillips screwdriver, and the sensor PCBs are well documented so that soldering them is as easy as possible. An Arduino is used as the brains of the unit.

[Sebastian] has come up with a great project and the idea of a platform like this with a couple of lesson plans included is a great one. He’s released the hardware under an Open Hardware license as well so others can share and add-on. Of course, there are other line following robots, like this miniature one created with analog circuitry, and there are other open source robots for teaching, like this one. But [Sebastian]’s focus on the lesson plans is a really unique way of approaching the problem – one that will hopefully be very successful.

Continue reading “Hackaday Prize Entry: E.R.N.I.E. Teaches Robotics And Programming”

Modular Storage With Peanut Butter And Lasers

I have storage on the mind, and it comes from two facts in my life:

First, I have tons of stuff in my workshop, far too much for the amount of space I have. A lot of this material is much easier to use if it’s well-organized. Think electronics, robotics, building sets. Modular parts that need to go together a certain way for them to be useful. It is imperative, therefore, that I come up with some sort of organization system to keep the chaos in check.

Second, my favorite tool is the laser cutter, born from my love for building vector designs. I can do art on the computer and have it manufactured in front of my eyes, and share my designs with someone else who can remix it into something even cooler.

So with those two facts in mind, I set about creating a modular storage system in Inkscape and cutting out the design from pine boards using a laser cutter. Let us go on a journey through my thought process:

Continue reading “Modular Storage With Peanut Butter And Lasers”

Friday Hack Chat: JavaScript On Microcontrollers

Microcontrollers today are much more powerful and much more capable than the 8051s from back in the day. Now, they have awesome peripherals and USB device interfaces. It’s about time a slightly more modern language was used to program these little chips.

During this Friday’s Hack Chat, we’re going to be talking about JavaScript on microcontrollers. [Gordon Williams] will be joining us to talk about Espruino. This is a tiny JavaScript interpreter that runs on the little embedded chips, has a debug interface, and allows you to program your board on any platform without any external programming hardware.

[Gordon] is the key developer of Espruino, and so far he’s launched a full-sized Espruino, and a pico Espruino on Kickstarter, both with amazing success. The software stack has been extremely popular as well — it’s been ported to the ESP8266 and dozens of other microcontrollers that will soon be in the Internet of Things.

During the Hack Chat, we’ll be discussing interpreted languages on microcontrollers, interpreter design and optimization, with a special emphasis on creating devices with Espruino and putting Espruino boards on the Internet with WiFi, Bluetooth, and other crazy radios. As always, we have a spreadsheet open to everyone if you’d like to ask a question.

Here’s How To Take Part:

join-hack-chatOur Hack Chats are live community events on the Hackaday.io Hack Chat group messaging. Hack Chats are mostly, usually, and this week noon, Pacific time on Friday. Here’s a time and date converter!

Log into Hackaday.io, visit that page, and look for the ‘Join this Project’ Button. Once you’re part of the project, the button will change to ‘Team Messaging’, which takes you directly to the Hack Chat.

You don’t have to wait until Friday; join whenever you want and you can see what the community is talking about.