Practical Wireless “Tele-Tennis” Build After Only 34 Years

Home-etched PCBs ready for drilling

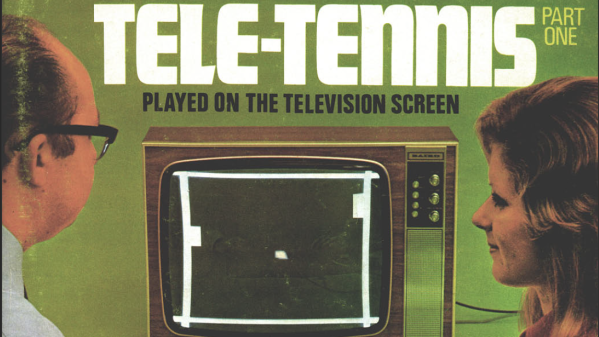
Back in November 1974 the publication “Practical Wireless” produced a five-part article series showing the reader how to construct a version of the popular “pong” game that could be played on the television screen available in the typical British home. [Grant Searle] had wanted to build this project for years, but it took him until 2008 to find the opportunity to do so. The magazine article printed PCB layouts to 1:1 scale, with a bill of materials and assembly instructions. After each month, the reader would have an assembled the project a little more, with the final month dedicated to point-to-point wiring and final setup. Subsequent months contained some enhancements such as a scoring system and sound effects, but these are not yet part of the main build. In order to understand the build, you will need to download the PDF copy of the magazines prints. (And if you’re an electronics nerd like this scribe, you’ve already done that right?)

A tidy assembly job with an authentic retro style

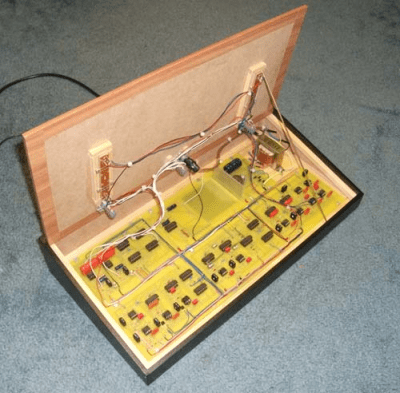
The electronics are based upon pure discrete 7400-series logic, 741 opamp-based ramp generators and, you guessed it, 555 timers. The way the various boards have discrete functions is particularly interesting. For example, in part 3, the PCB described (board A) not only is the master field/line sync generator, but also generates the video signals for the ball, with its position and size determined in an analogue fashion. Signals coming into the board from Board C (top/bottom base) cause a discrete flip-flop to toggle, changing the ball’s direction as it ‘bounces’ off the edge of the screen. Each board generates its own video signal, which are then all combined in the final video mixer (board E) that simply wire-OR’s them all with the composite sync to generate the composite video needed. This would have been tapped off and fed to a UHF video modulator, but [Grant] chose not to install that for the build. The whole thing was wrapped up inside an MDF case, coated in that dubious fake-wood plastic wrap, for that very 70’s aesthetic some of us remember fondly.

Pong is such a popular classic game, that we’ve covered many, many variants over the years. Here’s one that’s purely mechanical, another that uses the original PCB with a visually appealing twist, and finally, a completely virtual simulation of the original arcade circuit, courtesy of Falstad. We’re sure there will be many more to come.

Thanks [JohnU] for the tip!

A small round NRF51822 board glued to the underside of a mailbox lid, with a small vibration sensor attached

Check Your Mailbox Using The AirTag Infrastructure

When a company creates an infrastructure of devices, we sometimes subvert this infrastructure and use it to solve tricky problems. For example, here’s a question that many a hacker has pondered – how do you detect when someone puts mail into your mailbox? Depending on the availability of power and wireless/wired connectivity options, this problem can range from “very easy” to “impractical to solve”. [dakhnod] just made this problem trivial for the vast majority of hackers, with the FakeTag project – piggybacking off the Apple’s AirTag infrastructure.

This project uses a cheap generic CR2032-powered NRF51822 board, sending the mailbox status over the FindMy system Apple has built for the AirTag devices. For the incoming mail detection, he uses a simple vibration sensor, glued to the flap lid – we imagine that, for flap-less mailboxes, an optical sensor or a different kind of mechanical sensor could be used instead. Every time someone with a FindMy-friendly iPhone passes by [dakhnod]’s mailbox, he gets an update on its status, with a counter of times the sensor has been triggered. [dakhnod] estimates that the device could run for up to a year on a single battery.

Continue reading “Check Your Mailbox Using The AirTag Infrastructure”

A frosted glass disk with geometrical markers

Using A Laser Cutter To Replicate An Optical Comparator Screen

Precision instruments often contain specialized components that are essential to their function, but nearly impossible to replace if they fail. [Andre] had just such a problem with an optical comparator, which is an instrument typically used in machine shops to help check the tolerances of a finished part. It does this by projecting a magnified picture of an object onto a glass screen with markings showing angles and distances.

In the old comparator [Andre] bought on eBay, the markings on the glass had faded to such a degree that the instrument was almost unusable. So he contacted [James] over at Clough42, who was able to create a near-perfect replacement screen by using a laser cutter, as shown in the video embedded below.

The first step was to replicate the screen’s markings in a CAD program. [James] explains the process in Fusion 360, demonstrating how you can generate all the different scales nearly automatically through the proper use of constraints, variables and patterns. He then transferred the drawing to Lightburn, which drives the laser cutter and etches the markings into a sheet of glass covered with CerMark, a marking solution that turns a deep black when heated by a laser.

After etching, the final step was to apply frosting to the glass to turn it into a projection screen. While there are several ways to achieve this, [James] went for a simple spray-based method that gave surprisingly good results. It took a few experiments to find out that etching the markings on the back of the glass and applying the frosting on that side as well gave the best combination of sharpness and durability.

[James]’s project shows that even delicate instruments with custom glass components can be repaired, if you just have the right tools. A similar strategy might also work for creating custom scales for analog meters, or even old radio dials. If you’re not familiar with laser cutters, have a look at our experiments with an Ortur model. Thanks for the tip, [poiuyt]!

Continue reading “Using A Laser Cutter To Replicate An Optical Comparator Screen”

Laser-Engraving Hairlines: When A Line Isn’t A Line

When is a line not a line? When it’s a series of tiny dots, of course!

The line is actually tiny, laser-etched craters, 0.25 mm center-to-center.

That’s the technique [Ed Nisley] used to create a super-fine, colored hairline in a piece of clear plastic — all part of his project to re-create a classic Tektronix analog calculator from the 1960s, but more on that in a moment.

[Ed] tried a variety of methods and techniques, including laser engraving a solid line, and milling a line with an extremely tiny v-tool. Results were serviceable, but what really did the trick was a series of tiny laser-etched craters filled in with a red marker. That resulted in what appears — to the naked eye — as an extremely fine hairline. But when magnified, as shown here, one can see it is really a series of small craters. The color comes from coloring in the line with a red marker, then wiping the excess off with some alcohol. The remaining pigment sitting in the craters gives just the right amount of color.

This is all part of [Ed]’s efforts to re-create the Tektronix Circuit Computer, a circular slide rule capable of calculating all kinds of useful electrical engineering-related things. And if you find yourself looking to design and build your own circular slide rule from scratch? We have you covered.

Autonomous Inflatable Canoe

With the summer months nearly upon us, many are dreaming of warm afternoons spent floating on a quiet lake. Unless you’re [Kolins] anyway. Apparently his idea of a good time is controlling a full-sized inflatable canoe not from onboard with a pair of oars, but from the shore with a RC transmitter.

The linkage design allows the motor to be adjusted vertically.

Of course, as the video after the break shows, just because the canoe is powered by a remotely operated electric trolling motor doesn’t mean it can’t still carry human occupants. In fact, with the addition of a Matek F405-Wing flight controller running the rover variant of ArduPilot, the boat can even take you on a little tour of the lake while you kick back and relax.

We like that this project took the path of least resistance wherever possible. Rather than trying to spin up his own custom propulsion unit, and inevitably dealing with the challenge of waterproofing it, [Kolins] built his system around a commercial trolling motor. A clever servo mechanism physically turns the motor in much the same way a human operator would, while the speed is controlled with a suitably beefy ESC from Traxxas placed between the motor and its lead-acid battery.

It doesn’t look like there’s been any permanent mechanical or electrical changes made to the motor, which makes the whole thing a lot easier to replicate. We’ve talked in the past about the relative rarity of low-cost robotic watercraft, so a “bolt-on” propulsion module like this that can turn a cheap inflatable boat into an autonomous platform for research and experimentation is very interesting.

Continue reading “Autonomous Inflatable Canoe”

Hackaday Links Column Banner

Hackaday Links: May 29, 2022

It looks like the ongoing semiconductor shortage isn’t getting any better, and if the recent spate of computer thefts from semi trucks is any indication, it’s only going to get worse. Thieves seem to be targeting the Freightliner Cascadia, probably the most popular heavy freight truck on the road in North America today, with “smash and grab” thefts targeting the CPC4, or Common Powertrain Control module. These modules are sitting ducks — they’re easy to locate and remove, the chip shortage has made legit modules nearly unobtanium from dealers, and the truck won’t run without them. That’s driven the black market price for a CPC up to $8,000 or more, making them a tempting target. And it’s not only individual trucks parked in truck stop lots that are being hit; gangs are breaking into trucking company lots and bricking dozens of trucks in short order. So the supply chain problem which started the semiconductor shortage caused the module shortage, which drives the thieves to steal modules and take trucks off the road, which only worsens the supply chain shortage that started the whole thing. Nice positive feedback loop.

Continue reading “Hackaday Links: May 29, 2022”

Adjustable Workholding For Honeycomb Tables, With A Bit Of DIY

Honeycomb tables are often found on laser cutters, where they provide a way for work material to be laid flat while not interfering with things like airflow. This leads to a cleaner laser cut and a nicer finish, but if one’s work depends on precise positioning and placement, they leave something to be desired because there’s no good way to attach rails, jigs, or anything of the sort in an easy and stable fashion.

The solution [Ed] found for this was to make himself some adjustable offset stops designed to fit into his laser cutter’s honeycomb table. Each consists of a laser-cut disc of wood, which is screwed off-center into an acetal “plug” sized to fit into the vertical gaps in the honeycomb table. This allows each disc to be rotated to fine-tune positioning. With the help of some T-shaped pegs that are also sized to fit into the honeycomb table, [Ed] has all he needs to fix something like a workpiece or jig into a particular and repeatable position.

The whole thing depends on a friction fit, so the sizing of the plug needs to match a particular honeycomb table’s construction. We think this makes it a good match for 3D printing, as one can measure and print plugs (perhaps employing the Goldilocks approach) that fit with just the right amount of snug.

Honeycomb tables are fantastic for laser cutting, but if you find yourself in a pinch for a replacement, an old radiator can make a pretty decent stand-in.